A full Android FOSS raw imageing pipeline (tutorial)

As an Android user, amateur photographer, and FOSS advocate, I’ve long wished for a fully FOSS imaging pipeline on Android. I often use my Android phone for photography. It’s always on me and the camera hardware in them keeps getting better and better. There’s been some great FOSS Android software improvements recently too. I’ve finally figured out a fully FOSS pipeline that can go from raw image capture right through to a final, processed image. This post is meant to share the pipeline I’ve discovered, and I hope it will be a guide for others who want to implement a similar imaging pipeline.

Capturing raw images on Android

This part is easy thanks to the really great Open Camera app. This is a truly great camera app, with many excellent capabilities. Most importantly to me, it is FOSS, offers manual exposure controls, and allows raw image capture in .dng format. To enable raw image capture, you must have a phone that implements the “Camera2 API”. Here is a list of some phones that support this API. My phone is the Nexus 5x, and Open Camera raw capture works very well with it. To enable raw capture with Open Camera, open the settings (cogwheel icon), scroll down, and check “Use Camera2 API”. Then, click the “Photo Settings” option, tap “RAW”, and select “JPEG and DNG (RAW)”. Now, you will save a jpeg and a .dng raw file of every image you shoot with the Open Camera app.

Developing raw images on Android

This has been the more difficult part of the problem to overcome. But I’ve recently solved this gap in large part thanks to the very cool FOSS app called Termux. Termux is a really brilliant solution to install a minimal Debian-based CLI Linux distro on Android without the need for root. Termux is really awesome, and includes many smart ways to interact with the terminal using your phone’s hardware keys and onscreen keyboard. Read the help here to learn some of these shortcuts. They will be useful.
Now, what’s really cool and useful for us is that you can install several of your favorite command line image processing tools, which the Temux project has precompiled for ARM processors and hosted for you in its apt repository. For us, the two important tools are dcraw and imagemagick. First things first, however. Install the Termux app on your phone, open a session, and type apt update && apt upgrade. Then, install our two needed programs apt install dcraw imagemagick. You now need to give Termux acess to your file storage by running the included script termux-setup-storage. A little pop-up will appear asking if you want to give Termux permission to access your file storage. Accept this. Now, you can get to it with basic cd commands. The main directory for Temux is storage, and from there you can get to storage\dcim\OpenCamera, where Open Camera will store all of the .dng raw files that you capture.
The raw development approach that I came up with relies on using your favorite hald CLUTs to alter the colors of your raw images to a final jpeg right from the command line. I use @patdavid’s awesome film emulation hald CLUTs. I extracted just a few of my favorites to save space on my device. Using the great FOSS Amaze File Manager, I created a new directory inside the OpenCamera folder, which I named “haldCLUT.” I extracted some of my favorite of Pat’s hald CLUT’s there, and I gave them new shorter names to make my CLI life a little easier.
OK, we now have our raw .dng’s, our Termux Linux terminal set up, and our hald CLUTs in place. Here’s the really fun part. You can go from raw to processed .dng in one easy command. Use cd storage/dcim/OpenCamera to get to the base Open Camera directory, and then you can run:
dcraw -c my_raw_imag.dng | convert - haldCLUT/Kodachrome64.png -hald-clut output.jpg
Obviously, replace my made up file names with the real ones of your own files. What this does is to use dcraw to read in your .dng and do basic raw conversion which it sends to standard output (that’s the -c option). You pipe that over to imagemagick’s convert, which will read in the standard input (that’s the first - in that part). The second file name is the name of the hald CLUT you want to use to adjust the colors in your raw file. convert will know this because of the -hald-clut option you put in right after that. The last file name is the name you want for your output image.
To make your life easier, you can put this into a simple shell script, which you can save right in the OpenCamera directory. Here’s what mine looks like:

#!/bin/sh
dcraw -c $1 | convert - $2 -hald-clut $3
exit 0

I called mine “filmsim.sh”. Before you can run it, you have to have Termux adjust the shebang, so you should run termux-fix-shebang filmsim.sh. This is necessary, so don’t skip it. Now, you can run the script giving the .dng, the hald CLUT and the output file as inline arguments:

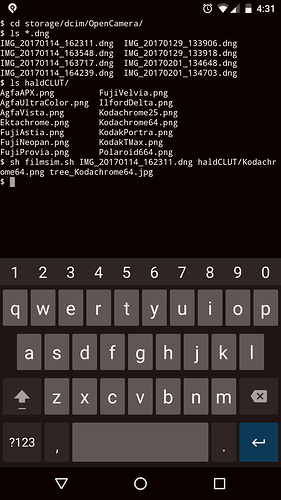
sh filmsim.sh my_raw_image.dng haldCLUT/Kodachrom64.png output.jpeg

It takes a minute, and then your final processed jpeg appears in the OpenCamera folder. Yippee!!

Here’s a screenshot of me doing these commands:

Here’s my processed image:

Here’s the raw file used for the above: IMG_20170114_162311.dng (23.6 MB)

I hope this is helpful, and any suggestions for improvements or tweaks will be very much appreciated!

[EDITS for spelling, adding raw file, and resizing the screenshot]
[EDITS 2. Fixed for grammar and clarity]
11 Likes

The link to the phones with the “Camera2 API” does not work.

1 Like

This is very cool, thank you for sharing!

1 Like

@Tobias Thanks for catching that! It was a typo in the URL. It’s fixed and working now.

Glad you found it useful. This is very basic post processing, but at least it is a start. One could use IM to tweak all sorts of other things too (contrast, levels, vignette, resize, etc.). I can envision a little library of scripts that one could choose to apply for various effects. Still no ability for interactive or “brush” type editing, but at least a full pipeline from capture to final product!

Thanks for the write-up! I’m posting it on the various social platforms now… :slight_smile:

1 Like

@patdavid Thanks! I’m pretty excited to have found out how to do this… It is in very large part thanks to your wonderful hald CLUTs that it is possible!

2 Likes

Thank you for sharing this! Do you mind uploading same image SOOC or RawTherapee Default profile output to compare the results ?

I wonder if termux:widget could help tie this together into a GUI-ish app: GitHub - termux/termux-widget: Termux add-on app which adds shortcuts to commands on the home screen.

Sure! Here’s the image SOOC with no profile applied:

I looked into the widget, but not in too much depth. Seemed like you’d still have to enter the file names, so I wasn’t too sure that it could be of much use. But maybe I’m mistaken. I should download it and check out what it can do…

Just want to add here that the Termux widget WAS a great idea. I’ve made scripts dedicated to each of the main hald-CLUTs I like. I can just select them from the list of scripts in the widget, the terminal pops up and prompts me to select the file name, and then it processes the image, makes the output file (with a standard output name), and closes. Fast 'n easy!

1 Like

Here’s a screenshot of what the widget looks like on my home screen:

Here’s an example of one of the scripts (for Agfa Vista).

#!/data/data/com.termux/files/usr/bin/sh
cd storage/dcim/OpenCamera
ls *.dng
echo "Choose the input raw image file"
read rawf
dcraw -c $rawf | convert - haldCLUT/AgfaVista.png -hald-clut ${rawf%.*}_Vista.jpg
exit 0

You have to copy that script into $HOME/.shortcuts, and then it shows up in the widget (as in the screenshot above).

Here’s a screenshot of the script running:

Saves the output image with a descriptive name. Easy peasy!

Here’s the link for the Termux widget, if you are curious: https://termux.com/add-on-widget.html

1 Like

Could you possible use this: https://github.com/termux/termux-packages/blob/master/packages/termux-api/termux-storage-get

To use the android GUI to select the file?

1 Like

That’s bloody brilliant! Took a while to figure how termux-storage-get works, but once I did, it works like a charm. The secret is that you have to pre-make an empty temp file first, because all termux-storage-get does is opens a file picker, and then copies the file you choose to the output file specified on the command line, but the output file has to exist already. I just made a blank “temp.dng” with the new file function in Amaze file browser. Then, I modified the script like this:

#!/data/data/com.termux/files/usr/bin/sh
cd storage/dcim/OpenCamera
ls *.dng
rawf="temp.dng"
termux-storage-get $rawf
dcraw -c $rawf | convert - haldCLUT/AgfaVista.png -hald-clut ${rawf%.*}_Vista.jpg
exit 0

Now, you choose the script from the widget, a file picker dialog pops up, you select your input file, and then it processes it and saves it to an output jpg. Now it’s REALLY easy peasy! Almost like a “real” app, lol!

Oh, and you have to install the Termux API app from the play store or f droid, AND install the termux-api package with apt from within Termux. A little unintuitive, but once you do both, it works.

Sorry I keep thinking of these things one by one! :joy:

1 Like

Lol! Actually, termux-storage-get seems only recently added to the Termux API. It’s in the package, but not in the documentation.

I had the idea to have a file picker for both the raw file and the hald-clut, and then a text dialog to enter a name for the output, but I can’t get it to work. It seems that each action launched by the termux-api runs as a separate background process, but not like a typical shell background process. The wait command doesn’t work with them, so they all run at once, not sequentially. :frowning:

OK, latest stage of the script. Due to the way termux-api works, Termux has no idea about any Android processes that are launched, so it doesn’t know to wait until they are done before going to the next line in the script. Traditional wait command won’t work because of this - it’s not a shell background process. The best solution I found was to poll for change to the MD5SUM of the two temporary files we set up in advance for the raw file and the hald-CLUT.

So, set these two files up using Amaze as I mentioned above. Then, install the core utilities in Termux so we have the stat command. Do it this way: apt install coreutils.

Then, make the “filmsim.sh” script and copy it to the .shortcuts directory. Here’s the script:

#!/data/data/com.termux/files/usr/bin/sh
cd storage/dcim/Camera
rawf="temp.dng"
hc="haldCLUT.png"
rawfMDSUM=`stat -c %Y $rawf`
termux-storage-get $rawf
while [ `stat -c %Y $rawf` -eq $rawfMDSUM ]; do
sleep 2
done
hcMDSUM=`stat -c %Y $hc`
termux-storage-get $hc
while [ `stat -c %Y $hc` -eq $hcMDSUM ]; do
sleep 2
done
out=`termux-dialog -t "Output file" -i "Enter a name for output image file with file extension."`
dcraw -c $rawf | convert - $hc -hald-clut $out
exit 0

Now, when you run filmsim.sh from the Termux widget, first you pick the raw file in the first file picker, then you pick the hald-CLUT in the second file picker, and then you enter the name of the output jpg in the pop-up text dialog. After a while the code runs and the image is made! Pretty much a whole GUI pipeline to process all your raws with any hald-CLUT you like… Fun!

1 Like

Here’s a final (probably) version of the script with some niceties added and a little added functionality. I found out that you with termux-storage-get, you can access the SD card or external OTG storage. For me, this means I could process .orf raw files from my em10ii directly from an OTG card reader plugged into the phone. I realized that I could unlock this potential with a couple of code tweaks, and it could become a pretty powerful mobile photo studio to go from camera raw to processed JPEG, and then upload to social media with your phone…
So I updated to be able to add any raw file extension. I also added code to make and clean up the necessary temp files for the copied raw and hald-CLUT files. And some useful text is written to the terminal as you proceed through the steps. I will write up a brief tutorial and some install instructions, and then make a pull request to add it to the scripts git repository. I’ll include a sample raw and hald-CLUT or two…

#!/data/data/com.termux/files/usr/bin/sh
cd storage/dcim/Camera
rawext=`termux-dialog -t "Raw file type" -i "dng"`
rawf="temp."$rawext
hc="haldCLUT.png"
echo > $rawf
echo > $hc
rawfMDSUM=`stat -c %Y $rawf`
echo "Choose the raw file you want to process."
termux-storage-get $rawf
while [ `stat -c %Y $rawf` -eq $rawfMDSUM ]; do
sleep 2
done
echo "Choose the hald-CLUT you want to use."
hcMDSUM=`stat -c %Y $hc`
termux-storage-get $hc
while [ `stat -c %Y $hc` -eq $hcMDSUM ]; do
sleep 2
done
out=`termux-dialog -t "Output image file" -i "example.jpg"`
echo "Processing. Please be patient...."
dcraw -c $rawf | convert - $hc -hald-clut $out
rm $rawf $hc
exit 0

Awesome. If you want to make a hald-clut folder in your PR, I was thinking of adding one anyway.

1 Like