My impression ist that Filmic RGB tends to compress shadows quite heavily as opposed to the lights. This can be amended by using shadow-highlights-balance. However, shadows still tend to be very dense. Ist this a characteristic behaviour of the Module? Should I manually adjust the black and white points by default?
Sincerely
Daniel
Hi @Daniel_Spenner could you provide some screenshots perhaps to show exactly what you mean?
1 Like
If crushed shadows then wrong black relative exposure setting, or wrong contrast setting, or possibly both.
Well, that’s what sliders are for, aren’t they ? Otherwise, filmic would be a simple check box.
4 Likes
This may be a silly question, but did you remember to raise the exposure first when working with Filmic RGB? Helps a lot with the shadows.
3 Likes
The defining characteristic of any curve named “filmic” is a toe on the bottom end that renders what Haarm-Pieter Duiker referred to as “soft compression of darks”:
http://duikerresearch.com/2015/09/filmic-tonemapping-ea-2006/
See Slide 34.
Make sure you’re looking at “real crushing” of blacks with the black point, and not the slope of the toe…
1 Like
If you aren’t happy after adjusting the black and white point, try going to the look tab and pulling the latitude slider all the way to the left and see what happens.
2 Likes
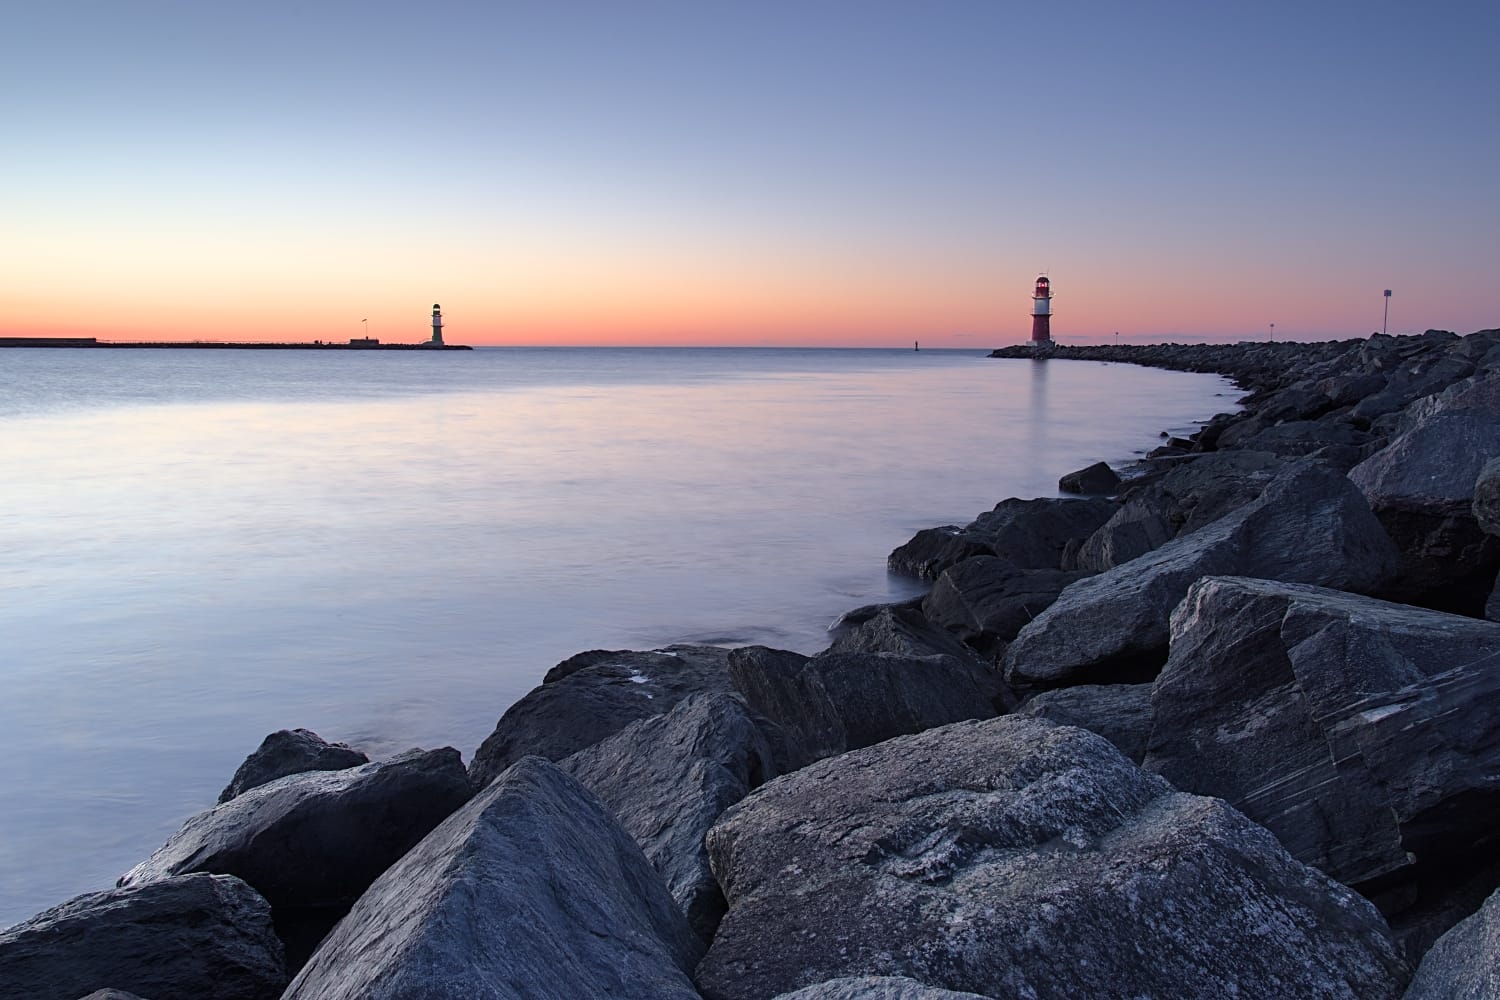
Yes, tonight I will put an image online, that illustrates the Problem I have.
Thanks!
I procede Like this: after adjusting exposure for my midtones, I switch to filmic and choose the white and black rel. exposure by the color picker Tool, looking for what I think should be the darkest, respectively brightest part of the image. Then I adjust for latitude and balance, depending on the need to do so. Latitude, if the image appears to be too desaturated, Balance to give the shadows a bit more space to breath, if necessary. I don’t usually touch contrast or midtones Satzration, since I am using TE and color Balance RGB for that.
Often I find too many elements to be too dark and the contrast to harsh. Then I return to exposure to brighten the image and then readjust filmic. This process rund through several iterations before the result is closer to my liking. I find the default behaviour to produce very contrasty and desaturated Images with a tendency to compress the darker areas to near black. I wonder, If it might be better to leave filmic on it’s basic settings, when auto applied by the scene referred workflow.
What do you suggest to smoothen my workflow?
Yes, that’s my usual workflow. I feel, that filmic produces a very contrasty image that looses too many midtones, If I just set black/white relative exposure. My images often become harsh and desaturated. Then I go through multiple iterations of exposure module and filmic before I feel the image looks natural again.
In my limited experience you need to push exposure way up until the contrast “toe” lands where you want it to be in the shadows. Ie only affecting the very darkest tones. You’re then in a somewhat better position and can instead tweak midtones and highlights. YMMV
Another way is to basically disable the curve part of filmic (make it linear) and use tone or RGB curves to add the S curve with more control.
So why not lower the contrast in filmic? As that’s where you notice that the contrast is too harsh… Personally, I find the default 1.1 often too much, and start from something like 0.950, increased if needed once exposure, and white and black reference are set. I find that if I have to readjust the exposure, that usually means I didn’t pick the proper midtone for my exposure setting (that tone should not change when adjusting filmic…)
Keep in mind that a high global contrast (in the midtones) forces more compression of shadows and highlights (you only have a limited amount of “tonal space”, if you use a lot for the midtones, there’s little left for shadows and highlights). If you find that you can’t get enough global contrast while preserving shadows, adding some local contrast often helps.
Of course you can use the tone equaliser to lower the global contrast, but that’s a lot more work than just lowering that global contrast in filmic. But sometimes TE is the only thing that works…
It sounds like you’re either putting the white point too low, the black point too high, or both. Try not to use the color pickers but to do it by sight (I’ve been there  ). The white and black point are exactly that, not the highest and lowest levels of the image. Unless the selected points are really 100% reflective white and 0% pitch black, you’ll be selecting the wrong levels. Most of the time the difference between them should end up around 12EV or more.
It’s important also to correctly define exposure, don’t be afraid to push it 2 stops if necessary to put the “middle grey” where you want it, because the idea is that filmic pivots around that, it doesn’t change it.
6 Likes
Great Help, thanks to all of you!
Bear in mind how other modules can further deepen shadows and exaggerate the effect. I try to take a light hand with Local Contrast for that very reason.
If too contrasty, then simply lower the contrast parameter of filmic’s look. Basic/default settings are only a starting point that I found ok-ish in a large majority of cases, there is no science in there.
1 Like
I am quite happy with the solutions you all came up with. This is my final workflow now:
I just untick the checkbox in exposure and then change the exposure to fit my main subject. In filmic I change the white and black exposure, if needed. Many times I decrease the contrast a fair amount to leave enough space for adding contrast locally later. I still often use latitude and balance to further refine the tonemapping. For general contrast changes I mostly use tone equalizer with the tonecurve preset applied. For local contrast changes I use the clarity preset in local contrast, adjusting the details-slider. For sharpening I have found the contrast equalizer to be very effective in adressing just the fine edges and not creating any weird artifacts. Also I have come to really like RGB colorbalance because it is such a multifunctional tool.
Now I am absolutely content with the results I am getting. Great help from all who have replied!
7 Likes
For local contrast/sharpening (as well as many other things) you can also use the diffuse or sharpen module. It’s a tricky one to get your head around, I’m still learning it myself, but the results are great. It is resource intensive, though, so if you have a slow computer, your workflow might work better for you.
2 Likes
Aurélien has produced a good video on how to use Filmic. If you have not yet watched it, then I suggest it is really helpful for yourself to watch it. I absolutely love filmic and what it does with my images. Like all good tools it takes time to master, but time well spent.
Tone equalizer is also meant to be used in conjunction with filmic to bring out the shadows better as well. I know that Aurélien has been critical of the shadow and highlights module, but I often am very pleased with the results I get using this module to improve the shadows. If I am correct, shadow and highlights module affects local contrast when it brightens the shadows and the tone equalizer module leaves the local contrast untouched. Sometimes I use both tone equalizer and the shadow and highlights modules to achieve the look that pleases me (Sorry Aurélien, I am sure that made you cringe).
2 Likes
In tone equalizer you can use the preset “simple tonecurve”, where you can adjust shadows and highlights in no time at all. Then you can avoid Wirkung in Lab colorspace
Another idea now 
I would start with some kind of fill light:
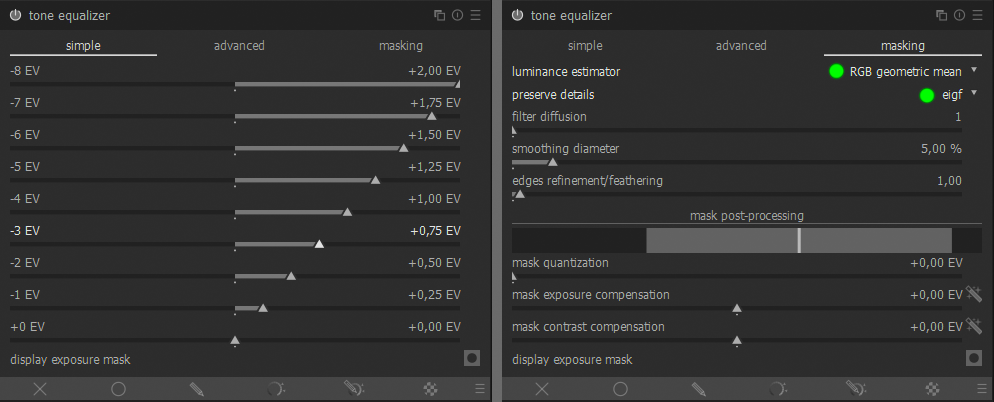
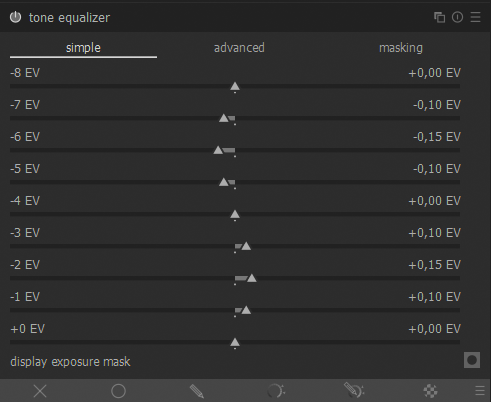
Then I’d give slight boost in overall exposure (adjusting the mask in Tone EQ may be needed), another instance of Tone EQ to bring back contrast in the midtones - important not to alter the first and last band, we don’t want to introduce clipping:
And then, Filmic RGB should do its magic 
1 Like