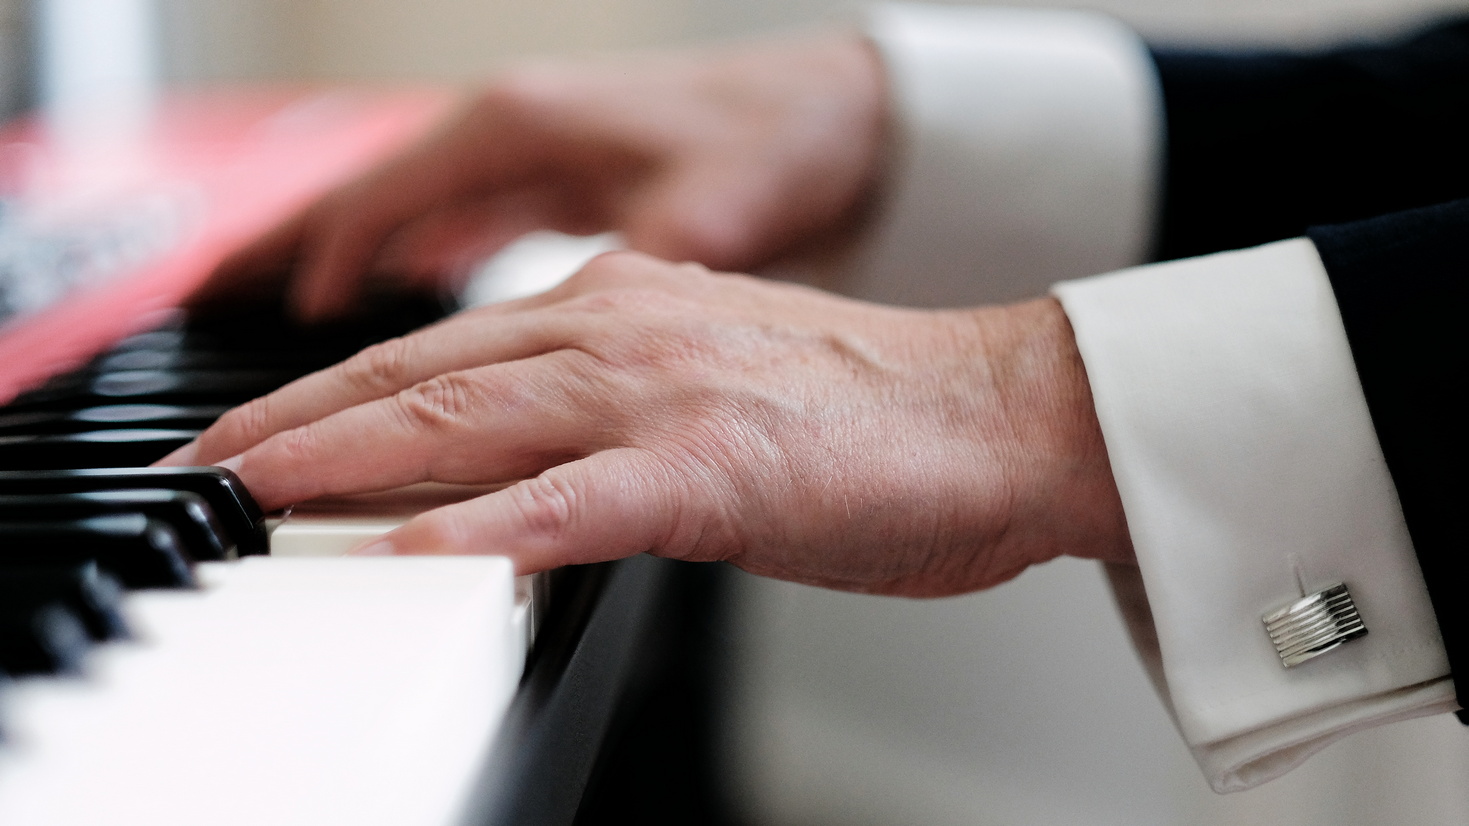
I was wondering about some pictures taken for an advertising with the x-t1 from Fuji and their wonderful fuji 56mm f/1.2. When i brought them to RT the results couldn’t convince myself. Even the jpc ooc was better. Something is wrong.
Could be the JPG is as good as you need it to be - I often find this. Only way to see if it could be “improved” by working on the RAF is to provide a link to the files and specify what you think an “improvement” would be and maybe see if someone else could “improve” the image.
Opinions vary but my view is it’s polite to link large files to a file repository like filebin.net.
Public forum so if image is commercially sensitive, you should protect your property in the best way you can.
Any critique will be very subjective. Would help to see the RAW file to see what can be done with it. Might also help to know what you plan to do with the image and how it may be viewed (size, print, web) - will there be text across the bottom etc?
As an image in itself I find the featureless white keys in the foreground distracting and the off-white cuff worrying. Also quite noisy, presumably from sharpening?
It will be printed as a invitation for wedding people to order me at the piano. My idea is only to show sharp the left hand. The right hand is unsharp. The picture will be cut down to 210 x 108 mm (like 16:9) for printing and is only the back-picture for small text.
But - as a classical trained organist - i want to show playing piano as elegant and romantic for wedding. The picture has to transport this within milliseconds.
Back to the technique: I drove the colour a little more to the warmth orange field away from the fuji green-style. I don’t want to desturb the bokey of the 56mm. But perhaps i can improve?
Thanks for any thought to this!!
Peter
Were you using any film simulations for the soc jpeg? Fuji’s emulations are awesome. I really like classic chrome. If yes, you can use a haldCLUT to simulate the film stocks in RT.
I’d say in this picture you have immediately set yourself distinct from us scruffy, t-shirt-wearing photographers…
If the image is to be used as a background, I think I’d 1) crop to remove the red thing at the bottom left, and 2) desaturate somewhat the red in the background. Don’t eliminate it, but remove it’s significance in the composition. Your hands on the keyboard, cuffed in formal attire, really send your essential message well.
Regarding the difference between OOC and RT+GIMP, I’ve come to take such as just different renditions. With sufficient knowledge regarding how the operators work in either venue, you can easily do whatever you need…
How did you work Fuji Classic Chrome on the RAF with RT?
Yes, i had the same idea to crop.
Glenn, there are also some T-shirt wearing Jazz-Sessions (still without pictures) - but many thanks to you for feeling this squizzling taste of wedding
Just thinking out loud here, and not sure how this photo will look as a background on a card vs. as a photo on a computer screen, but I find the blurred portion of the keyboard in the foreground:
is distractingly bright, and for me at least, overpowers the rest of the photo;
makes your shirt cuff look a little bit less white than it probably should in comparison.
The exposed side of the key revealed by the pressed key is much closer to the shirt color. I think the overall image might be better if the intensity of the foreground portion of the keyboard is lowered.
Honestly, I had a similar experience. I got an XT-10, and was happy shooting JPG. One day a friend said “you have to use RAW! Else you are missing out!” I started to shoow RAW and use Darktable for my photos, and it was … alright? If I ever went past ISO 1600 they grained up badly, and the colour always looked washed out, and dull. I spent ages to try and edit and improve my photos in Darktable. After some time I tried to do film-emulation extraction via a colour checker because the Fuji black and white was really really good compared to monochrome in Darktable. After spending a lot of time profiling I realised that my camera was always better to make JPG than Darktable - and took less time. Some really smart people have put thousands of hours into your camera body, to make it one of the best RAW to JPG processors in the world, and it’s there in your hands. So now I shoot only JPG. I spend almost no time editing, ever. And all my photos have beautiful colour, are wonderfully sharp and noise-free at every ISO, and my enjoyment of photography went back up. Because I was focusing now on taking photos, not “editing” them to fix them.
And it’s not really a popular opinion - people have insulted me for this, called me stupid, said I’m an amateur (I professionally shoot events), some send me passive aggressive videos about “beginner mistakes”.
What I’ll say is if you are in doubt, shoot RAW+JPG and compare for yourself. You may end up staying on JPG like I did. It just takes some time and method to ensure you always setup your camera correctly when you go out. But for me, going to JPG, made my photography better.
Interesting - I came to use RT because I was unhappy with my Fujifilm JPEGs. Some were “acceptable” but many were not so having that backup of RAW was - for me - essential. Using Sony cameras now as well and I stick to RAW + JPEG and would always advise others to shoot both, won’t really slow you down and storage is no longer expensive. Important difference between the two image file formats is editing RAW is not destructive, editing JPEG is. If on review a JPEG is good enough I would still advise to keep the RAW just in case you revisit and want to get more out of the image.
Your advice is sensible about setting up your camera, you should also set up your shots. RAW edits or tweaks are not for everyone but can be satisfying and rewarding. If you are happy with out of camera JPEG no-one should criticise you.
I have a Fuji and i always shot raw + jpeg, that is for sure a good solution, it only wastes a bit of space.
Given this, i convert the pictures i want to print and the ones i think are worth doing so from raw to jpeg, with raw therapee. I use it with xtrans file from 2015 or so, and i have created a profile i consider quite good for xtrans files, especially at base iso, since i most shot landscapes.
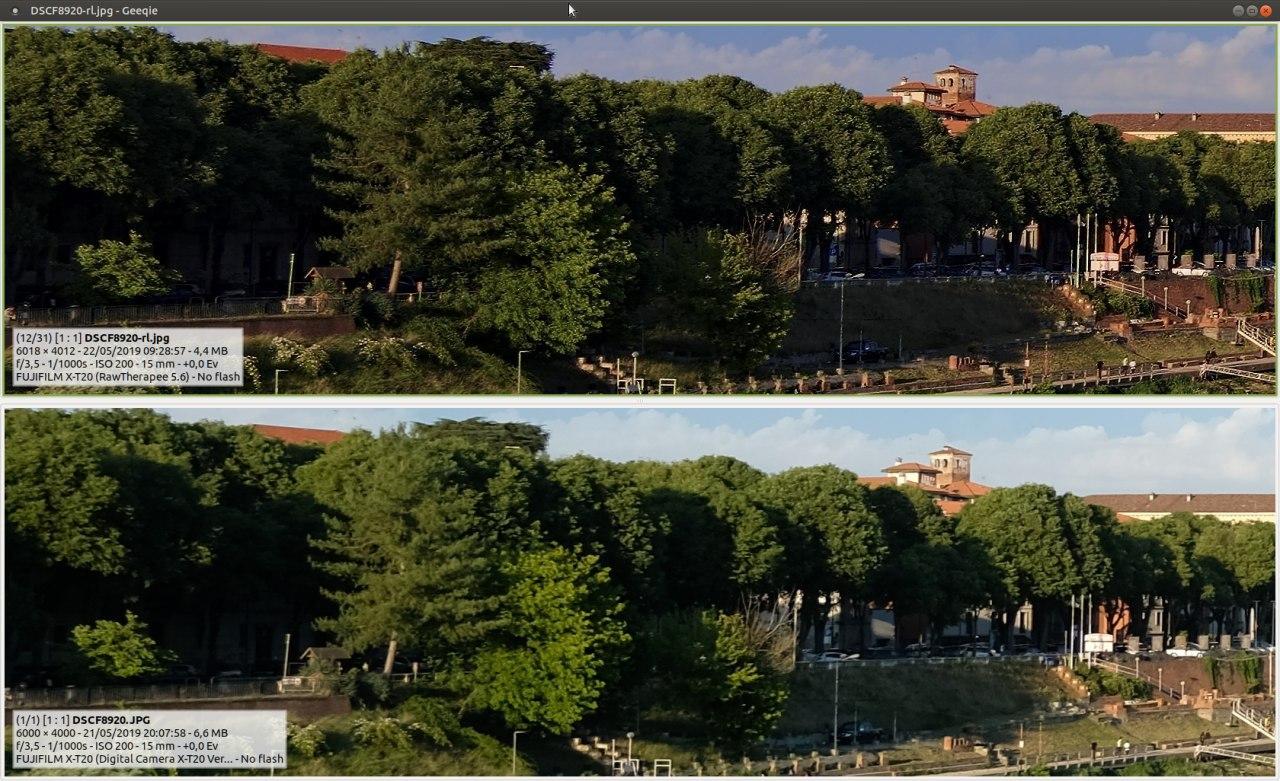
Given this, i attach the image, on the top the raw developed with raw therapee, on the bottom the jpeg. Unfortunatly the profile i have created for fuji 15 45 isn’t yet into lensfun, but you can find it into pull request. Incredible optic at 15 even full wide, save for distortion.
A thing that would be great to have would be better chromatic aberration correction, the one that comes with lensfun is “much better than nothing” but also isn’t by far as effective as autocorrection with bayer files.
I don’t know darktable enought to advice something in order to create better exports, save for markenstein 3 pass algo instead of the maybe still default fast algo.