Releases like this are too rare to disregard and thus all the more to treasure. In one swift motion the team is doing away with floating selections and bringing strokes/outlines for text. But this has been a bumpy road.
Floating selection buried
Doing away with floating selections has been on the team’s roadmap at least for as long as that roadmap exists. Some of the bug reports on FS behavior date back as far as 2008. It was a quirky concept, hard to grasp for newcomers and somewhat annoying even for experienced users.
It was possible to remap the Ctrl+V shortcut to pasting as a new layer, but then you’d have to wave goodbye to pasting Bezier paths etc. Not a real solution.
Now, if you’ve been watching GIMP development closely, you probably noticed this nickname, Cmyk.Student, popping up every now and then lately. This Google Summer of Code student working with the GIMP team is in charge of cleaning up this mess.
So this is the new behavior: Ctrl+V always pastes an image as a new layer now.
And since we are talking about @GIMP_Official, bitmaps are no longer pasted as godawful floating selections, they are just new layers now. See nothing fancy is happening in this video? That's the point! :) pic.twitter.com/4gC856Z8JP
— Libre Arts (@lgworld) November 9, 2022
There are just three instancing where you will ever see anything floating:
- When you paste into a layer mask, GIMP will create a floating mask. Here is what it looks like:
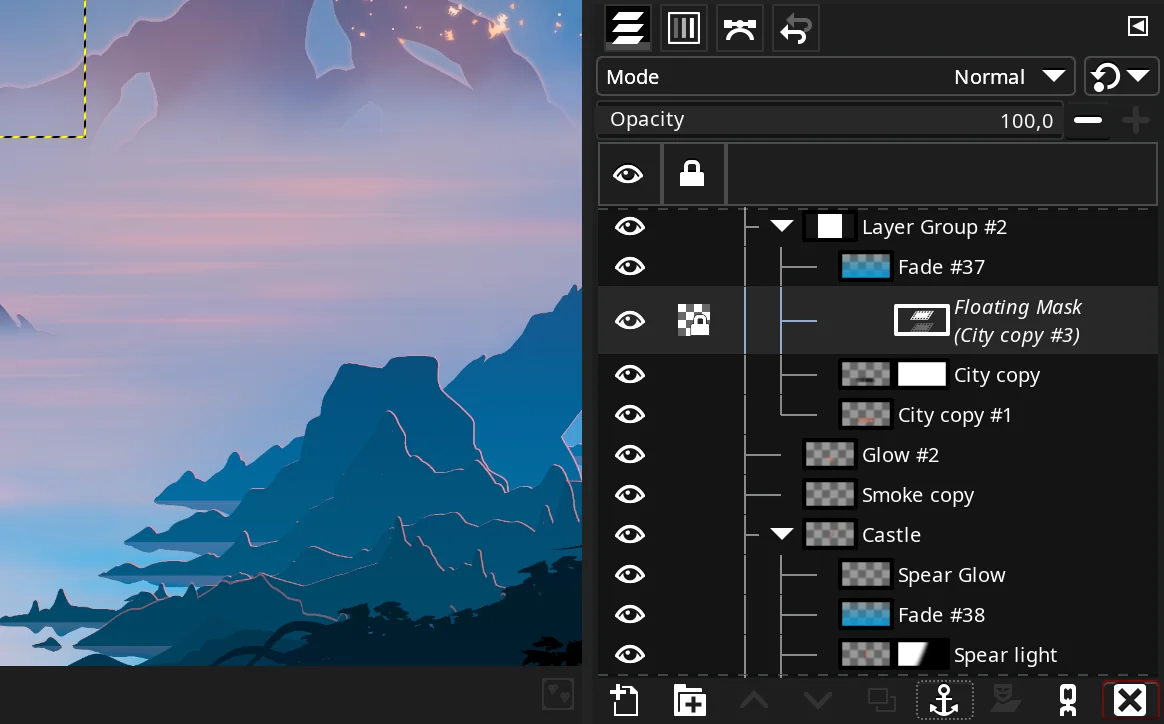
-
When you copy or cut and then paste with the Alt modifier on the canvas, GIMP will create a floating layer (this is what the official statement says, I’ve danced around this for a while but couldn’t find a way to do it).
-
When you explicitly create a floating layer for whatever bizarre reason. This is what you used to see before, except it now says “Floating Layer” rather than “Floating Selection”.
All in all, great and long overdue change for the better. Keep’em coming!
Pasting as a single layer
While we are talking about layers, here’s another useful thing. Now that GIMP supports selecting multiple layers (and multiple items in general), there’s a use case where you select several layers but you want them merged into one in another project. Fair enough, now you can do that.

You can map a shortcut to it too, of course.
Outlined text
This feature does away with probably hundreds of YouTube tutorials on adding a color outline to a text layer. Text strokes/outlines are now a setting of a text layer.

And because GIMP has this confusing system of setting text properties, you won’t find it in the on-canvas floating toolbar, you’ll find it in the Tool Options dock as an option in the Style drop-down list. So you can have filled text (just the fill), outline text (just the outline), and both (fill and outline).
The implementation is not without its issues. Most noticeably, when you start increasing the text outline width, you’ll quickly notice that the stroke is rendered inwards only. So this works only up to a point:

Some of that can be mitigated by using the round joint style instead of the default miter style. But the real solution, of course, is to provide an option whether the stroke/outline should be rendered inwards, outwards or both ways (and thus centered on the outline of the path in the font’s glyph).
The mind-blowing thing about all this is that the feature was requested 19 years ago and a functional patch was created 11 years ago. But, again, noone had the time or motivation to clean it up and merge. Until just a few months ago.
This is where you have to thank two people. I’ve mentioned Cmyk.Student here already. They are the person who finally cleaned up the patch and made it part of a future release. And the unsung hero of GIMP development who created the original patch is Massimo Valentini, one of the most prolific bugfix champions in the project.
Revamped Align tool
The Align tool now benefits from support of multiple selected layers. So you can pick multiple layers as objects in the Layers dock and align them against another object that you pick on the canvas.
The other major change is the introduction of the anchor point widget. You can choose which point of each selected target object to align by. This is a fairly regular 9-point widget, with corners, middles, and the center.
Moreover, it was possible to work on guides before, but you weren’t able to do something like evenly distributing them (or any other objects). Now you can:
The Align/Distribute update was introduced by Jehan Pages.
New UI theme and icon size selection
The new version comes with a grey theme based on 18.42% luminance middle-gray background color. It also allows overriding the icons size set by a theme and making your own choice.

The “Small” preset above is what I picked because on my laptop display (2560*1440px) it looks proportional to the rest of the UI. Medium matches the theme’s default one, large is already slightly unnerving, and huge is, well, huge:

Not as much granularity as Inkscape has, but a lot better than no choice at all.
More CMYK work
Finally, the plugin for importing and exporting PSD file now supports exporting CMYK(A) files with 8/16-bit precision per channel. When you do so, the CMYK soft-proof profile is used to tag the image.
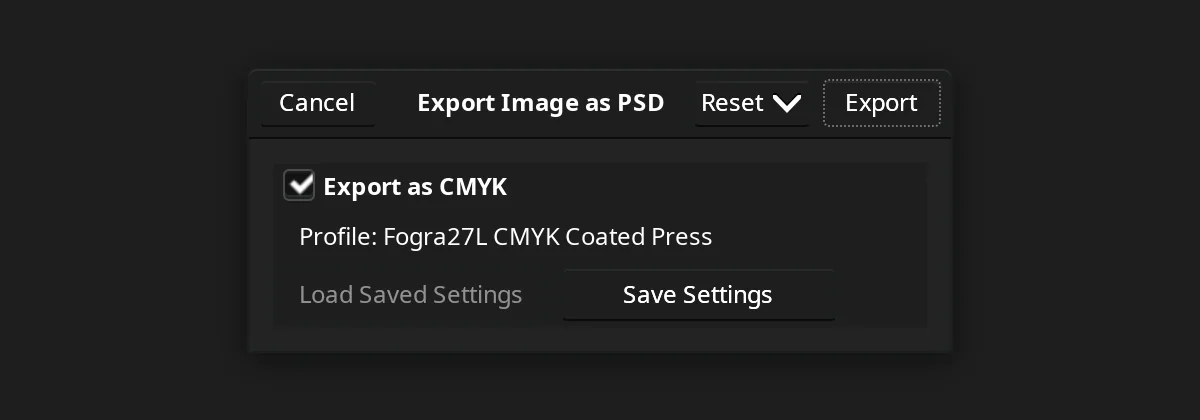
Another new feature is automatic exporting of paths to PSD files.
In a nutshell
While the team is focused on getting GIMP 3.0 to a releasable state, they still manage to bring new exciting changes to the table. I know it’s been taking a long time to complete the journey, but this seems very much worth it to me.
There’s official release notes with more information available. And you can download the latest development GIMP release here.
Featured artwork: Spear of Jealousy by Fredrik Persson
Writing this post involved testing GIMP, reporting a few bugs, making screenshots and videos etc. On the whole, it took slightly over 6 hours to complete. This is the time I would otherwise spend on paid projects to support my family.
If you appreciate the kind of work I do, donations to Libre Arts are once again possible, but limited to Patreon.
This is a companion discussion topic for the original entry at https://librearts.org/2022/11/gimp-2-99-14/