Methods for Color and exposure correction in RawTherapee

Edit: I’ve uploaded the raw file in question here: https://filebin.net/fest2qfn34hmay0v
Camera: Canon Powershot G7X Mark 2
RawTherapee Version 5.4

I’ve been using RT for over a year and I’m often frustrated when the camera makes an embedded JPG look way better than anything I can do in RT. I have spent hours and hours going through RT’s excellent documentation. I am just starting to get a grip on manipulating individual color channels in GIMP, and I think that’s my problem with this picture - that I need to edit the RGB channels individually and I don’t know how to do it, and how to approach it. I read Pat David’s excellent tutorial on Basic Color Curves but I have not figured out how to apply it in my own processing yet. So that’s my background.

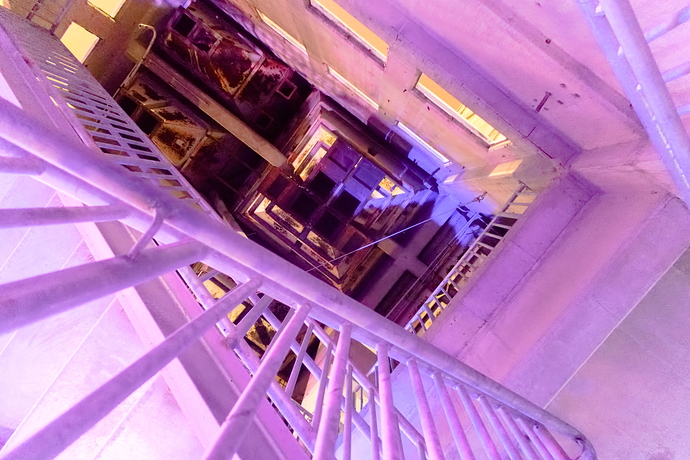
Here is the JPG from the camera, which I think looks really nice:

Here is the raw file. With the bundled RT neutral profile and some lens distortion correction applied

Here’s the the result from adding 1.33 stops of exposure compensation in RT. Notice how the blues on the right look all crappy. They are getting clipped.


Histogram of the jpg embedded in the file (the nicest image of the 3):
jpg%20histogram
.
.
Histogram of neutral profile:
Neutral%20profile%20histogram
.
.
Histogram of neutral profile with 1.33 stops exposure compensation:
33%20EC%20histogram

How do I need to think about this to get my raw files to look more like the embedded jpg? What are my next steps in processing? I take all different kinds of pictures, so I’m hoping to learn something more theoretical about the software that I can apply in other situations.

If I could change anything about the embedded jpg, I would make the purple color in the lower left more vibrant while still keeping it bright. The blue light that’s clipping in the raws I would like to keep vibrant (in the JPG, it looks more grey), but I realize I may not be able to do that while still boosting the overall brightness of the image, due to clipping.

After I do global edits in RT, I usually follow up in GIMP, which I am a little more comfortable with. So maybe start the color corrections in RT, then follow up in GIMP for finishing touches? Gimp is nice because of the layers, masking, etc…

Which version of RawTherapee are you using?
What camera make and model?
Upload the raw file, either directly here or using https://filebin.net/

Hi - I did not know we could upload raw files here because they are so big.

Camera: Canon Powershot G7X Mark 2
RawTherapee 5.4

If the raw file is not attached to this message, I will upload it right after. I can’t tell if it’s attached or not.

Edit: Here is a link to the file: Filebin | fest2qfn34hmay0v

@Stampede shooting in not-daylight requires having a good input profile. We have no dual-illuminant input profile for the Canon PowerShot G7 X Mark II, but we have one for the Canon PowerShot G7 X. You should either get one for the Mark II from Adobe DNG Converter, or try using the one for Canon PowerShot G7 X.
http://rawpedia.rawtherapee.com/How_to_get_LCP_and_DCP_profiles

Here I used “Auto-Matched Curve - ISO High”, set the Canon PowerShot G7 X.dcp as the input profile, and tweaked noise reduction a bit. Resized to the same size as your first image.
IMG_9983.jpg.out.pp3 (10.2 KB)


When you open the PP3 you should then go to the Color tab > Color Management and set the Input Profile to Custom and point it to dcpprofiles/Canon PowerShot G7 X.dcp (check your RT installation folder).

I have to ask: what is the origin of all the blues and purples? I assume that the actual colour of the railings is white.

Thanks so much! All the color management stuff confused me so much, and I sometimes will get good results from RT, so I wasn’t aware of how important that is. I’ll start paying attention and make sure to pick the correct input profile when I work on my files. Where would I find a DCP profile for my camera? Is it bundled with Adobe Photoshop software, or would it be downloadable from the Canon website? I am guessing it’s not included with RT because it’s proprietary.

I also shoot on a Canon EOS 80D, which is not included in the RT profiles, so I will need to get one for that camera also.

@elGordo this was a vacant building next to an event center. The purple and blues are from the show that was happening next door. They may have had yellow lights also, or they could have been sodium vapor lights with that yellow cast. Do you like the picture? I’m thinking of instead of leaving it as a rectangle, I will crop it into a circle to really screw with your perception even more. I am going to try that and see if I like it, but first I wanted to get the colors and development done right, which has been an ongoing frustration for me with many of my pictures.

@Stampede it says right there in the link how to get the profiles. It fixed the sky blues on my camera so I highly recommend it.

Well Duh. You are right. I didn’t read the link close enough. I re-read it more carefully and found the profiles I need. Now I am going to dig into the pp3 file that @Morgan_Hardwood attached and try to figure out how he got that sweet noise reduction, which is something else I have had problems with, especially since I shoot a lot of pictures in low light at a very high ISO.

Adobe’s profiles are proprietary. However, I make my own and bundle them with RT, so if you can get your hands on a color target, then you can help me help you help yourself.
http://rawpedia.rawtherapee.com/How_to_create_DCP_color_profiles#Shooting_the_Color_Target

Hi @Stampede,

let me also add that if you can’t get your hands on a color target, you can still help yourself by creating a dual-illuminant DCP profile using dpreview’s “studio scene comparison” shots. They include a color target, and are taken using lighting that should emulate daylight and tungsten. They might not be 100% accurate, but from my (limited) tests they seem to do a decent job.
It’s unclear whether it is legal to generate DCPs from those shots and then distribute them with RawTherapee, but if you generate the DCP yourself and do not distribute it, I think everything should be perfectly ok.

Morgan, I took that pp3 profile that you posted, and compared the noise reduction settings of what you had in the file vs. the defaults noise reduction settings.

Thanks for your help and patience while I try to learn this software better. Everytime I post on here, I find the people really helpful, and @patdavid posts some top-notch tutorials that have really helped me, so I signed up for a $5/month donation to the site.

Along with that spirit, as for providing files for you to make your own color profiles, I would do this for you with both of my cameras (Powershot G7X Mark 2 and EOS 80D) but those color charts are $100 and I’d probably never use it again. If there’s someone in the USA that could send one to me, I could do that and mail the chart back to them afterwards - maybe a couple weeks later. I could pay a deposit so you don’t have to worry about me running off with your chart. I would just send the raw files to you versus making my own profile from it. I like doing photography, not horsing around on computers, but I am the guy that the family members call when they have computer problems, but I don’t enjoy it that much. Only do it when I have to.

3 Likes

Thank you so much!! We deeply appreciate your participation as well as your donation :slight_smile:

1 Like

That’s true. Once you have a good all-round profile, making new profiles for specific light makes barely a difference.

There are a few people with color targets in this forum, I hope someone sees this and feels generous.

That’s great. I’d help you with the shooting once you get it.

One person emailed me to offer a wolf Faust it-8 color chart. Would that work for what you want to do with it?

@Stampede
Absolutely!
An IT8 is a very clever thing :slight_smile:

215_0

Have fun!
Claes in Lund, Sweden!

It’s fine. It’s not ideal because it’s prone to glare and difficult to take good shots, but if you’re willing to give it a few tries, great.

I see you used Neutral processing profile then added brightness. Using Neutral will give a very ‘raw looking raw’ and leaves it entirely up to you to ‘develop’ something good looking, and will usually give you a starting point that doesn’t have the general attractiveness of the JPEG that has been ‘pre-developed’ in camera.

I see there are some specific issues with your camera model, but the general advice, if you want the initial raw opened in RT to be comparable to JPEG in terms of overall attractiveness, is to have RT open raw files with the Default processing profile pre-applied.This ‘pre-develops’ the raw file to – maybe not the same look as the JPEG – at least something more optimal than the ‘raw raw’.

Woohoo! Thank you!

Also, as noted:

Thanks to the generosity of @paperdigits I happen to have an IT8 color chart we can get to you if you need it (assuming it wasn’t @paperdigits who already emailed you). Feel free to PM me and we’ll get you set up.

Hey @patdavid, what cameras do you have?