3.0 How to get good results automatically?

Perhaps the original question was being misunderstood by some. I’d like to chime in and tell you about how I see and understand it.

I think that darktable is a wonderful and powerful tool. If I think about how I use the application, I have to admit that I am probably just scratching the surface of what’s theoretically possible, but that’s OK.

  • First, after I imported the new images, there is the process of “culling” the pictures. For that alone, darktable with its features is a gift from heaven and very much needed. Comparing, checking focus, rejecting, rating, tagging of pictures (the culling mode is a great improvement btw).
  • Then, after culling, I check in more detail the pictures above a certain rating, which will be the pictures I’ll actually use for something or show to someone. There, I correct very obvious shortcomings of the original image like slightly wrong rotation, wrong whitebalance, or specs/dust problems. Also, corrections of exposure are done when necessary.
  • After that - for me, at least, in most of the cases, the export in the desired format is already happening and I can use the pictures for whatever I want.
  • In certain, special cases however, I try to really put some effort into the image. By applying more advanced modules I try to alter or increase the mood or the desired feeling of the picture. This is highly subjective, artistic, and with a lot of try-and-error. But it’s fun, and a nice hobby in itself, and can produce wonderful results.

If you think about the steps I just described, you see that darktable is already bringing a lot of value to the table, even if you are not fiddling around with every possible module-parameter there is. This is why I can very much relate to the wish of getting “good results automatically”. For example, if I am taking pictures from an outdoor party in dim light with higher ISO, I’d like to have a noise reduction which would be comparable with OOC-JPG by default, instead of fiddling around with several different sliders and knobs of a denoise-module.

This is how I understand the question of the original poster - good default output, comparable to OOC JPG for all those pictures that won’t get an “extra treatment”. Nobody is asking for “automatic artistic interpretation by an AI”, or playing a Stradivari without ever excercising. :slight_smile:

You fiddle around with one picture first and then save the result as a preset, which you can automatically apply to all the others.

That way you make sure that:

  1. The preset is very well adjusted to your needs (and is not an approximation that should satisfy all users quickly)
  2. you learn how to use the module and know how to readjust it if necessary
  3. with your own workflow and presets sou develop your own style and are not limited or influenced by given styles (think of Instagram presets and similar results offered by the most popular “few clicks” Smartphone photo apps) The pictures will be boring and uninspiring in the long run

I can remember when I started working with darkable how the base curve annoyed me, because I always had that typical harsh “Nikon” look, which made further processing more difficult and one-sided, especially when it came to bringing dynamic range better under control or when the subject needed a softer appearance.

I then learned to control the curves according to my own judgment and got desired results relatively quickly.

6 Likes

Indeed so Glenn, I actually do try to start with a neutral look, in fact my default camera setting is the neutral profile, and in Lightroom I also use ‘Camera Neutral’ as my starting point.

In Lightroom, I don’t use any default settings for any of the exposure related adjustments. I only set a little ‘Texture’, which I believe is similar to the Local Contrast adjustment in dt, a little vibrance and saturation adjustment (I find, in Lightroom, this work better with the neutral profile, than using the Adobe Color profile).

I can get a ‘near enough’ adjustment using a little ‘Exposure’, maybe some Highlights and Shadows, and set the black and white points.

I’m not looking for a similar workflow in dt as such, but understanding what gives me equivalent adjustments would help. Even though many adjustments have similar names, I’m not finding I can get the results I like so easily. I’m kind of getting the idea with Filmic RGB, but the learning curve with that is still pretty steep.

Cheers.

1 Like

This is in fact the biggest problem for all those (myself included) who have used other software before:

6 Likes

Imho this is only partially true. In the last years I tried different RAW converters (LR, C1, Bibble) and was always way faster in finding a good way for myself.

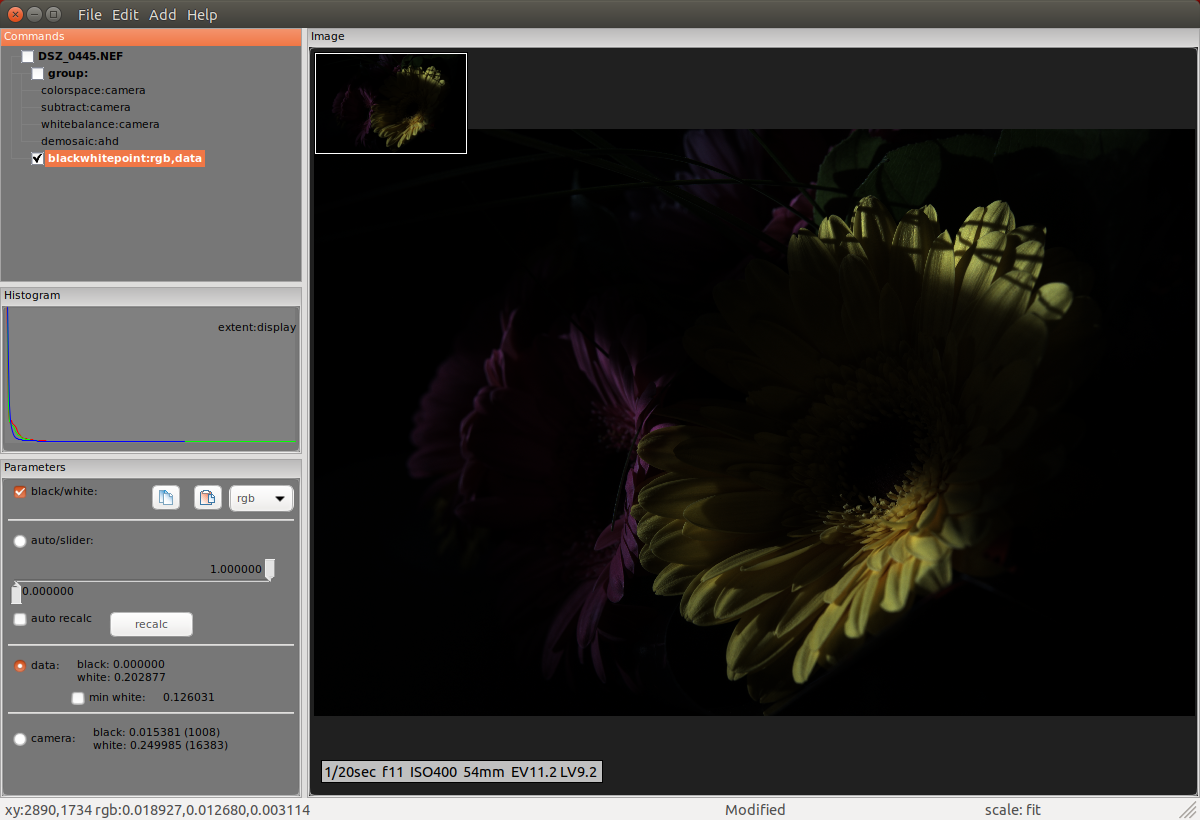
I got “ate-up” about this, so much so I went looking for a toolset that would explicitly demonstrate “Neutral”, that is, no processing other than what it took to make a RGB that reflected the raw measurements. Long story short, I ended up writing my own raw processor, ‘rawproc’ that lets me open the raw data and explicitly stack operations to see incrementally what each provides. To that end, here’s a rawproc Neutral:


The tool chain is in the top-left pane:

  • colorspace: camera,assign - This just associated the camera color primaries with the image; the actual conversion doesn’t take place until the image is either displayed or saved to a file.
  • subtract:camera - This particular camera requires subtracting 1008 from every raw value, specified in the metadata
  • whitebalance:camera - Applies the metadata-supplied camera white balance multpiliers.
  • demosaic:ahd - Turns the raw mosaic into RGB
  • blackwhitepoint:data - scales the raw data to display white, equivalent to setting black/white points.

The displayed image is the image from the last tool in the chain, piped through the color-and-gamma-corrected display profile. So, that’s not linear, but every tool in the chain respected the original data’s light energy relationships. So, let’s turn off the display transform, to look at the image without display correction. This, we’ll call rawproc “Linear-Neutral”:

Colors are a little wonky due to the camera’s colorspace being so much bigger than the display’s, but the significant deficiency is in the tone, much darker than desirable. Why this is, is a topic of a much more complicated discussion…

Okay, why all this? I think you’ve already ascertained this, but “Neutral” can mean different things in different softwares. I think I’ve shown the most neutral “Neutral” there is, so take what you see elsewhere and think of it critically. It’s not until you pick apart one-by-one the things it takes to get from the raw mosaic to a presentable RGB that you then get the insight to what tools do what for you in that journey.

By the way, welcome to the forum. There’s a lot to be learned here; I speak from direct experience in that regard…

3 Likes

Well, if that was true, I’d still be trying to work as I would with an Atari 8bit Basic and DOS 2.5 system ;-).

No, it’s quite clear that dt does work very differently to most other photo software out there.

Well, you are proof that hope is not yet lost :wink:

Indeed. Darktable 3.0 offers new scene-referred workflow that most other tools don’t offer and this requires a change in thinking and working.

2 Likes

Getting good results fast is a real problem. Besides debating on what good means, allow me to elaborate on what neutral means for various apps.

Neutral in LR and ACR means something completely different from the neutral that you would get from RT or dt for instance. Neutral is also different from one or several click apps such as DxO. I would say that LR lands somewhere in the middle.

In general, neutral in LR means that it is processed to the point where the photo has the proprietary look of the manufacturer. Adobe works very closely or as close as possible with the industry to get the look and feel that each camera and lens company would want the customer to have in their hands. This is important for branding and reputation, and customers pay for that to happen, knowingly or unwittingly. This insider info is privileged and depends on relationships, research, patents and money that open source devs will not have access to. Moreover, due to the complexity of these interactions, Adobe often has to settle for less and of course that would mean having dozens of vocal clients or pirates tearing them apart for not doing a good job.

I could write lots more but take a moment to change the process version of LR to see what I mean by neutral. If I recall correctly, PV 2010 is much more neutral than 2012 and either PV 4 or 5 started introducing sophisticated machine learning algorithms that process based on the content, making neutral even harder to define. I have no qualms with this paradigm but we must realize that it is a completely different one from that of RT or dt.

We generally prefer to build our own workflows from ground up and to do that based on what we know about light, colour and photo processing technique. Sure, it is a more nuanced approach, but it is one that is more gratifying in the end, at least that is my opinion and one that is probably shared by many of those in this community.

7 Likes

But why not doing thing properly from the beginning?
If someone wants to produce good results and use the tool to it’s potential, they need to learn how to use it anyway.
Like in the case i mentioned before, the more complicated approach may be the need to undo the pre-baked results and in worse case need to fight them with corrections. It may take longer and not produce intended results in such situation.
The faster and more painless way as s7habo suggested may be to create presets based on own preferences.

1 Like

That’s certainly looks very interesting, and I like the first image there, that’s a decent starting point for sure.

However, it does seem that we’re getting hung up now on the meaning of ‘neutral’. I’m not particularly concerned about how different software interprets that. What I’m looking for is something that represents the original scene I shot when I took the picture. Without any kind of boosted colours, or clippings to boost contrast, or over-sharpening, just a reasonable likeness to that original scene. That’s one of the reasons I don’t shoot Raw+JPEG, and only Raw, as I find I never end up using the JPEG version.

Once I’ve got that kind of starting point, then I want to work on tweaking the colours, contrast and sharpness etc. I’m not one for over-manipulation though, as I still usually want to end up with an image relatively close to the original scene.

Then I may well go through again and select a few to apply something more creative (using virtual copies/versions).

As I see it, that’s not a workflow that should be software dependent, or dictated by how others think it shoud be done, that’s just my choice and preference.

Of course how those images are edited is sofware dependent, and of all the software I’ve used, dt does have the steepest learning curce, and so far results that I’m happy with have eluded me to a point that I’m not yet ready to ditch Adobe.

I’m determined to get there though, but I am finding it a little frustrating, even after watching many of Bruce’s and Rico’s videos (which I very much enjoy watching).

I’m not exactly new to the forum, I have posted one or two comments over the last couple of years, just not as often, or intense as now though :smile:

cheers.

Yeah, I have got some presets, but so far I can only really get them to work to a point with some adjustments, because I do shoot with such a variety of images in any session, I do need some kind of automation. Any ‘auto’ settings in dt do seem to be a bit erratic as to the results they give, so at the moment I’m not finding many of them very useful.

But, again, to reiterate, I’m only looking for a reasonable ‘starting point’, not an automated final image. I am happy to learn any of the tools and workflows available, but I would also like to speed up my initial import and processing of new images.

To be a bit clearer, perhaps it might help if I expanded on that I am looking to migrate away from using Adobe software. For that, I need to look at importing and re-editing my entire collection of images (I’m only a hobbyist, so my collection is a modest 60,000 or so), of course I would like to initially make that process easier.

I know that dt does, or did, import some of Lightroom’s adjustments, but of the ones I’ve seen so far, that doesn’t work very well, and doesn’t give many that are anywhere near usable.

I’m actually quite surprised that there’s very little information to help anyone who does want to migrate wholesale from other software, such as Lightroom. I have seen one or two videos, but nothing that really gets down to the nuts and bolts of it.

To be fair though, even other commercial alternatives are very sparse in the respect too.

Anyway, I’ll keep plugging away, and thanks for your coments.

@MStraeten Doesn’t always work…I wanted to apply spot wb to a bunch of old images…it is saved with the settings that you make just before you save the style…ie everything will get the same wb…what I would like would be a way to use it automated… so using the average of the image each time it loads a new image…there are a few other settings like this that would be nice if they did a recompute and were not static…

‚Always’ is the key word in your reply: defaults should be a goot starting point as ‚always‘ as possible…
Your usecase isn’t covered if basecurve and basic adjustment are applied as a default - so no valid reason for applying these as default.
If you need a different default behaviour for decent modules you‘d better file a specific issue for that … its more a discussion of how presets can be applied than the default behaviour of a decent module. I doubt that spot wb might be a valid general default instead of camera wb …

If you want a one click solution, there is one: PIXLS.US - Profiling a camera with darktable-chart

1 Like

How do you download it so as to translate with DeepL?

Translation in progress here : darktable 3: RGB or Lab? Which modules? Help! - HackMD

2 Likes

A couple of preliminary notes:

  1. The words film/filming often appear. I assume these should be filmic.
  2. The following quotation/translation:
    ‘Finally, to display only a minimal selection in the interface and modules, to the right of “ More modules ”, open the list of presets and select “ Workshop – generic ”.’
    is problematic. I’d like to follow that advice, but the presets I see don’t include anything starting with Workshop. I guessed at Workspace - all purpose, but this includes the base curve rather than filmic. So maybe that’s a bad guess?

Oh. I , seem to have misunderstood how more modules works. It seems to display only by module group, and jumps to the basic group. Very odd behaviour IMHO.

As I said, it’s in progress. What you have now is a machine translation with some parts manually verified and corrected.