Any interest in a "film negative" feature in RT ?

You’re totally right. In fact, the first time i used glue and made it very nice and seamless. Then i bought a bigger lens, so i had to build a bigger tube… and that’s basically how lazy i am :rofl:
I will upgrade it sooner or later :slight_smile:

I’m going to use a similar sleeve on my spectrometer box, probably made from PVC pipe. In my cheap spectral profile post, @Tobias brought up bringing this equipment to LGM. Got me thinking about a “spectral sensitivity capture session”, where folks would line up with their cameras to shoot the spectrum and calibration images for making camera profiles later. On the box, a plate with an aperture and a sleeve would let someone just insert their lens , fire away, then quickly get out of the way for the next person…

I’m finding a lot of optical stuff doesn’t have to be sleek or expensive, just functional to the intended use. Might just be my delusion, though… :smiley:

1 Like

Wow, i wasn’t aware of your post, i’ve just read it. That’s outstanding work, thanks for mentioning! :slight_smile:

Agreed. For example, i’ve also found that using a simple flash bouncing off a piece of white paper can be on par with a fancy Kaiser SlimLite Plano for use as a backlight in digitizing film.
I actually did buy a SlimLite Plano → made the comparison → not impressed → amazon return :smiley:

2 Likes

But how do you focus in this case, especially with a manual lens? Can a flash work in ‘constant’ mode?

I have another conventional light bulb that i use for focusing, then i turn it off and shoot using the flash.
Actually, in my latest, super-lazy setup, the whole light box is mounted on top of a flat led lamp:

… so i just have to power on and off. :wink:

3 Likes

Hi all! To everyone interested, there is a new filmneg branch in the main RT repo.
Being on the main RT repo and not in my forked repo, means it is much easier to build than before. You can follow “The Automatic Way” instructions, and then:

cd ~/programs/code-rawtherapee
git checkout filmneg
cd
./build-rawtherapee

or you can follow the “Manual Way” and specify filmneg in the “Choose a branch” step.

You will now find the FIlm Negative tool under the “Color” tab.

This version is backwards compatible with processing profiles saved with RT 5.7 and 5.8 , but beware that it’s not backwards compatible with the current dev version of RT.
So, if you open an image that was processed with the dev version, you will need to re-adjust some parameters (it’s not difficult though, read on for details).

Moreover, when opening an old v5.8 processing profile, it is not possible to automatically convert the parameters to obtain the exact same output using the new conversion method.
So, the tool goes into a “legacy mode” state, uses the old method, and shows a warning label and an “Upgrade” button.
After you click the “Upgrade” button, you will need to re-adjust manually. If you click the button by mistake but you are not ready yet to perform the re-adjustments, you can rollback using the history, but if you save the processing profile (by closing the program, or going back to file browser, or opening another picture), there will be no way back, other than editing the .pp3 manually, or re-opening the picture with RT 5.8.

Note: keep in mind that after you have successfully upgraded a picture, you can copy/paste the same parameters on other pictures from the same roll and save a bunch of time (provided they were all digitized with the same lighting conditions).

Ok, so now the good news :slight_smile:

  • It’s now possible to use flat field
  • Non-raw (tiff) files are now supported
  • Color accuracy is improved
  • UI feels faster, since there is no need to re-run demosaic each time a slider is adjusted

There are some important changes in the usage of this new version, due to the fact that the inversion code now works after WB and after input color profile conversion:

  • MOST IMPORTANT: White Balance cannot be used anymore to color-balance the output picture, and must be set to balance the backlight instead.
    Do not use spot-WB on the film border or a gray part of the picture, do not use AutoWB, and do not use Camera WB if the in-camera setting was AWB while shooting the negative.
    For example, if you use a xenon flash to digitize your negative, just set the temperature to 6000k (or whatever the temp of your flash) and use that for all your negatives (until you change backlight).
    You can take a raw shot of the backlight only (without the film), then use spot WB to measure the values.
    Or, you can use the camera Spot WB function on the backlight alone, save a custom WB preset, and use that for all negative shots. Afterwards you can use “Camera WB” in RawTherapee.

  • The “Pick neutral spots” button now also sets the color balance. If you only want to spot-balance without changing the exponents, you can simply pick a single spot, and disarm the toggle button. There are also two balance sliders that can be adjusted manually.

  • To get a better result, an accurate input profile should be used, with no custom “looks” or color boosts to make pictures look prettier.
    If you use a DCP profile, deactivate the “Look Table” flag, but beware: some DCP profiles don’t work at all without the look table (more info here).
    In this case, or whenever in doubt, simply use “Camera Standard” : it seems to give reasonably good results with samples from different camera models.

The ideal situation, from what i understand, would be to create your own input profile using the exact same light source that you use as backlight (please anyone let me know if this doesn’t make sense).
That’s what i tried with my xenon flash, using ArgyllCMS and the handy “Save Reference Image” function of RT. Despite taking a very approximate target shot, i’m very pleased with the results; here’s a quick comparison (Kodak Portra 800).

Old version (working on raw data, before WB and input profile):


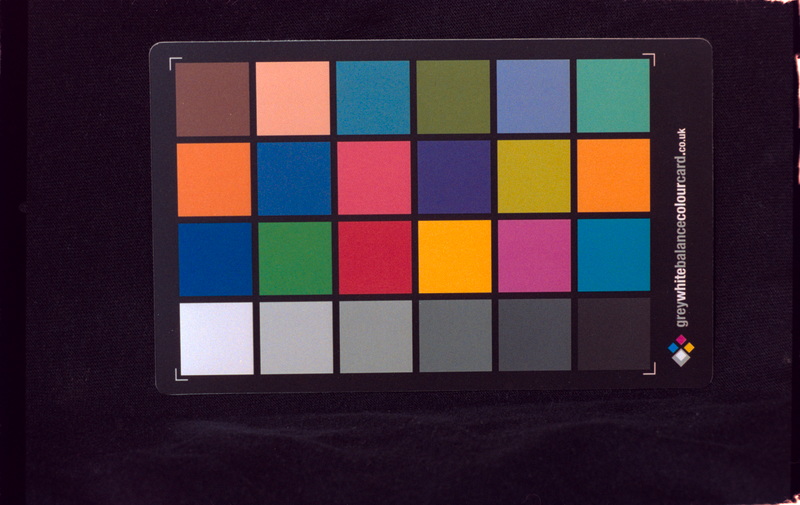
… awful. Notice the yellow and yellow-green patches.

New version, using Camera Standard input profile:

New version, using the custom icc profile:

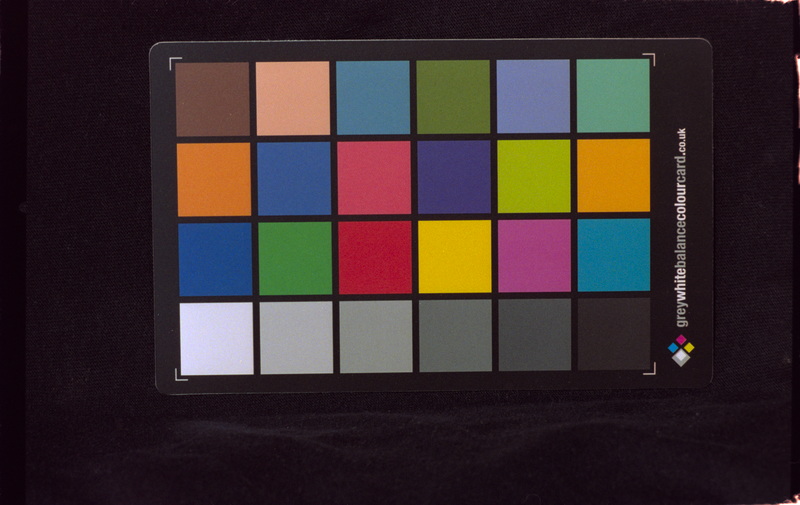
(for reference: http://www.babelcolor.com/colorchecker.htm)

Let me know what you think :slight_smile:

4 Likes

Thanks, I’ll try it on the weekend. What I’m worried about is absence of WB now, I used to touch it after setting the exponents for better look. Not all was attainable using exponents alone… Let’s see what it looks like though

1 Like

I’ve built the new version and unfortunately, I don’t like the new results at all :((( It’s much worse than it was before and looks like not very good manual conversion in Photoshop with heavy green casts which I cannot easily correct with sliders (I tried this and that and was not lucky).

It’s as if images have weird magenta-green veil which I struggle to correct but cannot. Previous develop had remarkable purity of colors which really set RawTherapee from all the other programs!

Let me give examples of what I had using the current develop branch (you can click on the image and then press left-right to quickly compare, skies look especially wrong on the filmneg one):


vs the new version from the filmneg branch:

One more example, current develop:


And filmneg branch:

Here are raws:
flat field:
https://ipalopezhentsev.github.io/photo/assets/images/articles/inverting-in-rt/Dslr0002.NEF

raw with film base:
https://ipalopezhentsev.github.io/photo/assets/images/articles/inverting-in-rt/Dslr0001.NEF

raw with negative itself (I sampled grey areas from the bus):
https://ipalopezhentsev.github.io/photo/assets/images/articles/inverting-in-rt/Dslr0006.NEF

I’m sorry to give the negative feedback, but I was just super satisfied with the previous develop! So can you please keep the old version working on raw’s too for those that like it more? So we can choose depending on format.
Will play with the new version more, maybe there’s something I’m missing.
But my first impression of the new version is that it’s much, much more fiddly and instable over the previous one with no apparent benefits over it (flat field worked ok for me on raw’s too, tiffs are not really needed except for stitching and inverting raw scans from dedicated film scanners…)

2 Likes

( OMG pixls was down for some time, i was freaking out! Big thank you to whoever fixed that expired certificate :smiley: )

No problem about the negative feedback, that’s what testing is for :wink:
Have to say you did a fantastic job with the first sample! I can’t match that result, even with the old version.
Can you post both the .pp3 files for the old and new version samples?
With the new version, did you use the WB values sampled from the flat field shot (temp=5553, tint=1.027) ?
This is what i got, sampling the neutral spots from the bus:

… and the pp3: Dslr0006_new.jpg.out.pp3 (12.7 KB)

It’s not as good as your first sample, but it seems less greenish than what you got with the new version…

Thanks again for testing! :slight_smile:

alberto

You are welcome! I’m ready to test anything from you. Just so that I can get the old colors back :slight_smile:

Yes, I took WB from flat field as you recommended. Also I tried unchecking LUT, it had no visible effect.
Agree that your conversion doesn’t look faithful (now it just has magenta veil instead of the green one…); that was the whole unique point of RT in its current development (non filmneg) form that you could achieve those vibrant correct looking colors quite easily.

I described my conversion method here (taking the first picture as example), using it you can quickly reproduce my results even without pp3s:
https://ipalopezhentsev.github.io/photo/rawtherapee/software/2020/06/14/inverting-in-rawtherapee.html

Note that it’s not just this one picture! I now have full rolls of converted films having such kind of great colors, converted with using this method!
Which sadly now doesn’t work with the new version.

Here are pp3s:
from current dev:
Dslr0006.NEF.pp3 (12.0 KB)

from filmneg branch:
Dslr0006.NEF.pp3 (12.7 KB)

I have two builds running side by side and I’ve copied my folder with photos so it’s easy to compare both conversions by just switching between two open programs. And so far I couldn’t match good results from the old one…

1 Like

I can’t see that magenta, but that’s me, i’m not a photographer, i have a terrible “eye” for these things… to me it looks just less saturated. Which makes sense because the old version applies the camera profile to the inverted image… which is totally wrong, but works somehow :rofl:

Congrats for the blog post, that is a truly in-depth explanation!

Don’t worry about the old method, it won’t go anywhere until the new one is fully fixed :wink:
I want to try a different route, it should be possible to get the same result as before.

1 Like

Just dropping that here, since it’s GPL-licensed…

2 Likes

Thanks for that, @anon41087856.
Well, we can now see a few different approaches for negative inversion. Should we not start a discussion to at least compare theoretical aspects? (Of course, we’d soon dive into workflow comparison, which has strong ties to UX differences, but anyway…)

@anon41087856 Of course i did take a look at the negadoctor source code while moving the RT filmneg code past demosaic :wink:
(BTW: the code is very well commented and clear to understand, thanks for that!)

I noticed you get the log10 first, then multiply and offset the resulting exponent, and finally exp10 to get the output, which should (i think…) be the same as exponentiating and multiplying the input (of course with different values), and in fact i get very similar results between the new RT filmneg and negadoctor.

But there’s one thing i wanted to ask you and never found the time: if i understand correctly, you do the calculation in the user-selected working space (which is Rec2020 by default).
Did you do it in purpose, so that a user can choose to do the non-linear calculation in a different space? For example, choosing ProPhoto gives a noticeably different output (of course after re-selecting the Dmin and neutral spots).
In my implementation i decided to create a dedicated colorspace with three spectral primaries at 650nm, 550nm, 460nm which are approximately the wavelengths of peak sensitivity according to both Kodak and Fujifilm datasheets.
(BTW i’ve used the wonderful tutorial and source code on ninedegreesbelow.com )
Then i’ve converted the image from whatever working profile to this color space, performed the non-linear stuff, and then converted back to the original working space. So that the inversion happens on the same red, green and blue primaries that were actually “recorded” by the film emulsion.
I don’t know, it seemed logical to me… do you think it can make sense? Or i just got everything wrong?

(…sorry about my bad math and explanation skills)
Any opinion or suggestion is appreciated :slight_smile:

1 Like

My coding approach is always to build basic blocks that are as agnostic as possible to pipeline assumption and as immune as possible to developer mistakes/omissions. It reduces the impact of my own stupidity and let room for future improvements without deprecating the code at all since no constants or color-spaces are hard-coded. In case I messed up something, the goal is to give users a kill-switch and fly by instruments.

But…

makes a lot of sense and is a brilliant idea.

It’s so logical I will borrow it if you don’t mind :wink: Do you have an ICC profile of that color space ?

2 Likes

Yes, you’re totally right, i need to fix that, hardcoding it wasn’t a good idea.

Of course you can! :slight_smile:

Sure. Here:

FilmNegRGB_650_550_460-elle-V4-g10.icc (1.1 KB)

I created it by hacking the source code from the ninedegreesbelow tutorial, so i guess there shouldn’t be any licensing issue… (please correct me if i’m wrong)

Here it is compared to Rec2020:
image

… and to ProPhoto:
image

Which might explain the different result :slight_smile:

1 Like

Thank you for calming me saying you won’t remove the old method! I was very worried I will have to keep my VM with current develop forever to continue using the method that gives me great colors! :slight_smile:
It’s great you have in mind some other method, please say when ready, I’m eager to test!

1 Like

@rom9 your process for combining the RGB files is so much easier than the way I was exploring. I was trying to use LibRaw and the Adobe DNK SDK, and I never really managed to get it all working.

2 Likes

Hi! Sorry for the delay.
I admit, my attempt was a quick and dirty hack (i wanted to solve the problem with existing tools), but it seemed to work anyway :slight_smile:

Keep in mind that if you build the filmneg branch of RawTherapee, you can also apply the negative inversion directly to a regular (non-raw) TIFF file. This way you don’t have to create the fake raw file anymore :wink:

Ilya, just wanted to thank you for your article, “Using free RawTherapee for inverting DSLR-digitized color negatives”. It gave me a much better understanding of the tool, and now my colours are richer and more accurate.

2 Likes