I have seen it, but honestly it doesn’t bother me much, so it’s low priority… (Patches are always welcome though 
Alberto,
I’m really pleased with the performance and ease of use of ART. Thank’s for all your time and effort on this. I do wish you had chosen another name though. ART is such a common word that any search on-line finds millions of things related to art and nothing related to the RAW editor ART. RawTherapee and darktable are unique words so searches for those are useful. But I realize it’s probably too late to change it now.
There is something I’d like to see in ART. I’d like to be able to apply masks to the color equalizer. I photograph flowers and sometimes I change the color of some of the flowers. For example changing a purple flower to yellow. Without masks everything in the photo that’s the near the same color as the flower also changes. Currently I use darktable for this because the color zones module can be masked. But I’d prefer to stay in ART. Just about everything else that I need to do with masks I figured out how to do with the four sections in the local editing tab. In the Color/Tone Correction tab I can do some color changes, but I can’t make a purple flower yellow and leave everything else the same. I would be ok if you moved the color equalizer to the local editing tab and allowed the masks that are available in that tab but I realize that you or other users may not like such a change.
Just to jump in whilst Alberto considers.
You could select the flower using colour similarity mask / drawn shape in colour correction module. Reduce the saturation.

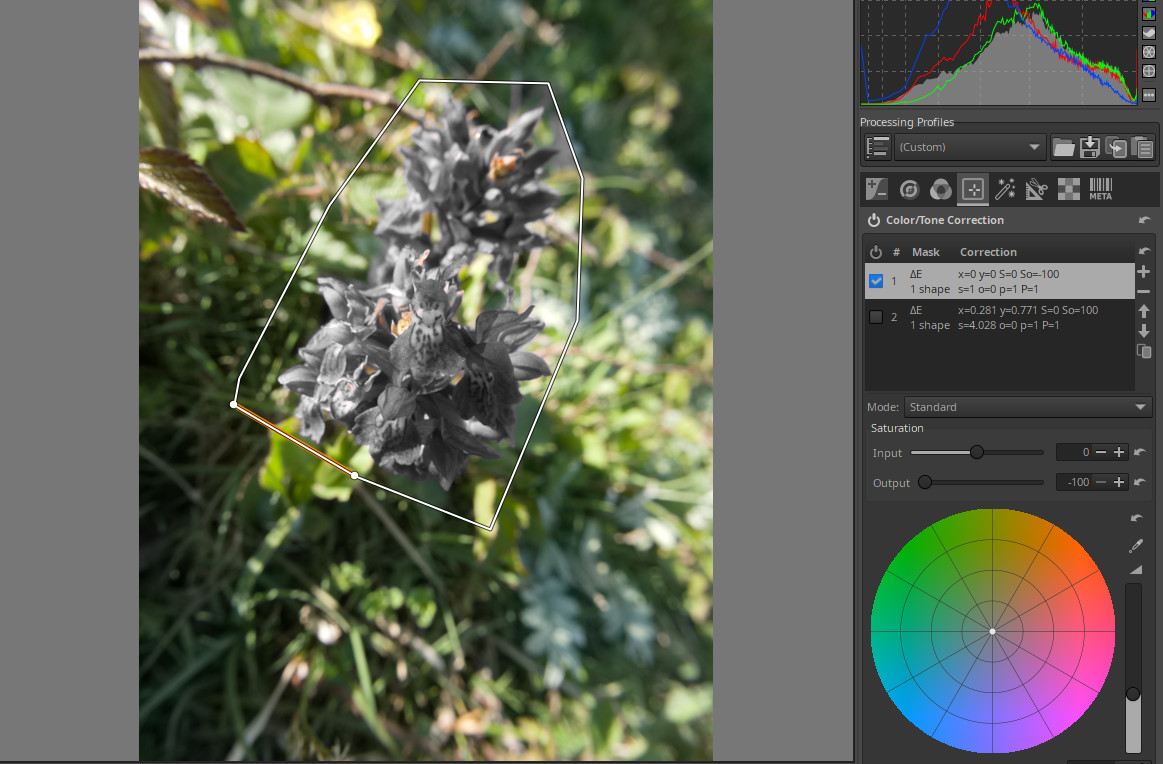
Use a second instance of colour correction with a colour similarity mask and copied drawn shape to add the yellow colour.

This is just a very quick attempt, I am sure it could be refined.
Yes, that’s what I was going to suggest, except that if you reduce the input saturation instead of the output one then you can use a single instance. But yours is also a good approach!
Didn’t think to use the input saturation, definitely a tidier way of doing it…
I wonder if anybody is good at identifying orchids?
Interesting idea. I did a quick test and it seems to work. Thanks for the suggestion.
David
I think I’ll duplicate this here since someone may have the same problem - 2 bugs I've found in ART
The feature is “Clip” highlight reconstruction mode, already present in RawTherapee
I asked to a friend who is an amateur specialist of European botanical orchids. We have in France (and in Europe) a botanical orchid we name “orchis de mai” which looks like that . The scientific name is Dactylorhiza majalis.
It can be found preferably in countryside rather in wet zones and also in the Alpes. It is protected in France.
@gaaned92
Many thanks for looking into this. Yes that does seem to fit nicely , I looked up the name you gave, and in the UK it is called ‘Marsh Orchid’. The appearance, size (around 40 cm tall) and habitat (marshland) describes it well.
We were walking along the coast (near Borth) in Wales, and found this area in the sand dunes with many orchids.
Hi, after months and months of use, here are few requests I have for ART. I know that many or all of them won’t be done (because too much work, don’t know how to…) but here they are, they are just wishes from me :
- Erase tool for brush mask. This mask is just a list of points with radius, that make the mask. When I create a mask, save the file and come back later to work on it, I’d like a brush that delete every points he passes on. I don’t like to create an area mask to erase areas by overlapping them.
- I’d like so much a “clarity” tool. Lab adjustments and Tone curves have tool to add light, but I think that it lacks a tool that add clarity of a picture, aka the extreme values don’t change, it’s just the luminance of all colors between that change so the scene is more “luminous” without adding any light (don’t know if I’m clear). There’s a paid RAW (and expensive, but don’t remember which one) that does that (along with saturation-vibrance) and it would be very useful for me.
- The vignette tool is good, but I’d like to have more control on it. I’d like to be able to see boundaries of feathers, and not to be limited to an ovoid shape. And choose the color would be nice.
But the most important for me is clipped shadow/highlight indication, and also colors outside color profiles. For the moment it’s white/black/blue. I would really like to be able to choose the color. For example pure/fluo pink/green would be perfect to spot instantly the areas outside the limits, way better than black/white. Or it’s possible and I miss something in preferences.
Hi,
It’s right there…:

I’m not sure I understand… if you want to add brightness without changing the black and white points, that’s what the brightness slider in the log tone mapper does:

If you instead are looking for a “lightroom-like” clarity slider, you can use texture boost with both strength and detail scale dialed down from the defaults.
You can use color/tone correction with a rectangle area mask to emulate a vignette, with all the controls you are asking.
You have soft-proofing and gamut warnings showing out of gamut parts of the picture in cyan. Then you have the false colours view that is completely customizable, both in the colors used and in the range of tones they cover. This is not really documented, but it works as follows: open your options file, and look for the [False Colors Map] group (if there isn’t one, create it). You will find something like this:
[False Colors Map]
IRE_2=#FFFFFF
IRE_10=#0000FF
IRE_20=#2290FF
IRE_42=#4B4B4B
IRE_48=#FF11FC
IRE_52=#7B7B7B
IRE_58=#00FF00
IRE_78=#E0C7BA
IRE_84=#AEAE00
IRE_94=#FFFF00
IRE_100=#FF7F00
IRE_108=#FF0000
these are key/value pairs that define the map. Keys are the of the form IRE_N, where N is an integer (between 0 and 108) that defines the upper bound for the tonal range that will be rendered with the corresponding colour (don’t overthink about “IRE” and its meaning, this is just a name here, probably used in a wrong way – apologies to the purists…). In the example above, the “deepest blacks” (in the [0, 2] interval) will be shown in white in the false colours view, and the “brightest whites” (interval [100-108]) will be shown in red. But if you don’t like the defaults, you can change both the ranges and the colours.
For example, here’s a map that will only show shadows and highlights that are close to “clipping”, rendering everything else in black:
[False Colors Map]
IRE_1=#00FF00
IRE_101=#000000
IRE_108=#FF0000

HTH
4 Likes
Hi @agriggio
OK. Just tried again. Because I tried it long time ago, and thought that for creating brush to erase shape or deltaE.
Never mind. I was probably in the 4th dimension then. Sorry. ![]()
About clarity : No it’s not that (target gray point). I tried it and use is, but it’s not the tool I would. It’s not very easy to explain but, here is a video, it’s explained since the start. Basically it’s the same family of vibrance, but just for the light/shadow tone, not the color.

It’s very different to the other tool and the one you pointed, at least for me, because you tool add/remove light/tone. Clarity does not do that. I miss something ?
But the guy explains in the video that the function was greatly improved for the last version of the program, so I guess it’s not an easy task…
About vignette : OK, except that in the vignette tool you can move and extend/shrink perfectly to the image, with the other it’s manual and maybe not so good.
And thanks for the last part about the colors outside the gamut. I saved the explanations and will use it for sure.
Thanks again for your time and efforts.
@agriggio , I’ve just read your explanations about false colors map. I was talking about this :
![]() , I don’t think that we are talking to the same thing. When I select them I have an indication in black or white. It’s these colors I want to change, the color map you explained is not about this I think, I’ve just tested and the colors didn’t change.
, I don’t think that we are talking to the same thing. When I select them I have an indication in black or white. It’s these colors I want to change, the color map you explained is not about this I think, I’ve just tested and the colors didn’t change.
The false colors view is more general, and can emulate the clipping indicators (just use the settings above)
HTH
Is clarity not really just an “edge aware” or edge targeted local contrast??
Some ideas were thrown around here
and
Yes, but I like the way that only extremes values have their colors changed.
I like to work on my pictures with these indicators on, in order to have a visual hint that says that I’m off limits, without the need to check it manually by a tool. The workflow is way smoother, fast. It’s an automatic warning. And have flashy colors would be a plus.
Thanks for this.
You’re right, it’s a little like the “local contrast” tool. It’s more advanced, but it’s the same idea.
1 Like
Now you can customise the colors by adding the following entries to the [False Colors Map] group in the options file:
[False Colors Map]
ClippedHighlights=#FF00FF
ClippedShadows=#FFFF00
3 Likes
Hi, @agriggio, I bow down to your feet. Thanks a lot !