It might just be me, but I would hope that we keep the Look section intact. I’m all for maintaining full control, but the Look section is an extremely streamlined way to obtain good results.
No. The automatic does not always work well. I have to correct it very often. Also, sometimes you want to adjust the shadows and highlights with toe and shoulder sliders yourself, which is not always possible when auto black/white points distort the curve a lot.
They are indeed very rarely used, but sometimes it is much easier (faster) to get good results with all the sliders from the look tab. My suggestion would be to keep the functions, but to collapse the whole look tab by default.
This is very restrictive. I would not do that. The functions that are there now are all useful on a case-by-case basis.
3 Likes
Those can be moved to tooltips in the next build, unless I forget.
The current way is how the power control works in all colour grading processes, I think. Edit: in color balance rgb, negative power darkens, positive brightens the image. However, ACEScct Specification - ACES Technical Documentation describes the formula similar to how I implemented it (only our offset is different, to affect highlights less, which people here have found easier to use).

It’s a simple multiplication. Since for slope > 1 the distance between two values increases, the contrast is increased. Also, since the value itself increases, it also modifies overall brightness.
It also affects brightness and saturation.
It’s the ‘b’ in an y = m*x + b linear mapping; the ‘m’ value is adjusted automatically (is not exposed as a control) so 1 will be mapped to 1 (unless changed by the exposed slope control).
For each channel:
m = slope / (1 + offset);
float b = offset * m;
y_with_slope_and_offset = max(0, m * x + b);


So it mostly affects the darker tones.
Try them all here: look offset slope power | Desmos
This is applied after the tone curve, in display-referred space.
2 Likes
There was one more idea: auto-gamma, which can be en/disabled via a checkbox. The idea would be to use a gamma which ‘projects’ the selected (output) pivot y onto the f(x) = x diagonal.
So this:
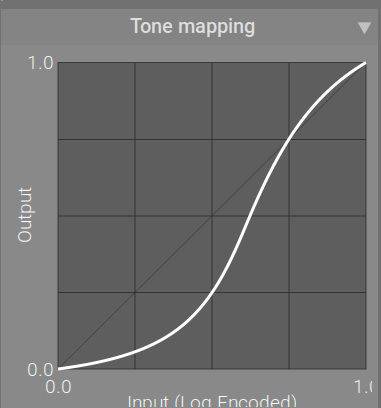
would become this:
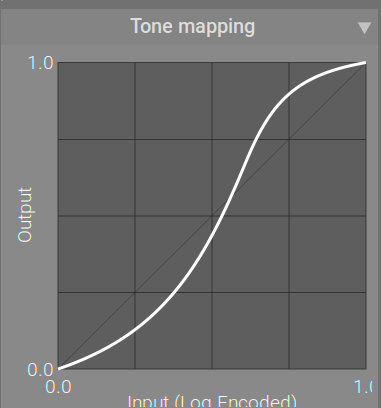
Or a more extreme example, this:
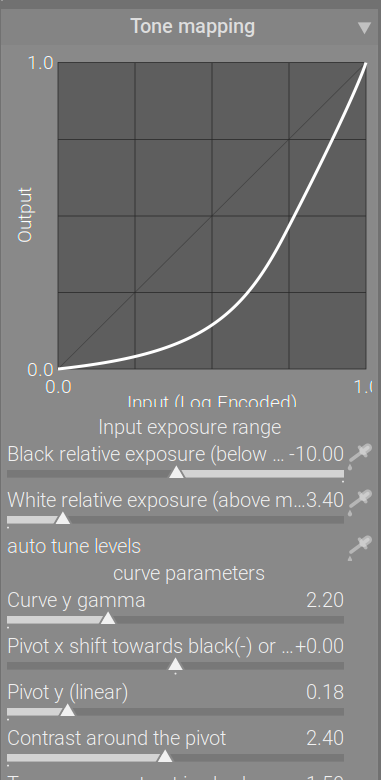
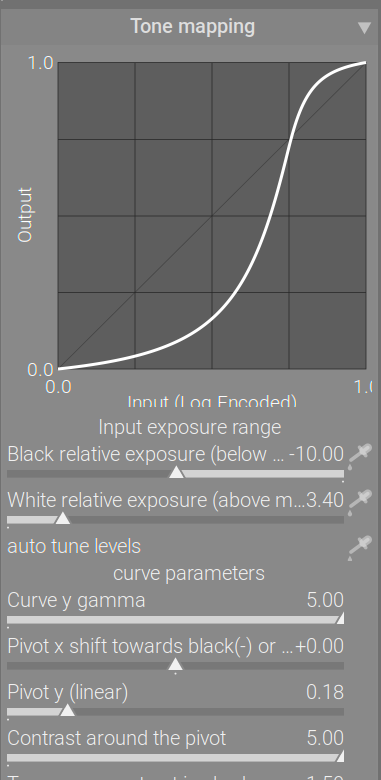
would become

With the gamma set, you get real contrast control (here, I bumped contrast to 5 to show):
The same ‘contrast’ with a lower gamma:

I have no idea if it would be useful, but I could add such a checkbox in the next build, and if it’s useless, can remove it.
3 Likes
This is what happened to me. I could not resolve the issue and only a reinstall fixed it.
When it happened to me I just had to hover until the border grabber popped up and then I was able to drag down and expand the graph again
Thanks! I had a feeling it was in darktablerc, but wasn’t sure which bit to edit.
Ah, that was the key to me solving it. What was fooling me was the border grabber is actually below the X axis writing, whereas I was thinking it was where the dark grey shading starts.
There is a little truncation as can be seen here:
Shift + Alt + scroll is still glitching the module, but now at least I can shrink the graph.
1 Like
I am your loyal tester. Go ahead. ![]()
6 Likes
I don’t know if this is related to the shift-alt-scroll issue, but I discovered that when I compress the graph too far then it’ll cause darktable to abort. It doesn’t seem to have any other effect and I can restart the program without any other issue.
Just chiming in: I’m predominantly using the look tab to do all my edit since I find it very quick and easy to get good results with them and have developed a good intuition of what they do. Hope they will still be available in the final version.
Of course if the majority of people agree that they’re useless sliders then so be it I will wait for the @s7habo tutorial on how to use the other sliders to achieve the same results ![]()
Thanks for all the effort! You guys make darktable really awesome.
5 Likes
I would suggest to put the explaining texts of the sliders into tooltips.
3 Likes
@kofa maybe wait a bit with the tool tips - do you mind if I try to do this myself?
2 Likes
It’s been a community effort (see the GUI changes from @MStraeten , for example), so sure, take a shot at it. I don’t care much for GUI programming, anyway, so if you give me a hand, I’ll be more than happy. ![]() (Most of the GUI code from my side was done using an LLM.)
(Most of the GUI code from my side was done using an LLM.)
3 Likes
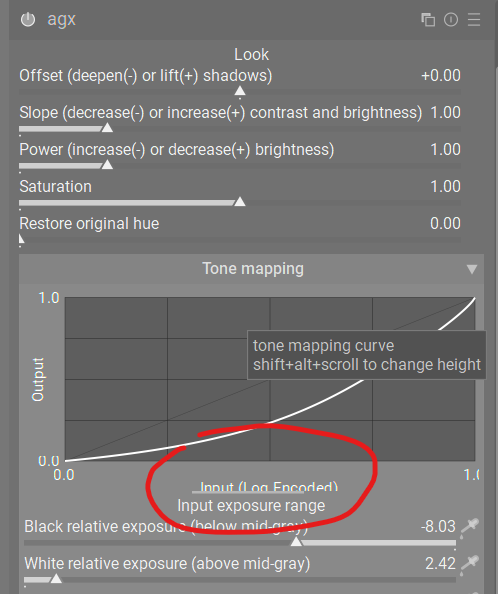
I don’t think those sliders are going anywhere. People will have to understand the difference between the sliders affecting input (basically: the exposure range), the mapping of that input (the curve params), and the display-referred post-processing (the look). The important part is, if any part of the range is clipped due to the black/white relative exposure, there is no way to restore it using the look. If any clipping (or excessive contrast reduction) happens during tone mapping (flat parts of the curve, e.g. due to too high target black / too low target white / too long linear section / too high power, again, there is no way to restore those using the look.
Hopefully, the default curve (-10 EV … + 6.5EV around mid-grey) does not clip much (that is, not much of the input is below -10 EV or above +6.5 EV middle grey, or more than -12.5 EV below / 4 EV above diffuse white), and it is certainly free of very flat areas.
7 Likes
The commit is ready but I couldn’t test yet because my internet is so slow…
I think the download still needs at least one hour ![]()
![]()
It’s an extremely tiny commit, basically nothing, but I need to test because I’m not good at coding.
You don’t need to download anything, you can edit files directly in GitHub. Open the file in my repo, edit it, and when you save your changes, it should open a new branch in your repo, and then you can raise a PR against mine.
Thanks for the update, I’ll have a look. Not today, though: I’m going to the local photo club tonight.
Yes, but I WANT to test before I create a PR.
3 Likes
You can use
git clone --branch<...> --depth=<X>
(say, with a depth of 1) to speed up the cloning.
1 Like
And you can disregard the integration tests.
git config submodule.src/tests/integration.update none
1 Like
I just did a bunch of tests of the module using old pictures made with my Nikon D90.
I’m just willing to throw away all my old edits and redo everything with this AGX module .
What I found while playing:
- I used almost always the same set of Look values as a base edit
- Then played a bit with the tone mapping to further enhance the result
- I can quickly get satisfying results, even with backlit subjects
- while in some edits I was using a mix of color balance RGB + Tone equalizer to get my result, I’m now only using AGX.
Allowing to tweak almost every aspects of the curve gives a lot of power.
Thanks @kofa for that port of the blender’s module.
8 Likes