Developing a FOSS solution for inverting negatives

Hello,

one more caveat:

If you want to remove gamma-correction and are already in the integer space, this transformation is not unique for the higher intensities, since different values in linear space project to the same value in gamma-corrected space (integer).

Hermann-Josef

Thatā€™s great will explore that and see where it goes! BTW all the outliers are positive. i.e. they are the highlights only.

On one hand I agree with you. To do everything properly is way to ambitious, and I never envisioned doing it 100% properly. But I am a firm believer in the 80/20 rule. So far maybe I have 15% of the work complete, maybe with a bit more thought and help I might complete another 5%, which is realistically my limit. This I feel would be an improvement to whatā€™s on offer.

Certainly I have got some good ideas.

Very possible, but I donā€™t yet fully understand what ā€˜tonemappingā€™ is, but I certainly like RT.

Thanks very much once again, especially the image. I was doing some experiments with a step wedge, and doing tests against commercial scanner software. I will explore that properly this week.

That could be my problemā€¦ :grinning:

The equation I posted is supposed to represent the analogue inversion of a film negative. It is presented in a paper by Dunthorn. It took me several days to understand it because I donā€™t have those skills or brains, but I do understand other crucial parts of the process. In this software space your choices are very restricted and in FOSS non existent (at least that that i am aware of), you can use what is embedded in your scanner software, and the good one is expensive and annoying. However from work flow perspective even the optimal setting by definition creates some clipping, so thatā€™s a restriction in itself. You can of course ignore all that and ā€˜attemptā€™ a fix later, thatā€™s essentially what colorperfect does, with a linear scan that is not clipped, or use your own methodology. I am quite happy to purchase colorperfect (and I have) but I then need to work in Photoshop or Photoline.

So my aims are (now):

To create a FOSS solution for inverting negatives that:

  1. Provides a practical workflow, such that no significant decision needs to taken at scan time. i.e. Scan once and never again.
  2. Provides a very high quality inversion that needs minimal refinement
  3. Provides an input into tools like RT that is optimised to complete that minimal refinement.

Ha, not yetā€¦ right now, just 8- or 16-bit, one-color or three-color images. I really didnā€™t know fp was a supported pixel type for TIFF until this thread. Iā€™m adding it to the 0.7 punchlist. Thatā€™s a no-brainer, as rawprocā€™s internal representation is fp; any image opened is converted to fp 0.0-1.0, including 8-bit JPEGs

rawproc has RGB min/max stats in the Image Information popup menu you get when you right-click on any tool in the chain. With that, you can see how the tone range is exceeded in either direction, tool-by-tool.

Hmm quite a rabbit hole this thread, as expected with any mention of colour space!

Some questions occur regarding the inversionā€¦ what number range is the input? Any 0 values will obviously result in an invalid result. Is there a link to the paper somewhere (maybe I even missed it on this page!)? It seems simple enough that perhaps layer blending modes could accomplish the same.

Gā€™MIC could also do that part easily - internally it doesnā€™t care about ranges, a float is just a float and data is just data (not even necessarily an image). Yes Iā€™m also a big Gā€™MIC fan :slight_smile:

1 Like

Hereā€™s a link to what I think is the paper to which you refer:
http://www.c-f-systems.com/PhotoMathDocs.html

Iā€™m working through it, interleaved with housekeeping chores on my own contrastingly simple softwareā€¦ :smile:

1 Like

Thanks, that doesnā€™t look too onerous at a glance. Thereā€™s a lot of explanation which would take time to read, it does mention dealing with values at the limits and the problems encountered (which may be the hardest part). I too hope to get some time to read it all!

typically normalised values of .1 to about .5

I need to finish some other stuff that the script does to do with cropping, but hopefully will post it on github next week.

Elle, I have moved a little further along, with what I was working on, and realized now the last piece of the puzzle that I need to implement is some tonemapping of the highlights, (or just math that will work well enough)

For the moment this needs to done outside of RT, in imagemagick. But I am looking for clues/inspiration on how to implement a curve like this: specifically the curve inside the box, but flipped around to work on the highlights only.

Screenshot from 2017-11-07 22-51-35

Hmm, this is a short question with many possible answers. Iā€™ve been experimenting with PhotoFlow filmic curves:

There are links in the above thread to some nice papers. But the PF filmic stuff is not easy to control, and further discussion of the PF filmic curves should probably be done in the above thread (where Iā€™m planning to make a post in the next hours or couple of days).

The base curves in darktable are well worth looking at - there are presets that emulate various camera styles from various camera manufacturers - these curves are all basically ā€œfilm likeā€ and can be modified until you see something you like, and then you can save a new preset.

What you are asking for is basically just Curves, but finding the right Curves algorithm and interface isnā€™t the easiest thing to do. Iā€™ve been trying to figure out those HD curves myself, but I suspect you know a lot more about them than I do.

Any ā€œfilm-likeā€ or ā€œprint-likeā€ curves shown in various digital imaging forums are suspect from the get-go unless they specify the actual RGB working space.

Most algorithms and LUTS that purport to be film-like fail to mention to the user that the actual tonality of a paper print made using traditional darkroom processing depends on the film, the film exposure and processing, the paper on which the film is printed, and the process and chemicals with which the paper is developed. So at the very least that nice highlights rolloff in a paper print is the result of not one, but two ā€œwet darkroomā€ transfer curves, each of which depends on many variables. This is why I find the PF filmic tonemapping both intriguing and frustrating - all the ingredients seem to be in place, but Iā€™m having trouble getting the sliders to correlate with what I think I know about the things the sliders seem to be emulating.

Other people hopefully will chime in with references to algorithms in various softwares for emulating the rolloff in the highlights achievable using traditional darkroom techniques.

1 Like

Like this?

image

Couldnā€™t you just apply a curve or two to the data using -fx (IM) or fill (Gā€™MIC) and then compare the result with the analog counterparts, rinse and repeat?

As people have pointed out, the shape of the curves will vary depending on your input and output data and what your expectations are. I think your post, #42 (which is apparently the Answer to the Ultimate Question of Life, the Universe, and Everything), would have been a great opener to this thread. Now we know what you are aiming to do. In general, it is better to put this up front so we know where you are going with your questions.

BTW, I just changed the title, category and tags to reflect the thrust of this thread. Let me know if this title is okay and / or feel free to refine it if you have the privileges.

Gā€™MIC can be useful for testing curves:

gmic 256,1,1,1,x/256 -dg 400,400,1,1

Which gives:

flat

So perhaps a mirrored gamma curve : 1-(1-x)^g

gmic 256,1,1,1,x/256 -oneminus -^ 2.4 -oneminus -dg 400,400,1,1

mirrored-gamma

In any case a LUT will usually help speed wise.

2 Likes

Thanks for those, I think I managed to do all the heavy lifting now, in that what comes out of the script is what would be projected by an enlarger. Itā€™s colors and intensities are correct. This curve is for the paper the ā€˜personality of which I am not try to modelā€™ as it has a very constant gamma, except for the toe, which is where I want a little bit of highlight compression.

This will allow me to use a ā€˜betterā€™ exposure in my inversion.

Yes thatā€™s what I intend to but the mathā€™s is hard for me, and toe curve has to be applied at the time of inversion, as optimum exposure creates values greater than 1.

At the moment I just let them clip, or choose a less than optimum exposure and adjust in RT.

The size and shape should be fairly straight forward as I believe it is precisely defined, there are not many choices left to choose from in the world when it comes to photographic color paper. This toe, which is now a shoulder will suffice.

Thanks and this thread has helped me a lot.

Will have a look at that, maybe that will help figure out to apply such a curve ā€œinlineā€ with my inversion.

The curve needs to be applied to values of:

Screenshot from 2017-11-10 22-11-13

Where K is the exposure, Jn is the normalised intensity of the pixel and Yp is typically 1.8

at that font size I can take off my glasses :wink:

1 Like

I find the source of that formula tricky to follow, but not because of the maths - certain ā€˜leapsā€™ seem to be made without explanation. Still reading it on occasionā€¦

If the optimal settings result in values being clipped and youā€™re looking for a way to compress rather than ā€˜loseā€™ them, it suggests the curve/formula itself has an issue for your input.

Edit: some explanation of it may help

The formula written in another way is just (K/J^p)^c where J represents the set of all pixels (but this equally applies to any one pixel individually). Rewritten it can be K^c * J^(-pc) and given that K is some constant of your choosing and we can normalize to any range, it may as well just be J^(-pc).

In other words, this is equivalent to reciprocal then gamma, or simply a negative gamma exponent : J^-g

A demonstration of this using gmicā€¦ letā€™s start with a cat image, negate in the ā€˜digitalā€™ sense then normalise to your input range:

gmic -sp cat -negate -n 0.1,0.5
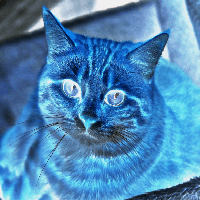
cat1

At that point itā€™s negated. Now try a negative exponent and normalise at the end:

gmic -sp cat -negate -n 0.1,05 -^ -0.2 -n 0,255

cat2

Thatā€™s really all thatā€™s happening with the formula.

Just to be clear, itā€™s basically saying negate with 1/x instead of 1-x. Then you can apply a usual gamma/tone curve in whatever editor you like so long as it has sufficient gamma range. That of course ignores any colourspace or normalisationā€¦

1 Like

Not sure I can explain it fully, as I have followed the approach contained in the documents published, which I believe is the foundation of the colorperfect product:

What does the negate do to the pixels in gmic? is it something like (QuantumRange - pixel)

I get what you say, though it takes me a lot longer. :blush: Though your discussion has made me realise that the highlight compression done by the Photographic paper, can probably be implemented independently, and perhaps that step is not that critical after all as it can be done later. Though I guess only testing will tell.

Itā€™s probably best, that I finish off the last, bits of the work, I was working on and get it on gitbhub.

Sorry I worded that badly - I meant that I was trying to explain it.
gmic -negate is 1-x, but accounting for the range of values (subtract min, subtract from new max).

My point is the whole formula boils down to using a reciprocal to invert, the rest is just setting gamma as you might normally. The article/formula is just a very long winded way of saying ā€˜use reciprocal for film negativeā€™.

Please share what you have so far, with examples and sample files. It is difficult to discuss without something more concrete; e.g., @garagecoder had to use a cat photo to illustrate his point :roll_eyes:.

This compression shouldnā€™t be done much later but right after linear exposure compensation and before gamma correction. You mentioned that JN represents a normalized intensity value. Normalized suggests that the pixel value is already different from the one recorded by the input device, unless the device itself does the normalization, in which case the data is no longer linear.

If accuracy is your aim but you would still like to do some highlight compression to the linear data, then it would be appropriate to compress the highlights only and leave the rest of the data uncompressed and linear. I.e., you only normalize the portion above 1 and the portion in the highlights you are willing to de-linearize.

Finally, check out websites like http://mathisfun.com to brush up on your math. I didnā€™t mention it before because I didnā€™t know your proficiency. There is no shame in looking things up once in a while. I do it too.

For a more advanced discussion, check out Filmic Tonemapping with Piecewise Power Curves ā€“ Filmic Worlds, which I found quite illuminating. @Carmelo_DrRawā€™s PhotoFlow (linear_gamma branch; latest unstable release) has two implementations of this filmic tone mapping method.

Unfortunately I donā€™t have permission to share the scans, but I will create some more than I can share.

But garagecoder has given me the idea ā€œsimulate the scans by creating a digital negative of existing digital imagesā€

gmic -sp cat -* 0.000004 -^ -.5 -d0

Screenshot from 2017-11-12 18-08-33

creates a simplified simulation, as this film has no toe or shoulder, mask and each layer (channel) has the same gamma. I gave up with gmic as for the moment as I donā€™t have the time to invest learning something new right now. But If I had added those additional things, you can easily see that reversing it is no longer simple.

This is covers a lot of my goal but in reverse, and calibrated to the characteristics of the emulsion.

I will take a break from this for a little while, thanks for the help so far.

1 Like

I put a first cut of the scripts/tools on git hub, I have called it scantools:

The goals are to create a FOSS solution for inverting negatives that:

Provides a practical workflow, such that no significant decision needs to taken at scan time. i.e. Scan once and never again.
Provides a very high quality inversion that needs minimal refinement
Provides an input into tools like RT that is optimised to complete that refinement.

Invert scan: has a couple of different ways to try an invert the scan: not sure yet what is the best.

The rest, of the scripts allow you to use a flat bed scanner to scans all the film that will fit on the platter in one pass.

Its far from finished but a start.

3 Likes