Excellent, thank you! I will only use zero suppression for comparisons going forward, thanks for the tip. I see that it is basically a color median filter being applied, to smooth color independently of luminance detail. It definitely should be turned off for comparisons.
It would be most intriguing to see your examples of how false color suppression can cause confusion with demosaicing artifacts. I would love to see it.
I did not optimize eahd for speed because it’s rarely used. Amaze, lmmse, igv, and vng4 are optimized for speed.
Fast is out of concurrence. It’s fast, but only good for anything less than 1:1 view
Thanks, but I am not at all concerned about false color artifacts. Those are well documented elsewhere, and there are a variety of tools to help us mitigate this. And as you said, they usually are hardly visible in a print.
The diagonal line artifacts in AMaZE are visible in prints. That is the problem I hope can be resolved.
To follow up, I’ve conversed with Prof Emil Martinec by email and he has very kindly allowed me to share his insightful comments about the AMaZE algorithm. Rather than try and paraphrase what he said, I’m copying them wholly in this post:
Yes, AMaZE useds a different method for interpolating diagonals and yes it sometimes produces artifacts of the sort you are seeing. It’s a different way of doing the Bayer demosaic that is invoked when there are edges which are more strongly diagonal than horizontal/vertical. The non-implemented aspects of AMaZE had more to do with other parts of the algorithm, not the diagonal interpolation, so would not have any effect on this particular issue. If I ever get back to tinkering with it, one of the things I want to look at is to fix the sort of zipper-type artifacts you are seeing.
AMaZE uses several different interpolation schemes, and then attempts to select the “best” according to some criteria. In the non-implemented parts of the original scheme, there were different interpolation methods, and a different evaluation algorithm (the latter was much more time-intensive).
BTW, the diagonal artifiacts occur when the diagonal interpolation is used. In the Bayer array, along one diagonal are all green pixels, and along the neighboring diagonal are red/blue. So if green and red/blue are substantially different strength or there is a high contrast gradient, one can get alternating one-pixel wide diagonal lines from the differing brightness of the green diagonals vs the red/blue ones. In standard horizontal/vertical interpolations, these effects don’t occur because there is a tendency to make the interpolated missing green pixels more strongly the average of their neighbors, and then the red/blue information is interpolated based on that, resulting in a stronger correlation between luminance values at native green vs native red/blue sites. It’s all about attempting to infer edges at a resolution higher than that of the green pixels in the Bayer array, and if you make a mistake you get ringing artifacts at the pixel scale.
–Emil Martinec
So I think this clearly establishes that the diagonal artifacts are indeed present and are a known issue with the AMaZE demosaicing. As cuniek pointed out, it may be possible to average the brightness of neighboring green pixels with red/blue pixels, like DCB does, and so avoid the ringing artifacts. However, the result of doing that is chunking into 2x2 pixel block jaggies on diagonals, which is what DCB, Capture One V10, Lightroom and other demosaicing algorithms suffer from.
hi @samuelchia, I was just having a further look at this. It’s a lovely photo, I ended up working on it, I hope you don’t mind!, it’s below.
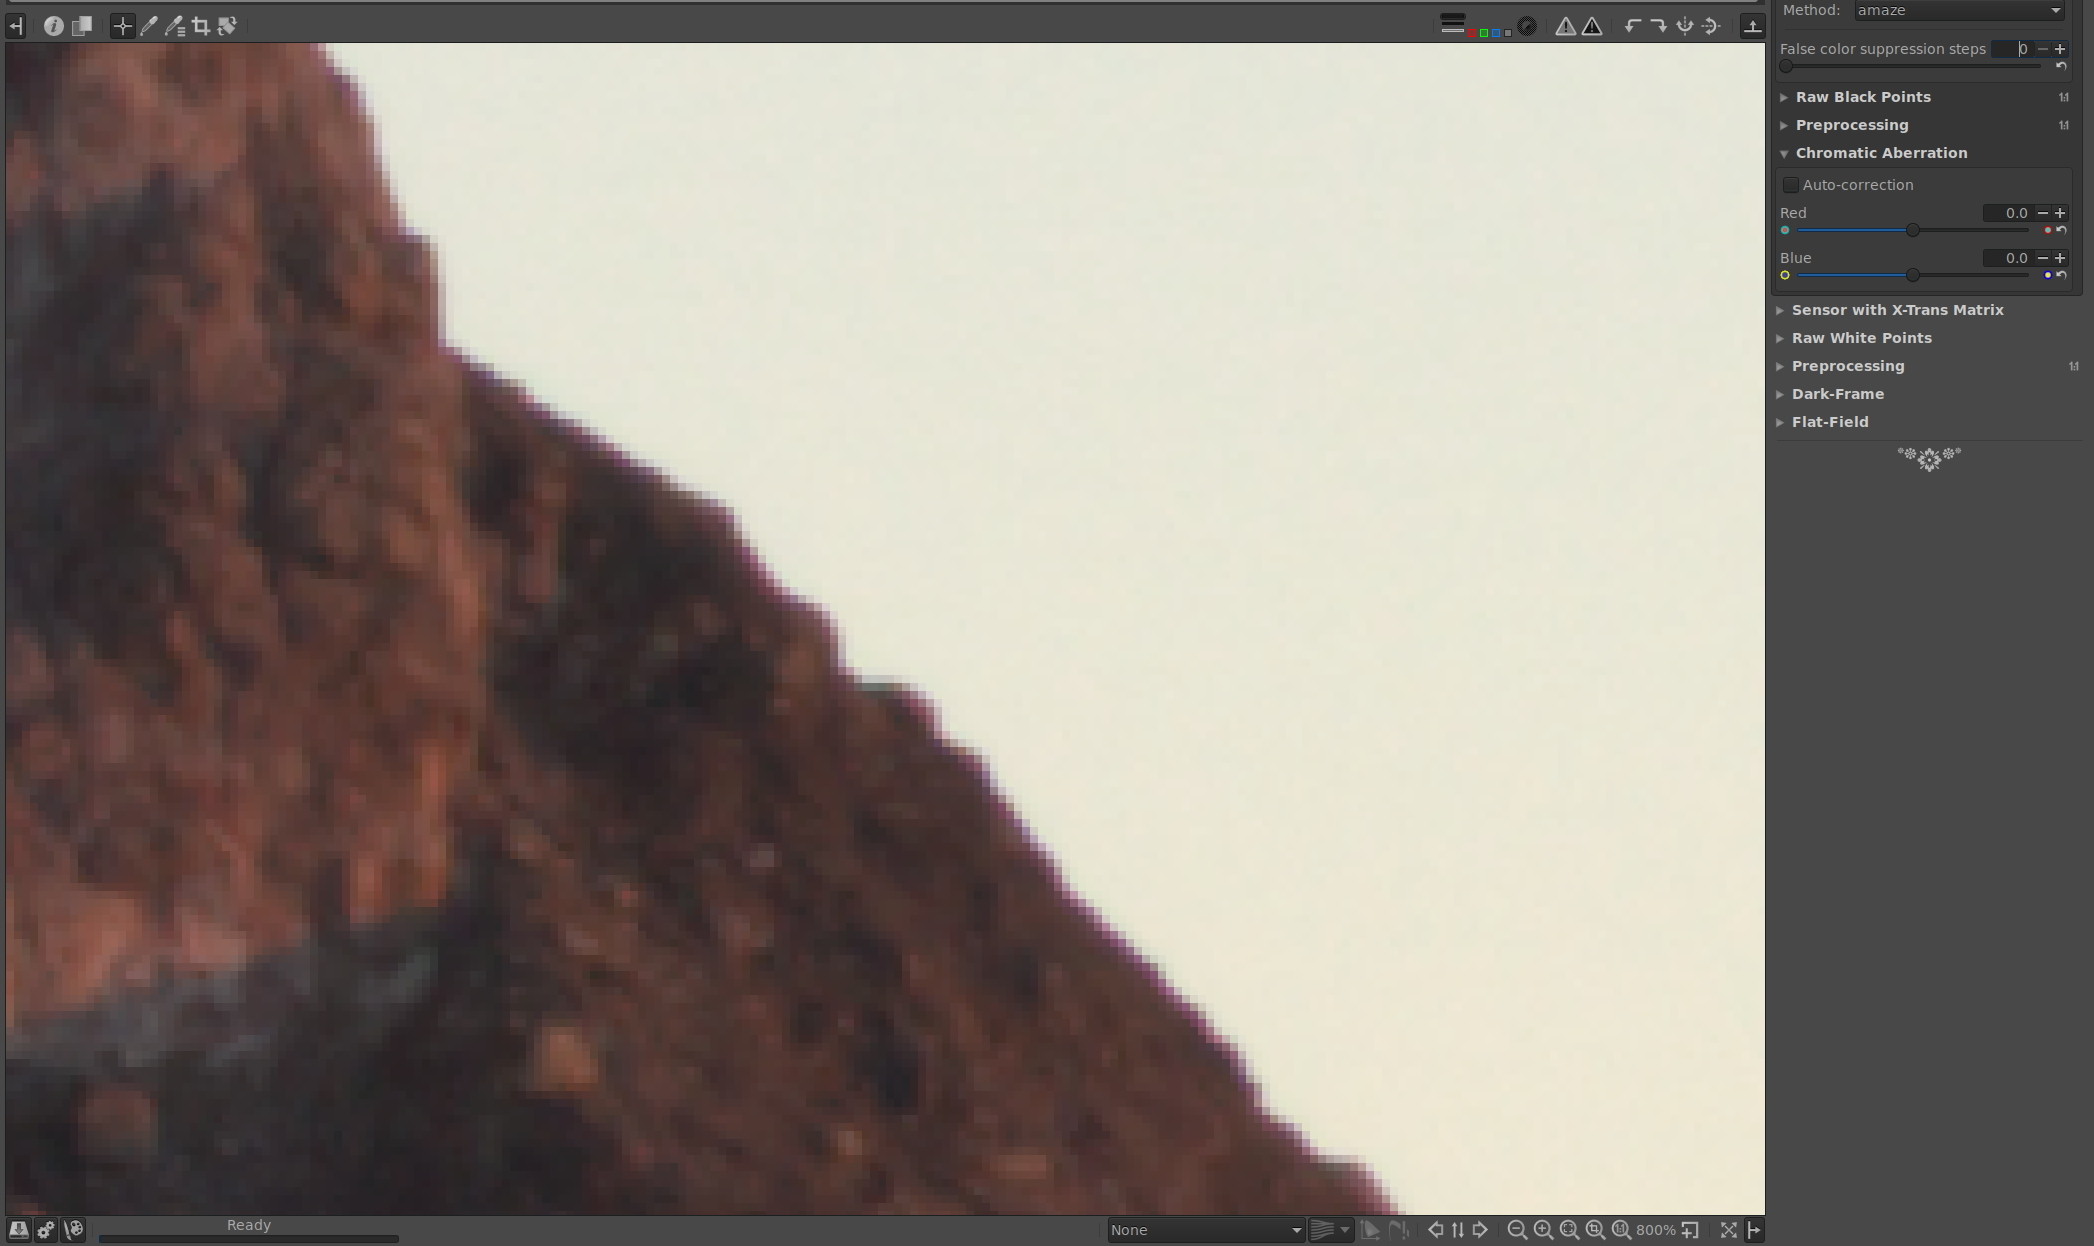
Also below at 800% is what looked to me like the worst bit of the artifact issue. To me, not doing fine prints, this looks like a very small aberration. Also I think one step of False Colour Suppression deals with it.
A great photo in any case.
Thank you for your kind words about my photograph. I don’t mind at all, otherwise I wouldn’t have uploaded the raw file. It is actually one frame of nine for two row stitch. The final image is about 150 megapixels. It’s a view of Gunung Agung on Bali, the highest peak, at sunrise, with the caldera of Batur visible in the distance on the left. Here’s a jpeg of the final rendered image.
Regarding the artifacts you show in the crop, those are false color artifacts. I have no issue with that at all, and I know how to mitigate those. The artifacts I’ve been pointing out so far, are diagonal line ringing artifacts. I can see them in a 40x80 inch print I made two years ago. I can just barely see them in a 25x50 inch print. The area you look at has an edge that is almost horizontal, so it is not good for seeing the artifacts. Look at my crop example above to see an edge that is strongly diagonal where the artifacts are visible. Those cannot be mitigated so easily.
In my previous post, I shared that Emil, the creator of the AMaZE algorithm, recognised these artifacts as known issues, because of the way the algorithm treats diagonal detail.
P.S. I have shared raw files to actual, important, images of mine, which I use to make fine art prints for others, to prove that these issues are real, in real-world photographs, and they do in fact cause artifacts which I can see in actual prints. As these prints are high value prints, and since the issue is proven to be really caused by AMaZE, I am removing my original resolution examples. I’ll leave the crop examples here for anyone else who may stumble on this thread and is interested to study them. Knowing that they appear along high contrast (around 40-50 degree) diagonal edges means that you can easily find them in virtually all your photographs, so my raw file examples are no longer needed.
Hi Ilias, my apologies for missing your reply. The most obvious artifact is the ringing on diagonal edges, not the false color artifacts, of which there are almost none remaining because I applied 2 steps of false color supression. What you are seeing is perhaps chromatic aberration, which has not been removed yet.
Please see Emil’s comments in my post above. I hope this clears it once and for all for everyone that it is not
about false color artifacts.
You should be able to zoom in as much as you like on your laptop? That is no different from me providing a 1600% crop.
Samuel, there are some loose ends here which I’d like to see tied up.
First, your tif with the black arrows is file MG_0292… whereas your raw file is _MG_4593.cr2. Is it possible we’re at cross-purposes here?! (The images seem to tie up fine however).
My screen grab has a small 45 degree section with magenta colouring. However I seem to have gone off piste and am not covering an area you pointed to, sorry about that.
I’ve gone back and located the areas with the black arrows and these are shown below, screen grabs of 800% views, no FCC steps and no chrom.ab correction. There are no lines remotely resembling the very clear lines you’ve shown with the “tree against the sky” picture, i.e. the rows of red pixels and other colours which stick out like a sore thumb and are clearly unnatural. On my PC with my eyes, these are simply not present, as the pics below show. Furthermore, the magenta / reddish pixels become much less pronounced with one FCC step, so kind-of by your own definition, this surely means they are what you call false colours, which you are not concerned about. So in that great scientific tradition, my challenge ! is to provide a raw file which others can process with a recent RT which shows these artifacts.
Here’s a sequence of 3 covering the main area with arrows -
My apologies, there was a slip up in the file naming as I switched folders during saving, and accidentally clicked on another saved file with a different image file name. On windows the ‘save as’ dialogue then immediately overwrites and assigns that name. Pure accident. The crop does indeed come from the 4593.cr2 raw image file.
Indeed, I have done so with three raw files so far. You didn’t even need to challenge me back then and I do not accept any further ‘challenges’ from you. I already have, on good authority, from the creator of AMaZE, that such artifacts are known issues with the current algorithm. It would be great if anyone can offer ideas to help improve the current implementation of AMaZE, if at all possible.
It is difficult to see the diagonal line artifacts on unsharpened raw images if you have an untrained eye. That is why I provided sharpened crops, and the original raw, because you can then render out your own unsharpened versions and compare the issues in the same pixel positions, informed by the enhancement of artifacts from the sharpened crops I provided. I have not encountered a single case where Focus Magic or Photoshop CS6 Smart Sharpening did not work to enhance the artifacts, in a way that helpfully informs where they are physically present in the unsharpened raw conversion.
Here is my last attempt at trying to show you what I see. If you still cannot see it, I don’t know how better to show it to you. The link below is to the same crop from the 4593 raw file. It has several layers. The main pair is AMaZE and DCB, with no sharpening, no false color suppression, zeroed settings in Raw Therapee. First look at the Focus Magic sharpened pair. Toggle the layer visibility between layers ‘AMaZE FM Radius 1 Amount 175%’ and ‘DCB FM Radius 1 Amount 175%’. Note the huge visual differences between the rendition of diagonal edges, and the strong 45 degree line artifacts present in the AMaZE layer. Then switch the visibility of those two layers off and look at the ‘AMaZE’ and ‘DCB’ layers only - these are the unsharpened renditions. Toggle the layer visibility between those two layers only. I hope you then can spot the artifacts now. Toggling the layer visibility - the ‘flash to compare trick’ - is key to being easily able to identify the nature and presence of the diagonal line artifacts that AMaZE produces.
Samuel, the new link is giving me a 4.8Mb TIF. I’m guessing this requires Photoshop, which I don’t have. Gimp supports layers but on opening, it says ‘Incompatible type for “RichTIFFIPTC”; tag ignored’.
I’m on Ubuntu and only have RT and Gimp readily available.
Are you able to supply several discrete files instead of the layers please?
The TIF is the mountain again. Do the layers all originate from the Raw file I’ve already been looking at?
Ah, that you did not make clear before. Not having Photoshop makes it more troublesome to share examples.
Below is a link to a zipped folder, where the layers are now saved as discrete baseline TIFF files, and the filenames correspond to the layers names, so please read my instructions in post #36 on how to look at them, combine these TIFFs into a layered file in GIMP, and toggle the layer visibility between the sharpened AMaZE-DCB pairs only, and then the unsharpened pairs only. I added the Photoshop CS6 Smart Sharpen examples also, since Focus Magic is unfamiliar to some who hang out here.
You can use Raw Therapee’s RL deconvolution sharpening also. The settings shown in this screenshot bring out the diagonal line artifacts. Thanks to Ingo for the infomation about getting PixelShift Branch’s version of RT, but I’m unfamiliar with building my own Windows version of the program, so we will just have to deal with a 800% magnification in my screenshot, rather than 1600%, which is quite unnecessary to see these artifacts anyway.