It occurs to me that if the panorama goes from brighter to darker from side to side you can use the Graduated Filter.
I’m not using Hugin but Autopano Giga, the company and the product was “defuncted” by GoPro a year or two ago but I prefer it Hugin for the control points. In Autopano, I selection a small section of the 2 adjacent images and APG finds all the control point for the section. With Hugin I have to do it manually.
The problem is that Autopano only support 16bit TIFFs and not the 32bit Tiffs
Thanks
1 Like
I want hoping for something magical (a couple of clicks) and RT would match the brightness or tell the brightness to match.
Thanks
Thanks, I didn’t know about that, but imagemagick can convert these.
Thanks
Hmm… Autopano doesn’t have the ability to fix mixed-photometric shots?
I don’t know of a fully automatic method, but a deterministic manual method would be to calculate the EV of all images from shutter/aperture/ISO, choose one as a reference/anchor, then adjust each image’s exposure compensation based on the EV shift from the anchor.
I’m fairly certain RT has some level of scriptability (this is in the category of “functionality I have never used but probably will in the future, ask me for more details in a few months”), so you could probably automate this with a little bit of scripting if you have a lot of broken panos.
@foto make sure you’re using a version of ImageMagick capable of performing the conversion without losing data - look into --enable-hdri and into “quantum-depth” -q16 vs -q32
e.g. 6.6.8.5 - enable HDRI forces Q16 ? - Legacy ImageMagick Discussions Archive
@Entropy512 it can.
I’d like that too.
My usual toolset is dcraw and ImageMagick. I would adjust the exposure with the dcraw option “-b”, eg “-b 0.25” to make it two stops darker (EDIT assuming dcraw is making linear outputs, of course). You can extract the shutter speeds with exiftool, and the ratio of the shutter speeds is the factor you need for “-b”.
To avoid clipping, I would adjust downwards, not upwards.
Isn’t this basically what Enfuse is for? You might be able to run enfuse separately to match exposures, then feed them into a stitching program?
For ImageMagick, check out @snibgo’s pages; e.g., Adding zing to photographs. The scripts are for cmd.exe use, which I find unwieldy personally, but he breaks down the process so you understand exactly what to do in your own context.
I am pretty sure that -q16 is sufficient as HDRI enables float already.
Just adjust the exposure by eye. I’ve done hundreds of 360 panos like that.
If you still get a seam somewhere in the sky or something just use the heal selection in gimp or something like that.
It’ll be perfect 
1 Like
Not even remotely, if I’m understanding the OP’s question correctly.
Enfuse is for performing a bracketed-LDR to LDR tonemapping without an intermediary merged HDR step.
(It can, and is, abused as a method of tonemapping the dynamic range of some sort of HDR input downwards, that is the core of the tonemapping phase of Google’s HDR+ algorithm.)
The OP is looking to salvage a panorama where the camera was accidentally left in autoexposure mode and as a result has different exposures for each image in the panorama. Hugin can compensate for this (up to a point, Bad Things are likely to happen if your input is 8-bit JPEGs with wildly different exposures.). Based on what they have said, they don’t have brackets for each angle in the panorama (if they did, THEN enfuse would potentially be part of the solution. Although HDRMerge followed by RT unclipped or exporting 16-bit TIFFs followed by tonemapping the stitched output is another approach.)
In Hugin parlance, OP is looking for “Exposure corrected, low dynamic range” - not “Exposure fused from stacks”. The latter uses enfuse, the former does NOT.
1 Like
Exposure Value, or EV, is defined in Wikipedia to be “…a number that represents a combination of a camera’s shutter speed and f-number, such that all combinations that yield the same exposure have the same EV (for any fixed scene luminance).” Here’s the function:
EV = log2 \frac{shutterspeed^2}{ aperture}
Yes, we all want to do that in our heads. So, I added EV to the camera metrics I display in the picture panel of my hack software, rawproc. With that, one could open the “reference image”, note its EV, then process all the other images with an exposure compensation that added or subtracted to each one’s EV to make it equal to the reference Image’s EV. Yes, a manual way about it, but in this post I’m really aiming more at illustrating the essence of the problem.
Now, I am just going to have to take my camera out in the yard tomorrow, spray-and-pray an auto-exposed, hand-held set of shots for a pano, and take them inside to the comfort of my office and see if this little bit of information will help me make them equally bright…
3 Likes
Don’t you need to consider ISO as well?
Yes, if ISO or “exposure compensation” has changed between the photos, they both need accounting for.
EDIT: No, as @ggbutcher points out below, a change in exposure compensation isn’t relevant here.
Good call, all three things affect the brightness of the rendered image.
If the ISO was the same for all the images, then the EV number would be sufficient to calculate the compensation. Fortunately, ISO has a linear progression: 200 is one stop brighter than 100, 400 is one more stop, and so on.
The EC effectively changes the aperture-shutterspeed settings used to expose the same light, so the picture with a -1 EC will be darker than one with 0 EC. So, I’d assert consideration for EC is already captured in the EV.
Now, I’m not inclined to change the definition of EV on my information display, I don’t want to spend time explaining things like that to folks who just read Wikipedia. In noodling around with this, I discovered that exiftool calculates a useful value for its Composite group, Light Value. It has the following definition:
LV = 2 * log2(Aperture) - log2(ShutterSpeed) - log2(ISO/100)
I’m a large fan of using established convention, so, I put that into the picture display. Here’s a screenshot:

The information display is at the bottom-left of the picture panel. EV and LV are calculated specifically using the two equations I posted above. Note the LV is different from EV by about 2, which is the number of stops different from ISO 100 to ISO 400
One thing about exiftool author Phil Harvey’s LV is that he anchors ISO to 100. Thing is, there are old cameras still in use with base ISO of 200, and there are high-end cameras out there now with a base ISO of 64. As an absolute measure of something, I think anchoring the number arbitrarily would not be good, but for relative comparison purposes such as brightness between two “adjacent” images, it should work fine, methinks.
So, same drill with LV: pick a reference image, determine its LV, and exposure-compensate each of the other images by an amount of stops necessary that would make the two numbers equal.
By the way, I’m also a fan of @KristijanZic’s TLAR (That Looks About Right) approach…
3 Likes
ISO is also tricky because the gain may not necessarily be linear.
You’re talking about some cameras’ shift at some higher ISO, no?
'Speriment #1: ISO 100, Aperture Priority
So, stepped out the front door and took three pictures, ISO100, Aperture Priority exposure at F8, just tried to get overlap between adjacent shots. I’m not a pano-guy, so first lesson learned: 24mm is too wide a focal length! The far parts of the image aligned, so that’s good enough for brightness considerations.
Here’s the camera info for each:
DSZ_4013.NEF: 1/640sec f8 ISO100 EV15.3 LV 15.3
DSZ_4014.NEF: 1/320sec f8 ISO100 EV14.3 LV14.3
DSZ_4015.NEF: 1/250sec f8 ISO100 EV14.0 LV14.0
Okay, got shutter speed variation, so that’s good. BTW, the metering mode I use is highlight-weighted matrix, so the images you’ll see in a bit are dark, by design. Oh, and that goes with a EC of +1, which stayed the same for all three images.
The first interesting thing of note is that the brightest image out-of-the-box is the LV14.0 one, next-brightest is 14.3, and the darkest is 15.3. This corresponds to the EV definition, per Wikipedia: “Each increment of 1 in exposure value corresponds to a change of one “step” (or, more commonly, one “stop”) in exposure, i.e., half as much exposure” (I bolded the last part). In bear-of-little-brain terms, larger EVs got less light.
Of interest but of less importance is that in these images, EV=LV. Yes, since the ISO remained the same, and it shows that the exiftool equation performs identically to the Wikipedia EV equation for aperture and shutterspeed. Well and good, so far…
So, using the 14.0 image as the anchor brightness, I determined that the 14.3 image needs a 0.3 stop EC boost, and the 15.3 image needs a 1.3 stop boost. So, in rawproc, I opened each image, processed it to demosaic, and applied the corresponding exposure compensations. Then, I “stitched” the images together with rawproc-butt (I just slid the windows around to overlap each other at the relevant points…) and took this screenshot:
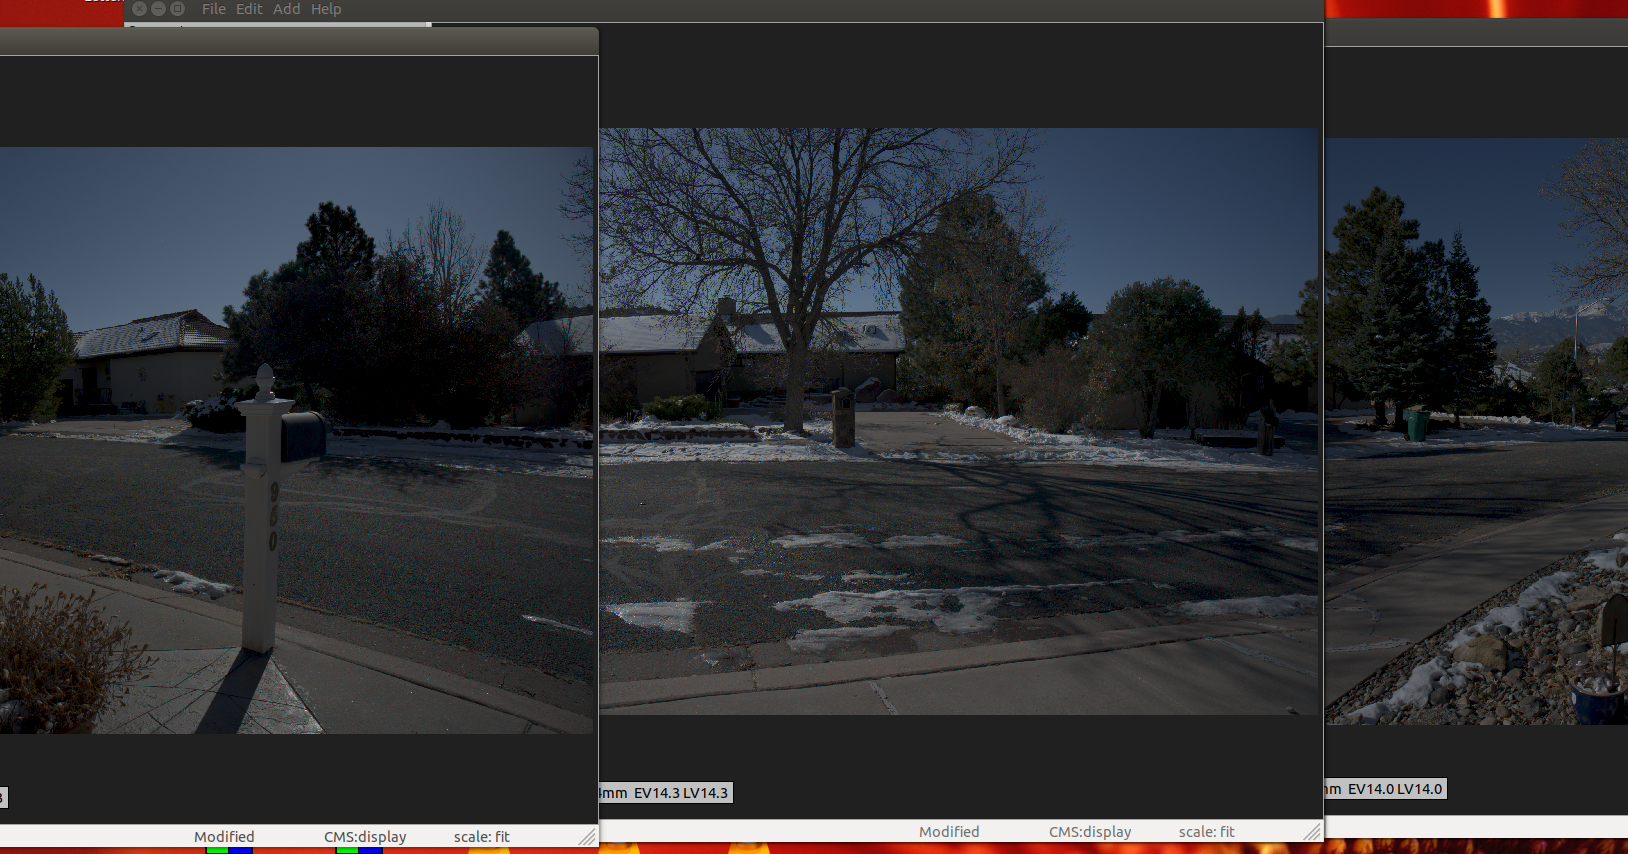
Look at the sky transitions; TLAR, IISSM…
So, without rawproc, one could run the following exiftool command to get the LVs from all the raws in a directory:
$ exiftool -LightValue *.NEF
======== DSZ_4013.NEF
Light Value                     : 15.3
======== DSZ_4014.NEF
Light Value                     : 14.3
======== DSZ_4015.NEF
Light Value                     : 14.0
    3 image files read
Pick the brightest (lowest LV) image, and subtract that LV from the other LVs to get their ECs…
4 Likes
I haven’t played with it, but I recall that darktable has an Auto Exposure timelapse deflickering option that might work for you. Otherwise Lightroom’s Match Total Exposures does what you want.