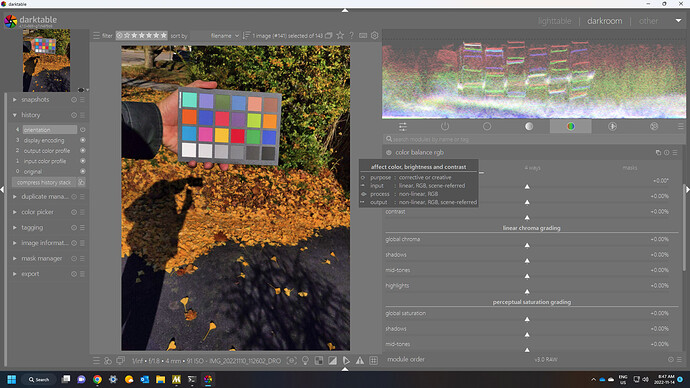
Evaluate the new sigmoid tone mapper just merged into master ...

Of course you should try and get the best possible exposure when you can (what is “best” will depend on the image). But the role of filmic is not to correct errors during capture…

The problem you are faced with in a lot of exterior scenes is the dynamic range of that scene. A modern camera can handle quite a range, much more than paper can handle. So you have to compress the range from your capture. And that is the main function of filmic (and sigmoid), and why it has the “white reference” and “black reference” sliders. (The conversion of scene-referred to display-referred is also done in filmic, but that’s a fairly straight-forward operation which doesn’t allow any parameters).

You may still want to reduce the dynamic range before filmic, but I find I use that mostly to control (local) contrast. Compressing the dynamic range will automatically reduce local contrast; either over the whole image, or in the roll-off at the extremes, depending on the contrast setting (which sets contrast around middle gray). So changing the exposure for some parts of the image can help maintain the local contrast (“details”) where you want it.

Once again, this is all for correctly exposed images!
I said that using rgb levels after filmic can be used to bring punch back if filmic makes it too flat (like the sunflower image if you put the white ev low enough so that it doesn’t turn too white).

This was in the sunflower saga thread about the patch that removed a gamut mapping stage from filmic.

And i said it was probably a bad idea :stuck_out_tongue:

The same as raising the target display to above 100%. Tricks to get a certain result using filmic , but not necessarily the best idea or in the idea of the modules :).

1 Like

True. I just meant in a general sense it’s better to avoid as many problems as you can, rather than fixing them later. Of course there are many uses for various modules.

No it wasn’t you …someone mentioned using it to tweak white and black points…

EDIT

It was this post

1 Like

Hello,

Today I finally developed my holiday photos with the sigmoid module. I had no problems with the “RGB Levels” module.
This is the basic style I used today.
OOC Sigmoid Landscape.dtstyle (7.3 KB)
And the organisation of the modules.
modulegroups_Sigmoid.dtpreset (1.6 KB)
Here are two short videos of my workflow,
2022-11-13 23-17-01.mkv (5.6 MB)
2022-11-13 23-47-37.mkv (4.0 MB)

Update:
When using this style, I turn off Filmic and use the white balance in legacy mode.
Greetings from Brussels,
Christian

2 Likes

So you use this before sigmoid, ie in the pipeline??

Hello,

Yes, I have not touched the order of the modules.
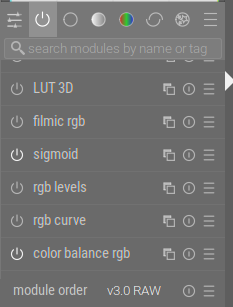
The RGB Levels module is just before Sigmoid and Filmic. For more precise settings, I also tried the RGB Curve.
What I really like about the Sigmoid module is its ease of use and compatibility with other modules.
Sigmoid offers directly excellent results without being an all-in-one module !
Capture d’écran du 2022-11-14 09-38-25

Greetings from Brussels.
Christian

1 Like

I only ask as based on the tool tips this would feed non linear clamped data to sigmoid… its rgb not lab but non linear at least from my understanding and from the tool tip, whereas the tip for curves is mentions linear output…but again I am not sure if curves is scaled 0-1 but I think it has to be correct? Using levels would seem to not provide sigmoid with the data that it might be expecting or designed to work with but in the end you get the results you want…

EDIT:
So the data is not clamped by levels its just not available to be adjusted outside 100%… that part is obvious (cant be adjusted) but I thought it might be clipping the output to what it displayed… so that part is good but I think the output non-linear … for you it may be semantics as you get what you need…

I think color balance says the same thing, ie non-linear output and it comes before filmic and sigmoid… Tone eq and some modules say quasi or frequential processing/output. I guess it can be tricky to see at what point the data are no longer linear and if it really matters hugely

Still its interesting that filmic I believe says it will accept linear or non-linear data as input but sigmoid says only linear… could just be a tool tip thing as there is no documentation yet…

Hello,
Thank you for all this information, unfortunately I can’t help you because it’s beyond my competence.
All I can say is that so far I haven’t had any problems with these two modules :smiley:
Thank you very much for your help,
Greetings from Brussels.
Christian

nice picture. is there a play raw for it? :slight_smile:

A lot of the nuances are explained here and in many other places. I thought that the rgb levels module was potentially clipping the data and so I initially questioned how you were using it…

I’m still not 100% certain that it might be an unnecessary distortion of the data to control exposure when you are following it with a tone mapper designed to work around a middle gray set point but in the end its giving you what you need so its good for your purposes.

1 Like

For the record, ‘non linear’ doesn’t mean that it clips . Just in case you think that.

Tone equalizer also messes with the linearity of the data in a way.

As long as you know what you are doing , a lot is allowed and possible :wink:.

Setting exposure first means that all the modules after it have a correct idea of what is shadows, midtones and highlights. For example , the sliders in color balance rgb require less messing around.

So yes, if you play with rgb levels , any module after that (above that) will have a messy view of what are shadows , mids and highlights. If you know that, then it’s fine by me! If you do it just in front of filmic , most other modules have already done their work.

It’s unorthodox, yes. Very :). But it also clearly falls in the ‘no right or wrong’ area , if it works for you (in this case @Christian-B :wink: ).

1 Like

I have absolutely no idea how it works but if levels only act on data within a range you might get a sharp change at that boundary? When sigmoid then compress the DR that sharp boundary gets pushed back into the visible? Sounds like a terrible idea when the “proper” workflow is available.

Of course if you keep complete check on every aspect of the image you’re editing it doesn’t matter. For me though it’s important to be able to rely on tools not producing artefacts or distortions that you may miss when doing a quickish edit.

Ignoring the whole preserve mode (that is also in rgb levels ) , but a levels adjustment is basic substraction, addition and multiplication .

The ‘gamma adjustment’ by moving the middle point is a power operation. Stuff that can be done on ‘infinity data’ just fine. Negative values are maybe a bit of an issue.

See it like this, if you take the 100% point and drag it to 50%, you are multiplying everything by 0.5 (as in, dividing by two). If you encounter a value that is 350% for example , you can do the same adjustment just fine and it becomes 175%. So far , it works fine on scene data , and you are even still linear.

Exposure is also nothing more besides multiplying.

Now, if you drag the mid point without modifying 0% and 100%. Let’s say you are dragging 18% to 50% without changing black and white. That is a pow() operator , which makes it a sort of curve. So you loose linearity. But that pow() operator is also perfectly fine on a value like 350% without clipping it.

There is no sharp knee here. (I use this all the time in inverting and finishing up my own negative scans , which i do in floating point on a whole roll at the same time to not clip anything).

A ‘floating point’ levels adjustment isn’t that different to an exposure adjustment with some extras. But not something to be scared of.

Still unorthodox, and I keep saying that to make it clear that i don’t go recommending this :). But it’s also not as wrong as putting a display-referred module before filmic :wink:.

If it prevents people from having to go through all modules again and again because if a late-workflow exposure change … sure! If it works for you, it works for you !

I haven’t needed it. But I also don’t mask that much. Take from that what you will.

2 Likes

Hello,
First of all, I thank you for all this information.

I agree with you. I don’t know why, but in trying to do the right thing and avoid back and forth, I tended to overexpose my photos without noticing it directly, as the eye quickly gets used to it.

Super, RGB Levels and RGB Curves are by default just before Sigmoid and Filmic in the 3.0 Raw module order :wink:

For me too, unfortunately all modules that are misused can produce artefacts, as with everything, communication is very important and influences the perception of quality. I would quote the French philosopher Voltaire : The best is the enemy of the good

By default, “preserve colors” was set to Luminance and indeed, on some photos, I had color variations. I set it to “none” by default.

Today, I have again developed a hundred photos, and I am becoming more and more a fan of the Sigmoid module and I use it by default.
I only use the RGB levels module if I need to fine tune the processing.

Greetings from Brussels,
Christian

1 Like

For those so inclined, I believe dt code has plenty of comment notes. Feel free to examine them to see what the tools actually do and if that matches the documentation. Always good to review, since dt development happens at a breakneck speed, especially if you are using master or a branch. Most of us devs become good at what we do that way too - the beauty of FLOSS software.

1 Like

Hello,

If I can contribute to the project and you accept my imperfect English, it will be a pleasure. What is the procedure to communicate you our observations, is it via this forum or via github.
I mainly work on Darktable in French.

Greetings from Brussels,
Christian

The forum is not the best place to report issues. Github and the procedure specified here (development | darktable) may help point you in the right direction. No need for English mastery or even proficiency. Our PIXLS and dt communities are diverse. As long as you play nice most of the time :stuck_out_tongue:, we welcome your feedback and contributions.

3 Likes

Sigmoid works a treat most of the time I’m finding. I can usually cut Color Balance RGB out of my workflow in Sigmoid mode. I just did some quick edits as a comparison and haven’t gotten too deep yet.

This red back drop usually takes some tweaking in Filmic, Sigmoid gets a more pleasing look a bit faster:

Sigmoid:

Filmic RGB:

I’ve also found red brick in shadow to be challenging in Filmic where as Sigmoid RGB is better looking right away and the other colors in the image stand out a bit better:

Sigmoid:

Filmic RGB:

One area I’m struggling is with blown out highlights. Even with the Tone Equalizer module I can’t seem to get as good as a results with Sigmoid quite yet. Granted I think Sigmoid degrades to white a bit more gracefully especially with high contrast but I can definitely pull more detail and color out of the Filmic approach a bit more easily for now:

Sigmoid:

Filmic RGB:

edits: grammar and spelling

13 Likes

V6 Filmic?? Color Pres mode?? For the reds I find v5 much easier…using no as the preservation mode and tweaking latitude and then using the mid tone saturation slider you can get a range of red, yellow oranges based on what you need for the image say sunsets or whatever… v6 can be more of a challenge I agree…

1 Like