Oh, but it is quite awful. I spent the day just trying to get the camera to focus the first image on the very front of the subject, everything else I let the camera figure out, apparently including composition…
Right now, I’m thinking of this capability as a means of QC-ing small parts I can’t see well with my old eyes. Already, I can see I’ll need to polish what I think are “smooth” surfaces, as even resin lithography has its limits…
the area circled in yellow shows the problem @Jade_NL and you have already pointed out: it’s out of focus. In case it’s an important area, it has to be in focus and Nikon doesn’t make it easy for you, you can buy (or better yet DIY) a macro focus rail. That way you would set up everything with your Z6, focusing at the very front of the subject, but before starting shooting pictures, you would move the camera slightly backwards with the rail (it’s better to move the camera instead of the subject; that way the relative position of the lights won’t change). Suggested reading: Using a Macro Lens on a DSLR
I’m not sure about the red area, but just in case: it seems that there’s a stripe of out of focus details, top to bottom, almost next to the left border of the subject. If it is indeed out of focus, it may be because there hasn’t been enough overlapping between adjacent images. That is, the steps between images were too large. It is usually advised that images overlap around 25% for better stacking. You may or may not control what your Nikon does, but if you find out you can’t set smaller steps, you can always shoot from farther away, getting lower magnification, so your steps would be good enough. Your Z6 sensor would still give you enough details after cropping the stack. Suggested readings: (1) DOF Estimates For Macro/Micro; (2) Is it better to use a focus rail or the ring on my lens?; (3) Using ControlMyNikon To Step Focus (commercial software)
the green area shows a typical problem while stacking: bright areas spill over darker areas. This is really difficult to avoid if you’re not careful with your lighting setup. A technical explanation shows that the out of focus brighter areas create some sort of haze over the darker areas. You can reduce a bit the problem closing the lens aperture, but if you close it too much, you will enter diffraction territory.
However, the easier and in the end better solution is using diffused lighting, e.g. with a light tent (which of course you can DIY). That way lighting won’t be so harsh and you will prevent creating some artifacts (at least to a certain degree) like the bright coloured pixels on the right side highlights of the subject, most probably caused by thin film interference, and one pesky artifact (read until the end of the first post) where the subject seems to be moving between shots
in that green area you can also see that you have missed some images at the rear side of the subject, although that is usually not so important (you will usually wish to see the front side and not care much about the rear side of the subject)
all around the subject there’s a ghost image, a halo which most probably will be caused by the stacking algorithm. Just try another app with a different algo
if you need to get details better resolved, shoot your images with your lens wide open. That means you will have to take more images, because of the shallower depth of field
It seems too much for some casual focus stack, but once you get the hang of it you will pretty much focus (pun not intended) on the subject and nothing else.
@XavAL, thanks a lot for this feedback. I’ve always wanted a macro rail, never quite knew why 'till now…
Wondering if what’s going on in the green circle might have to do with the translucency of the material. UV curing resins work better if a bit translucent, so the curing light can reach farther into the material. This resin is probably somewhere in the neighborhood of 30% translucent; thin parts are pretty see-thru, but the material rapidly transitions to opaque as the material thickens.
The ghost was worse in my first stacks, but enfuse has a parameter to control that I added to later processing. Not being familiar with the algorithms, I have some study to do to understand its specific effect.
Well, I can’t be 100% sure if I can’t see the real object, but I bet that at least the effect explained in the link I provided is clearly present in your stack.
I have been tempted so many times to buy one of WeMacro’s automated rails - but then I put it off because I know I wouldn’t use it much, and as an electrical engineer, I’d rather try to DIY it.
The problem with DIYing it is that my mechanical skills kind of suck… But if you’re 3D printing N-scale model railroad parts with an MSLA printer, you might have good success building your own macro rail. I’ve seen from your SSF project that your mechanical skills are much better than mine.
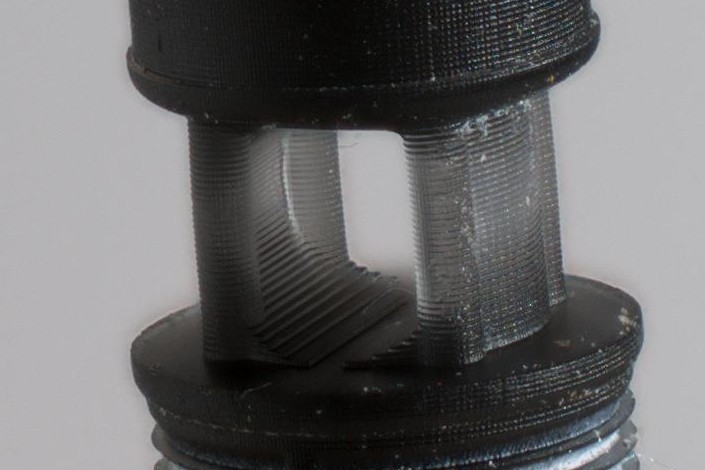
I was looking at the CAD model of this part this morning; those layers may be the resolution of the cylinder that subtracts to make the hole, #faces=90. I’ll have to print it with a higher face count to see if that’s what is showing up here…
It would be neat if we could have access to your stacking set to see what others could do. Probably not for me though due to my laptop’s inability to handle your camera’s output resolution.
Ah, I don’t know which yet. It’s just that when looking at the CAD render, the faces generated are roughly aligning with the stair-stepping I’m seeing, particularly in the standoff between the two cylinders:
I’ve been very tempted by an SLA printer, I primarily just don’t have enough space for Yet Another Printer, especially with the ventilation requirements for MSLA.
All (well, mostly) scrap wood; the inline fan is a 200CFM jobbie for grow tents, and there’s a cheap Amazon heater in the cabinet and a grow tent thermostat hung on the outside. I don’t have room for a cabinet large enough to let me manipulate the printer cover, so I’m experimenting with the slide-up plexiglass covered with a red acrylic film for UV filtering, and just running the printer without its cover.
I’m not too worried about off-topic stuff here; SLA printing is an elemental form of imaging…
I would be specially interested in the present stack, because of the flare/haze problems it shows. I would like to investigate a bit if it can be improved.
And about the printer: if the standoff between the 2 cilinders is the most important part for you, maybe is worth trying to print the part lying down, with the hole facing up. That way you could take advantage of the greater horizontal resolution of the printer: it seems the vertical resolution (or steps) is coarser than the horizontal resolution. The downside is that the cilinders would become less «polished» and will show those steps
It’s 385MB, took a hour to upload on my dodgy internet.
Actually, my priority is the resolution of the fins on the lower cylinder, and the vertical orientation nicely renders that. I’m not sure if the stair-stepping in the standoff is the printer or my CAD resolution, so I’ll test that in a couple of days with a higher CAD #faces setting. Even if it’s the printer, I think I can live with it, especially if painting will fill it in. Looking at my other models in this scale, I don’t think it would be noticeable as-is anyway, just have to keep “rivet-counters” from bringing their magnifying glasses…