@XavAL, thanks a lot for this feedback. I’ve always wanted a macro rail, never quite knew why 'till now…
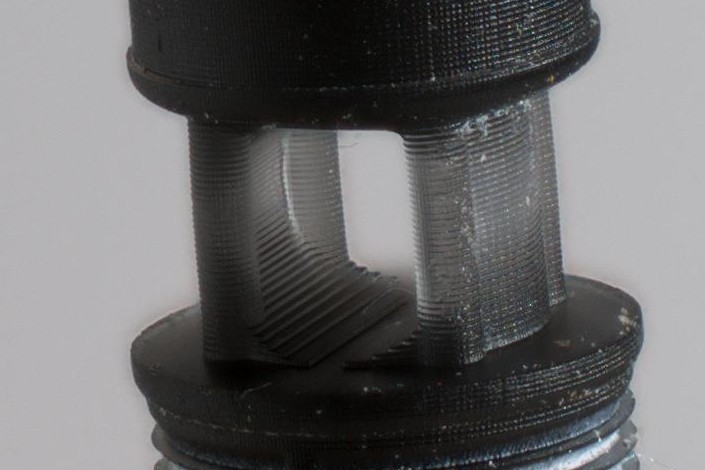
Wondering if what’s going on in the green circle might have to do with the translucency of the material. UV curing resins work better if a bit translucent, so the curing light can reach farther into the material. This resin is probably somewhere in the neighborhood of 30% translucent; thin parts are pretty see-thru, but the material rapidly transitions to opaque as the material thickens.
The ghost was worse in my first stacks, but enfuse has a parameter to control that I added to later processing. Not being familiar with the algorithms, I have some study to do to understand its specific effect.
Well, I can’t be 100% sure if I can’t see the real object, but I bet that at least the effect explained in the link I provided is clearly present in your stack.
I have been tempted so many times to buy one of WeMacro’s automated rails - but then I put it off because I know I wouldn’t use it much, and as an electrical engineer, I’d rather try to DIY it.
The problem with DIYing it is that my mechanical skills kind of suck… But if you’re 3D printing N-scale model railroad parts with an MSLA printer, you might have good success building your own macro rail. I’ve seen from your SSF project that your mechanical skills are much better than mine.
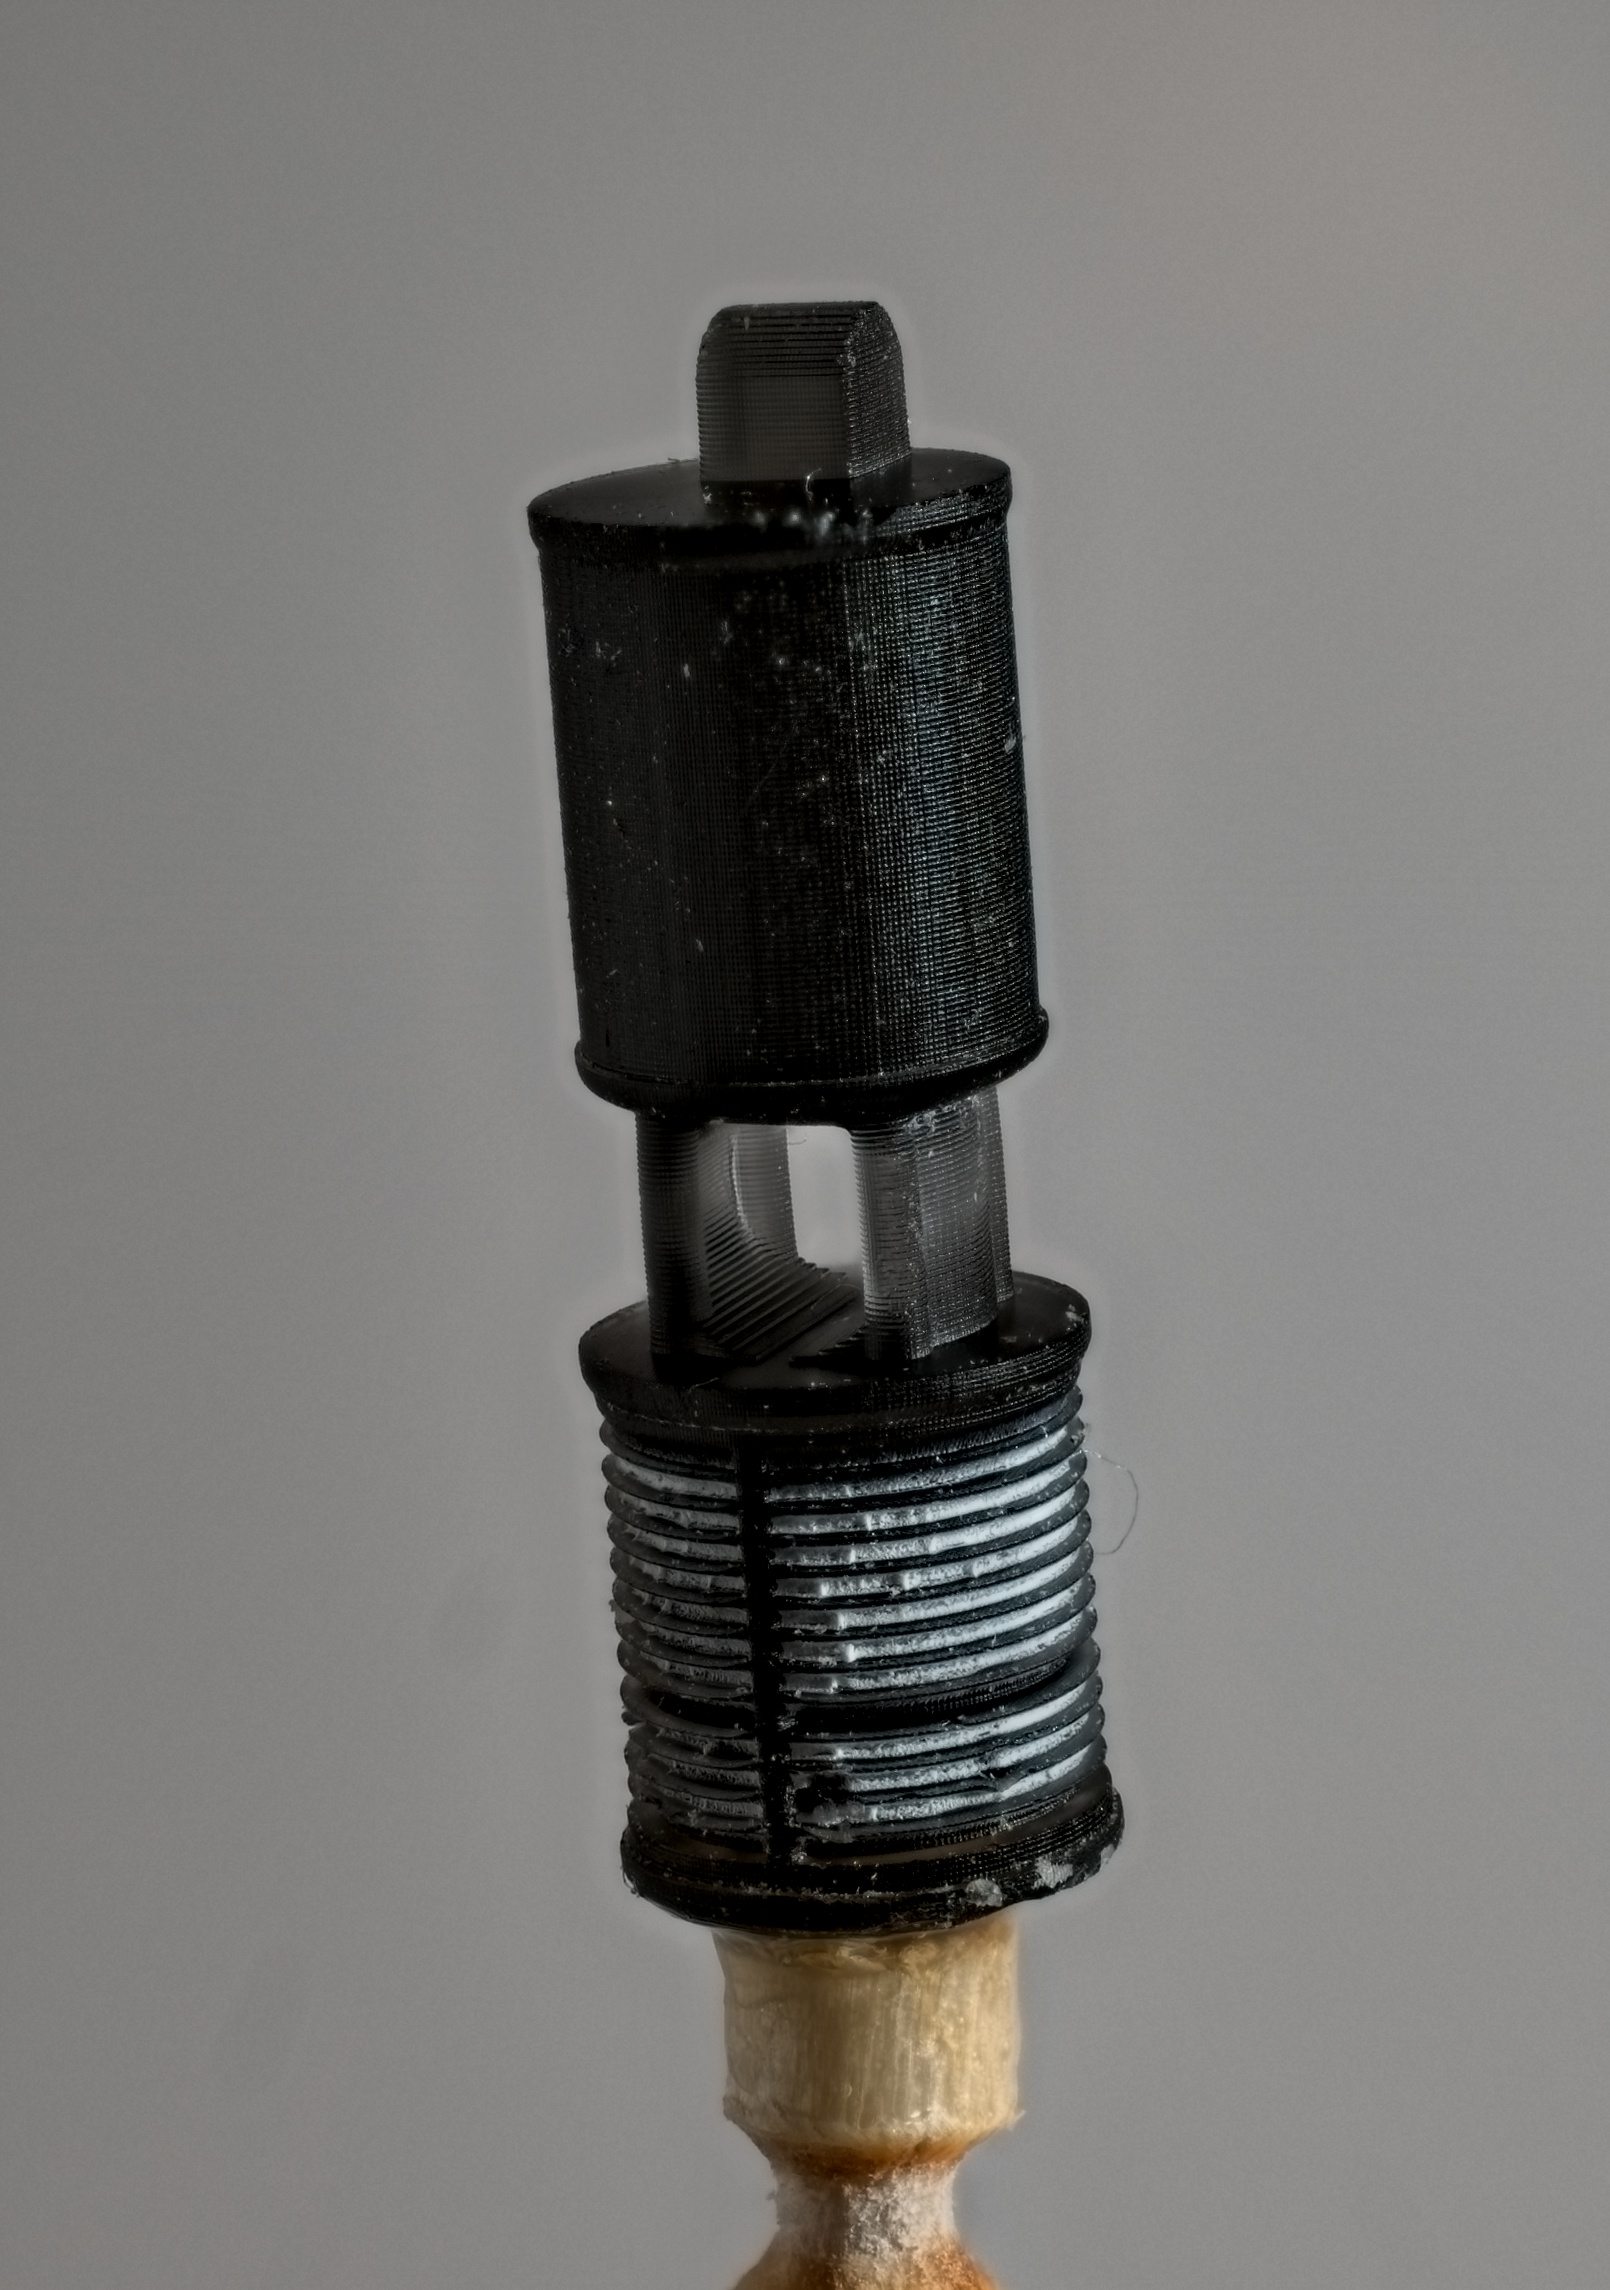
I was looking at the CAD model of this part this morning; those layers may be the resolution of the cylinder that subtracts to make the hole, #faces=90. I’ll have to print it with a higher face count to see if that’s what is showing up here…
It would be neat if we could have access to your stacking set to see what others could do. Probably not for me though due to my laptop’s inability to handle your camera’s output resolution.
Ah, I don’t know which yet. It’s just that when looking at the CAD render, the faces generated are roughly aligning with the stair-stepping I’m seeing, particularly in the standoff between the two cylinders:
I’ve been very tempted by an SLA printer, I primarily just don’t have enough space for Yet Another Printer, especially with the ventilation requirements for MSLA.
All (well, mostly) scrap wood; the inline fan is a 200CFM jobbie for grow tents, and there’s a cheap Amazon heater in the cabinet and a grow tent thermostat hung on the outside. I don’t have room for a cabinet large enough to let me manipulate the printer cover, so I’m experimenting with the slide-up plexiglass covered with a red acrylic film for UV filtering, and just running the printer without its cover.
I’m not too worried about off-topic stuff here; SLA printing is an elemental form of imaging…
I would be specially interested in the present stack, because of the flare/haze problems it shows. I would like to investigate a bit if it can be improved.
And about the printer: if the standoff between the 2 cilinders is the most important part for you, maybe is worth trying to print the part lying down, with the hole facing up. That way you could take advantage of the greater horizontal resolution of the printer: it seems the vertical resolution (or steps) is coarser than the horizontal resolution. The downside is that the cilinders would become less «polished» and will show those steps
It’s 385MB, took a hour to upload on my dodgy internet.
Actually, my priority is the resolution of the fins on the lower cylinder, and the vertical orientation nicely renders that. I’m not sure if the stair-stepping in the standoff is the printer or my CAD resolution, so I’ll test that in a couple of days with a higher CAD #faces setting. Even if it’s the printer, I think I can live with it, especially if painting will fill it in. Looking at my other models in this scale, I don’t think it would be noticeable as-is anyway, just have to keep “rivet-counters” from bringing their magnifying glasses…
I have played a bit (well, not a bit, TBH) and all my suggestions still apply (and some extra ones):
recheck the vertical resolution of the 3D printer: to me, it’s way lower (its resolution) than the horizontal resolution
I’m still not sure if your camera takes too few images: it seems that they don’t overlap enough and there are fuzzy areas where no image had those areas ever focused
AFAICT, the ghost can’t be removed: background brightness keeps changing at every shot. Load all your unaligned tifs on gimp, in a single image, each shot in its own layer. Go to filters > animation > playback. Put playback speed to 0,25x and run it (top left button). You will see what I mean (unless RT is doing some weird things, which I doubt…). So, given that the luminosity of each image is different, the stacking algorithm can’t correct it, and it creates the haloing
I honestly wouldn’t use that 40mm lens anymore for focus stacking: I’ve had to apply a really strong defringing. We are lucky the part is mostly B&W. If you don’t remove that fringing, it will end up in the final stack, and a myriad of colourful artifacts will appear. And the more artifacts you have to fix or remove, the less time you will be checking the quality of your parts
I would use a light tent and continous lighting, unless you really trust your strobe (I wouldn’t, looking at the images)
This is the processing done in all images before stacking them: DSZ_0001.NEF.pp3 (14.1 KB)
Exported as linear tiff, stacked and then reexported to sRGB without any further processing.
I must add that I haven’t been able to stack them with enfuse (the aligning part keep just throwing only one image), so I’ve had to use Zerene. Don’t worry, to me this is a proof of concept, just to show that the bright haloing could be tamed down. You can keep mastering enfuse if you wish…
Yeah, I just let the flash strobe with a 2sec delay for recovery, which may not have been long enough. I’m definitely going to do the next campaign with a light box and my trusty LowellPro halogen spot. That’ll let me switch to electronic shutter, hope that doesn’t bring its own issues…
Not good news on my lens. It’s the Nikkor 40mm DX macro, which I bought primarily to do slide and negative reproduction. Not really good for any other macro application, too short. Surprised at the CA, wouldn’t have expected Nikon to make a lens that bad.
Hmm, I never had an alignment failure with hugin’s align_image_stack.
Regarding the printer, I’m going to try a few prints when I get going again, switching out combinations of CAD faces and Z-increments, easy to do with such a small object (1/2hr to print). Right now all I’m missing is the right foam board to make my vat covers, no joy at the first hobby store just an hour ago. Got one more to try…
You mean this is the AF-S DX Micro NIKKOR 40mm f/2.8G?
Well, you already have the lens. Try to learn how to work with it. E.g.: focus on the farthest point and fill as much of the sensor as possible (increase the magnification). That way you will have to zoom in and crop much less, thus the CAs won’t show as much (will be much easier to remove). You have to frame the image focused at the farthest point, because the subject will be bigger at the sensor plane focusing that way.
There are other exotic possibilities to work with that lens (reversing the lens, …), but the quickest and easier way should be filling the sensor as much as possible.
One thing I forgot to add: given that you are going to use a spot light, and I think it will be strong, you can control how deep the shadows are going to be by bouncing back some light placing a sheet of aluminum foil outside the tent (working as a reflector). Just adjust the distance to the tent and you will control the fill light.