Sorry, I am not skilled enough to give any advice
However, the PS article gives some ideas (thank you, @RTaubold)
on how to fix the problem – but I would rather have a solution
which would warn in advance, so to speak. Det ville være skidegodt, Egon!
You get me wrong.
I think it’s a bug that the preview is very different from the export. This should never be the case. Do you agree? If yes, what steps can I take to get this problem fixed?
the explanation makes perfect sense. RT had the same problem, which I solved by using a fixed size image (independent of the current zoom level) to estimate the ambient light. (in fact, now that I mention it, I don’t remember whether I back ported this in the official version, I have to double check – though this is not relevant here…).
bottom line, I think using a downsampled image to estimate the ambient light would be a way to fix this, assuming this is feasible in darktable
100% is 1:1 preview so it’s just what fits on the screen.
I’m currently trying to test with a small crop so that I can preview the whole image at 100% but so far I’m getting an ever increasing range of random tangents… But I’ve still got a few more things to try.
This preview vs output issue is not a new problem. The G’MIC plugin is known for such unreliability because it relies on the pixels that are sent via GIMP and then rendered. That is the basis for my question. Even if the zoom level isn’t manipulated, one has to be sure that the rendered image, if that is what the code is querying, is the same image that the processing would be working on to produce the output, with the correct colour management (and conversions and theories) I might add.
I am not convinced by the PS article. Dehaze inherently changes the colours. It is something that I have accepted since dehaze became a thing long ago. Ideally, the changes are corrective. However, the affect of haze is difficult to estimate well, so it is inevitable that there will be some uneven colour shifting and brightness distortions. I guess this is where GANs and other machine learning techniques come in.
The explanation from the previous bug report I linked to essentially says that the effect relies on the neighboring pixels. So if you’re viewing at 100 percent then the neighboring pixels are the same for viewing and export.
Of course, there may be a residual effect missing from the pixels out of view but I wouldn’t expect that residue to be strong enough to have such a dramatic impact. But that’s why I want to try it on a crop so that can be ruled out.
It’s important that the preview and the export are identical or very close so you are able to judge the result of your editing.
This turns out to be a challenge in many situations also and maybe especially when working with haze removal.
In RT many tools are marked with a “warning” (1:1) indicating that the editing result is only reliable viewed at 100%. The 1:1 view seems always to be correct.
In DT you get no warning and even the 1:1 view is not correct in the dehaze example in question.
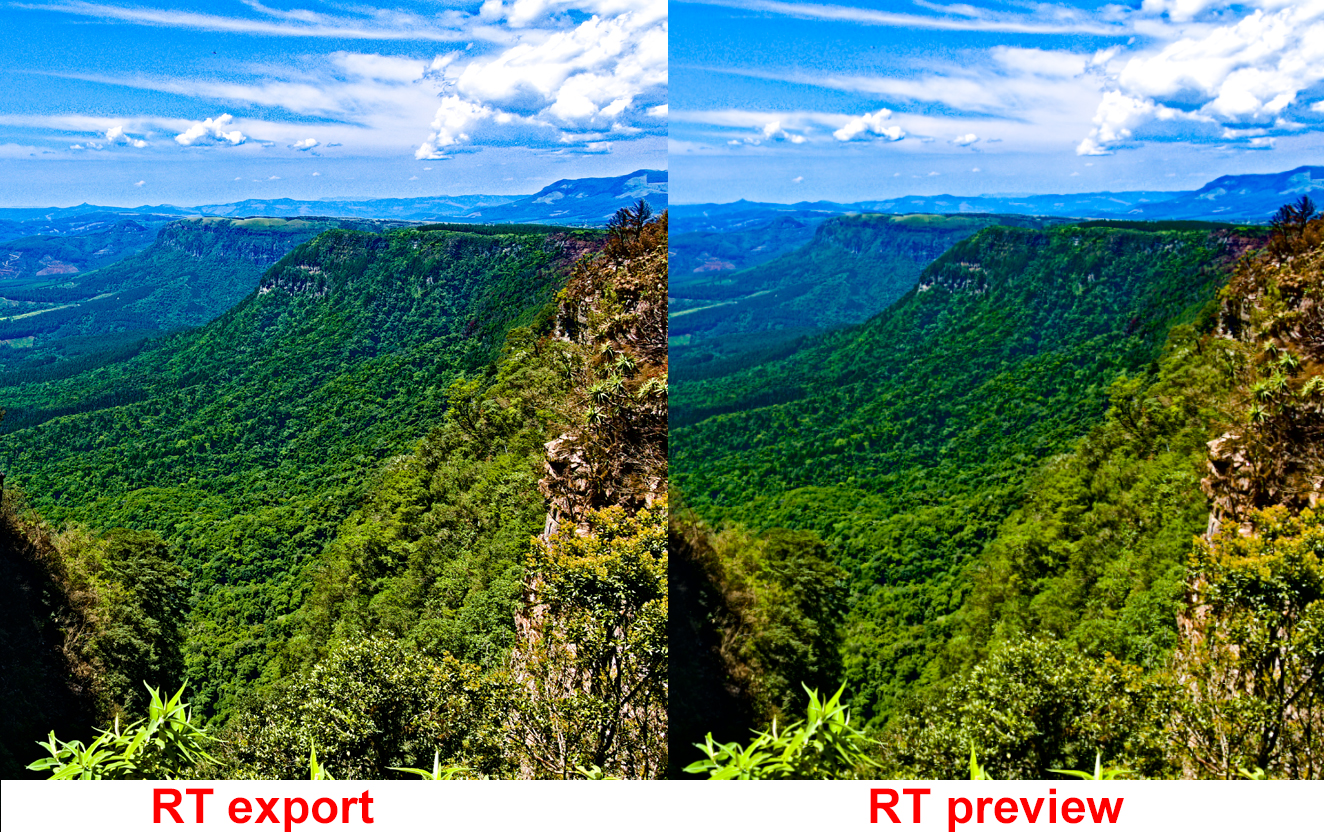
No 1:1 warning is appended to the RT Haze removal tool and the result is excellent in both normal and 1:1 view!
Can the method described by @agriggio be adapted to the Dynamic Range Compression tool or other RT tools? That would be awesome!
I don’t know if the behaviour of the DT Haze removal tool can be classified as being in error but improvements will be certainly appreciated!
Below you will find screen shots of RT Haze removal in normal view. Sliders are set to max. (not pretty) but the views are very, very close!
if you have evidence of (significant) mismatches
between preview and output, please open proper bug reports. it’s hard to fix something when you don’t know it’s broken…
Since there is no 1:1 warning stated on the haze removal tool it seems to me that the method used to construct the preview in haze removal is superior to methods used in other tools where a 1:1 warning is present. Maybe the method could be used in other tools so the 1:1 warning is no longer needed?
If you are looking for an example of the RT preview being different from the export you could look at the following (I don’t know if the code has been changed since the problem was posted or if the problem qualifies to be “significant”):