Should I call this in Windows PowerShell
Yes, Either PowerShell or call the command through the basic Microsoft Command Prompt, also a shell, but a less capable one. Either will do, but I will assume the Command Prompt as that is always available.
The gmic “user experience” is very different from that of "gmic-qt". The latter is a “container” of G’MIC scripts and aims to interact with some host paint program ( as a plug-in extension ) to make those scripts available as “filters” to paint program users. When built (compiled) in a somewhat different way, gmic-qt can also operate, “standalone”, as a command which may be called from a shell. “gmic-qt” furnishes a way for shell-users to access paint-program filters based on G’MIC. That capability is not otherwise pertinent to this discussion.
Please understand that I am not a computer scientist only self-taught, and programming green
Alas! gmic — in contrast to gmic-qt — is a ‘command line interpreter (CLI)’ that interprets “pipelines” — sequences of G’MIC commands — and the building of pipelines is essentially a programming craft. Further, gmic is designed to operate in a shell — all of my (in)famous tutorials simply presume that setting.
The gmic-qt plug-in does furnish Custom Code filters in the Various section; it is handy for writing small G’MIC pipelines so as to obtain a sense of how they operate in a paint-program setting. I do not recommend this setting for writing (and investigating) anything other than short, simple pipelines.
Now, you may not care to spend that much time programming pipelines. Understandable, But the advice being offered here runs along pipeline programming lines. I wager that you are capable enough to follows those lines in a very basic way. Let’s make sure that you can.
First, confirm that gmic.exe can be called in whatever current directory that your command prompt is operating in. Skip past this procedure if you are assured that gmic is in your Windows PATH and that you can invoke gmic.exe from any folder/directory.
From your Windows 10/11 desktop:
- Type “Command” in the desktop Search field, lower panel.
- Windows Search offers ‘Command Prompt’ as the primary result. Open it.
- In a couple or three seconds Windows opens a command prompt window.
- Among other initial indicators, there is a line consisting of a path, which typically starts with a drive letter and proceeds through a sequence of folder names, these separated by back slashes "". This preamble tells you the path to your current working folder (directory). This becomes the operating context of the Command Prompt. This sequence ends with a “>” character and a flashing prompt.
- At this flashing prompt, type
gmic.exe.
- This may fail with the Command Prompt reporting:
"'gmic.exe' is not recognized as an internal or external command, operable program or batch file." You need to add the folder containing the gmic.exe program to the Windows path; see previous posts on that topic.
- Or, the
gmic.exe is indeed on your path and it prints its own preamble. Among other things, it complains: "[gmic] No commands, options or data provided." You haven’t given gmic a pipeline to work on. Of course, you are very keen on providing that pipeline.
One of the most important G’MIC features (my opinion: of first importance!) is that it can be extended with “custom commands.” Indeed, the majority of the nine hundred or so commands that the out-of-the-box G’MIC interpreter knows how to perform are custom commands - G’MIC scripts written along this general scheme:
<name> : <pipeline>
<empty line>
<name> : <pipeline>
<empty line>
       .
       .
       .
The prose in <angle brackets> describe what is to be written; do not literally write <name> but write a brief bit of plain text, beginning with a letter and excluding all white space, that is descriptive of an action. That becomes the name of the custom command. The colon : is the one literal character to be written here. It’s job is to designate the left hand as the key needed to fetch the righthand <pipeline>, a G’MIC pipeline.
During the course of its execution, gmic.exe encounters custom command names; it employs the encountered name to fetch predefined pipelines. Any custom commands that you write need to go in a place where the G’MIC can find them.
One such place is %USERPROFILE%\user.gmic. %USERPROFILE% is a pre-defined Windows environment variable designating a path that varies from one Windows installation to another. user.gmic is a text file intended to contain custom command definitions. The format of user.gmic follows the rules given in Adding Custom Commands.
-
Write the text file, %USERPROFILE%\user.gmic`
-
Within that text file, define a custom command <name> : <pipeline> The left hand side of : becomes the name of the custom command. The right hand side of : establishes what the command does - Or, in your case, the G’MIC commands that you want to apply to your images.
-
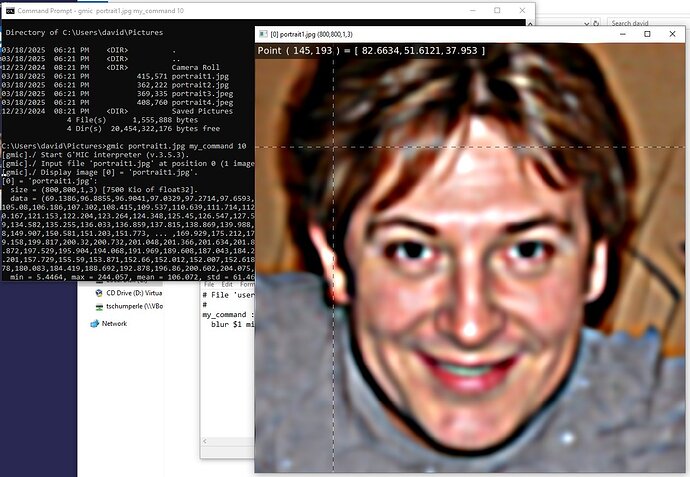
Ensure that G’MIC can find your command and that it works as expected. Bring up a Command Prompt and change directory to the folder where your image files are. Then, at the blinking prompt write: >gmic.exe -input <some file>.<some extension> <your custom command name>. Recall that whatever I write in angle brackets is descriptive of what you write; it is not to be literally transcribed!
-
You will likely repeat step 3. a number of times before you find the sequence of commands that furnish the results you desire, and you resolve various pipeline syntax errors that always plague ‘green programmers.’ You will be modifying your custom command in %USERPROFILE%\user.gmic` a number of times. Keep calm and carry on.
-
In Post 14 @David_Tschumperle furnishes the setting for batch work that does not make excessive memory demands. Replace his demonstration command, blur 10, with your custom command, once you are satisfied that it operates as expected.
Hope this helps.


