I have not tested the speed difference, but on my computer sometimes DT crashes when I engage astrophoto denoise. I believe this is a problem with my computer rather than a DT problem. However, editing the same image in Ansel when this occurs allows me to apply astrophoto denoise without a crash. That is why I suggested Andy the OP might want to try the fork.
BTW, having tried Ansel there is much I miss from DT. I personally use shadow and highlights module a lot. Lets be fair, this module or its equivalent is probably in every piece of commercial software and even FOSS. It is there for a reason. It works well. Then AP comes along and tells as it is bad. Well as much as I like the tone equalizer module and use it, the look is different to shadows and highlights. I really appreciate all the great work that AP has done, but I don’t want to be forced to do it his way and only his way.
In Ansel I also I miss the export module in darkroom view. I do not to have to go back to lightroom view to check or set my export settings. I also love the way DT now names the processing module with the preset used.
As much as I dislike his communication style, he clearly articulated the problems with this module and said its fine as long as you don’t push it hard.
I totally agree with this statement. He also said photography is about the look. So if it looks good it is good.
What I really like about DT’s shadow and highlights module is the ability to soften with bilateral filter if halo effects occur. It is also better to perform multiple instances of smaller values than one large sledgehammer adjustment.
I am working a playraw image at the moment and the dynamic range of the lighting means I am using both the tone equalizer module and the shadow and highlights module.
@hannoschwalm thanks for all the great work you and the other developers put into continually improving DT. I just love the way the modules are renamed with the used preset. A small but nice improvement.
For me the difference in the three images are in the settings chosen by the user. The middle one seemes to have more local contrast but I cannot know the settings used to sharpen the image in Capture One and Lighroom. Just assuming that the sharpen and denoise functions are adjustable in these programs.
The version made with darktable looks a bit blurry, but for me this is a result of the user edit. When I opened the lowest image in darktable the image already had good sharpness and low noise, therefore I just added a bit sharpening with the contrast equalizer and sharpen module (to my personal taste). DSC04771.ARW.xmp (11.0 KB)
I don’t know if others have shown it but I really also like the look that you get by using the watercolor preset in subtract mode…it will be instantly dark and you can see the detail…then you just drag the mask fulcrum tab in the left to return the brightness and dial in the effect… I first saw Boris use it in one of his video’s
Using those 3 layers on a slow computer is painfully slow, and you can get good sharpening with a single instance set up like this. Much faster, and you just fine tune the sharpness with edge sensitivity (or maybe an extra iteration if really needed)
I know I think AP also said not to use the sharpness slider… it is I believe to be reserved to tweak a blur when the module is used like that… but you can use it alone and still often get nice sharpening… Often up to 50% is okay you just can’t change much else from default or you will get dark edges pretty quickly… There could be other reasons I have forgotten that make this not a good idea but hey if it is fast and looks good why not??
I’m getting the same feeling about contrast EQ - I haven’t used it much, as D&S seems to get all the bells and whistles, but at least for simple sharpening it seems to work well.
I’m lazy and should explore D&S in more depth… I use 90% of the time the dehaze preset… It just seems to give the look and degree of sharpening I need… I might add a local contrast one on occasion if I have a pretty flat starting point and sometimes I bump the iterations a bit… I have sort of abandon the the contrast eq… it is good for tweaking noise a bit in certain situations … I guess the D&S is using wavelets in a manner similar to the contrast eq and then its just different math after that on the scale…
Sorry to suggest a different tool, but for what it’s worth I really like the results I get from the RL Deconvolution sharpening method in RawTherapee/ART. In my experience it’s on par with DxO Photolab (which I have) and Lightroom (which someone else used to compare for me in a test).
Tbh, use what gets the job done. If LR is your thing, as is for majority of professionals, use it.
I usually use LR on default Sharpness levels (40), then do additional sharpening in Photoshop, depending on whether that file will be viewed on screen or in print and at what size.
That being said, RawTherapee has one of the best sharpening tools for my taste, but the whole app is painfully slow due to no OpenCL usage.
To sum up, I didn’t learn anything new from this thread.
I am also looking for a D&S module setting that would bring the sharpening quality closer to Rawtherapee or Lightroom. Even jpg photos straight from the camera are better sharpened than those from Darktable. I tried several instances of D&S or contrast correction, but did not get satisfactory results.
If the photo does not contain any details, only simple, large lines, the sharpness in DT is acceptable, but if the photo contains fine details such as grass, leaves, or blades of grain, DT is useless. The photos are either blurry or overly sharp.
I thought that some advanced DT users would know D&S settings that would mimic RT or Lr.
I think the developers of this module themselves don’t quite know what’s going on here, because if it were otherwise, the D&A module would have default settings as good as the competing RT, because there you just need to turn on the tool without unnecessary manipulation, as in DT.
So, after 3 years of learning DT, I’m going back to RT. Faster, more efficient, and better, without the frustration.
Generally jpg’s appear sharper so no surprise there. My experience is opposite - coming from Adobe I feel I can achieve better results here. But then again I have no RT experience. So me be that is better and more efficient.
Before you go - and if you haven’t done so before - I would ask/challenge you to submit a picture - one you like and consider potentially sharp - to play-raw. Ask for sharpness if you like. Download the xmp’s and see how those are developed. But generally - there is no recipe for success here.
Just stumbled over this thread and I’m a bit astonished that people have problems sharpening their pictures with darktable. I hadn’t the passion to read through the whole thread, but there are so many different ways to achieve a sharp output, that I really don’t have a clue where the problems are.
I think @Jetze’s suggestion for a Play Raw makes sense. And maybe you can as well describe what tools you use for sharpening with what settings.
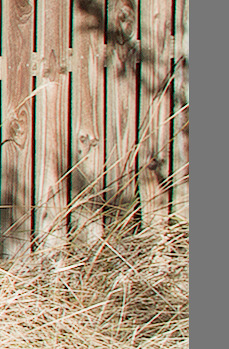
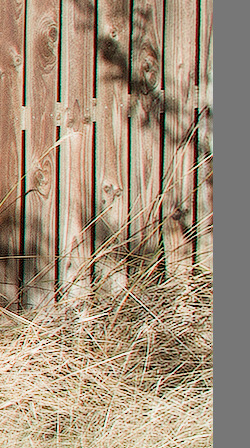
I took one of the pictures from the starting post and processed it.
For me it is that sharp, that you can cut onions with it - if you want more we need other photo equipment.
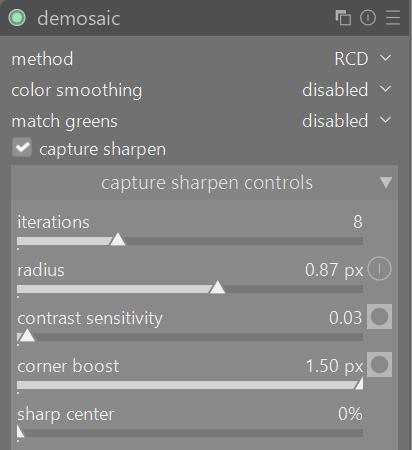
Darktable 5.4 will bring RawTherapee’s capture sharpening (you can try it using the highly builds on GitHub). Of course, if RT works better for you, use that.
I am using DT 5.3 and I have replaced a diffuse or sharpen preset that I used for initial sharpening with the new capture sharpening found in the demosaic module that @kofa mentions. It is sufficient sharpening for many images and if I need more sharpening DT has many additional options in my view.
If RT gives the sharpening and finished looked that a person likes then so be it. But I can get more than enough sharpening from DT. It would be a good learning exercise for us all if @Damian_J could post a playraw that demonstrates the superiority of LR or RT. I do remember liking the initial sharpening in RT years ago.
Just been experimenting with capture sharpening. This image is a crop of the edge of the frame from a canon 10-18mm lens set at 10mm with f22 producing excessive softening due to diffraction. The top image is using DoS module with preset for aa filter sharpening and a second instance of lens deblur hard.
The bottom image has capture sharpening as an additional step. I have maxed out corner boost and reduced contrast sensitivity. I am so pleased with the improvement that I am no longer going to get rid of this lens. I still will avoid f22 because of diffraction but I have used this aperture here as an extreme test of capture sharpening with this crappy lens.
@hannoschwalm thanks for the create work of including capture sharpening in DT and thanks to the original creator of capture sharpening.