How about focus bracketing?
I haven’t tried it myself, but it sounds like it might help. I often end up with pictures like the OP here, even if I don’t use high zooms, and I’m sure most of the time misfocussing is the problem.
How about focus bracketing?
I haven’t tried it myself, but it sounds like it might help. I often end up with pictures like the OP here, even if I don’t use high zooms, and I’m sure most of the time misfocussing is the problem.
Yes, I had a UV filter.
@kulkarniankur I think if you remove the UV filter and try again you’ll get much better results. I’ve seen this before on a Nikon P900 and without the filter the images at long zoom were a lot sharper.
I would recommend testing the setup under controlled conditions: brightly lit static subject, tripod, delayed or remote controlled exposure to eliminate vibration, trying out all apertures from the widest. With minimum ISO.
Then remove one factor at a time, eg stable but handheld shot, higher ISO, shutter vibration… and compare images.
That said, also adjust your expectations to the fact that this is a small sensor camera with a do-all lens. You may not be able to get good shots in all conditions. Knowing the limitations will help you decide when not to bother.
Interesting.
With filmic on, I get this at 100%, with/without high quality processing (a new option that can be activated in the darkroom):
With filmic off:
At first, I thought the preview is picking up on ‘fake detail’, introduced by the hard transitions where the image is clipping (which filmic prevents). So I reduced exposure, but still got more ‘in-focus’ marks on the bird:
To my eyes, the top-left corner is the sharpest part of the image; I only turned on focus peeking when I noticed that the corner actually looked sharper than the bird.
I still think it is a lens flaw, to be honest. Here is a brightly lit blade of grass on the top left:
And two from the top right:
This is without any CA/lens correction in darktable. The screenshots were taken with the same magnification setting and same screenshot area dimensions, I just moved a different part of the photo into it.
The locations are:
@kulkarniankur, @rvietor , @Terry:
I don’t think it’s a shallow DoF problem. Here is the top left corner, a sample from the middle along the left edge, and finally the bottom left corner; the top is in the background, the midpoint is at about the same depth as the bird; bottom in the foreground. They are reasonably (and similarly) sharp:
Top:

Middle:

Bottom:

The same positions along the right edge:
Top:

Middle:

Bottom:

It basically comes down to:
So… Zooming at the far range makes the picture harder and harder to make good. So zooming in far and then expecting to crop (a lot), sorry but that’s not your camera.
So, if you zoom a lot, don’t expect to crop. Your lens get worse , so you resolve less. So make your subject / composition good in camera , not by heavy cropping. Or zoom less . Maybe even try zooming out more to crop , AND a zoomed in version and see what you get out of both.
When I have to teach non-photogs how to take descent pictures at events , I always hammer down on ‘do not try to zoom everything. The camera you use isn’t top end, and zooming in at less than ideal light conditions is very, very for cameras like this’.
For a compact smaller sensor camera I would rather have a faster, better lens without large reach. But that’s me.
The fringing hints that the lens has issues, or a hard time . A filter (good or cheap, or smudged) can make it harder. But it might just be the limits of the lens . Or a slight focus issue (can do a lot on those ranges).
Trying to fix the fringes and lens issues and sharpening with something a big larger radius , and sizing the result down in you can. I think these are the only things to do with this image now.
But for next time , realizing that your camera is at its limits is the best thing . It makes you make a few attempts with different approaches (for me at least ).
Bit lagere aperture, and wide open to get the lowest iso possible. Zoom out a bit more, and one more a bit more zoomed out .
Remember the reciprocal rule. If your effective focal length is 400, you require 1/400th for shutter speed . But that’s an old rule. Modern pixel precise results require more . Your smaller sensor might even more.
Motion blur and lens issues are harder to fix than noise, specially these days. But you always get better pictures with more light in the lens, simple as that.
I agree, but for inexperienced photographers it is hard to escape the allure of superzoom bridge cameras. The box says 60x zoom, but it does not say that images won’t be that good except for some special cases.
I remember my Panasonix TZ90 fondly, as I got quite a few great photos out from such a compact package. But it was disappointing to quickly realize that the useful zoom range is up to approx 150mm equiv, after that it was a joke. And of course only useable in daylight.
I had an Olympus C 2100 UZ, 10x zoom (38 - 380 mm equivalent). At 2 MPx, the lens was good enough throughout the range ![]() (but the sensor had lots of noise, and the lens had horrible CA).
(but the sensor had lots of noise, and the lens had horrible CA).
I think that field curvature is a possibility I would consider first with this kind of lenses: bridge cameras have quite complex yet relatively cheaply produced lenses, so the field curvature may not even be symmetric and slight misalignment can make it appear in corners.
The test in the above article with grass etc is simple to perform, that’s one think I would do first.
Wow… Can you help me do this in darktable?
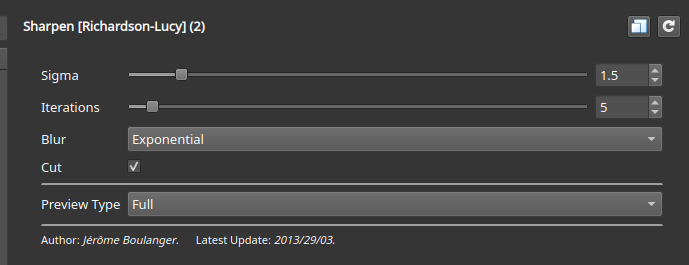
With darktable and after that in GIMP with GMIC’s Richardson Lucy Sharpen:
Far away from perfect but hey…
Very nice… I had never heard of chaiNNer, Can you help me by pointing to a tutorial?
I know of GIMP but I am not aware of GMIC. Can you point me to a tutorial? I am learning a lot from the wizards on this forum!
GMIC is a Toolset with a huge amount of filters. It can be used as standalone Tool or as plugin for GIMP and other tools. It’s website is here:
There are some Video Tutorials here. But there are way to many filters to make tutorials for each. For many, you have to play with them to understand how to use them and if they are useful for you.
I like the Richardson Lucy sharpen filter, because you often can get more sharpening without creating too much noise. Important is a cautious use of the sliders. My settings were this:
Everything is described here. There is information about installation, use and also links to various AI models:
I agree and for that reason I only got myself a x5 zoom Canon G16 for my compact camera. I use it extensively in dim light and get very good results. These ultra zoom x60 zoom bridge cameras just don’t live up to the sales pitch.
This looks promising on my laptop screen.


