Input color profile to use for negatives

I too encounter this a lot with my negs. I use the standard color matrix, which I believe is the only one we should use for the input color profile.

I think it’s a white balance problem, but maybe @anon41087856 can confirm…

Input profile must be set to the profile, the digitizer saves the file. I.e. if you use your dslr as a digitizer and process the raw file, then standard color matrix ist the correct input profile.

But how should the white balance be set correctly, then? There is this in the article on darktable.org:

  1. first the scan is corrected, i.e. the colorimetric deviations brought by the camera or scanner that scanned the film, 2. the film itself is then corrected, i.e. the colorimetric deviations brought about by the film and by its possible ageing.

The first step is done early in the pipeline, neutralizing the sensor white balance, adjusting the exposure so that the histogram of the image occupies the entire 0-100% range without negative values or clipping, and applying the input color profile (ICC) of the sensor used.

There is nothing about how to actually set the white balance. There is no point in taking a spot white balance through the holes in the film, because the signal there is clipped anyway. Take a separate picture of the light source with lower exposure so it doesn’t clip? Maybe, I haven’t tried that.

That is exactly the same problem I have struggled with - finding a way to set the while balance. Especially because I don’t have the option to re-scan many of my negs, I just have to work with what I’ve already got.

On Aurélien’s video, he does take a spot reading from the white of the light source at the edges, but as you have rightly pointed out, this isn’t always reliable because it’s clipped. When I have taken a spot reading of the light source through the sprocket holes, I usually get worse results.

I tried now to set a custom white balance in the camera with an image of the light source (iPad screen properly exposed) and then used this white balance to digitize the same film frame as above. The result is a bit better, but the greens still look radioactive, and the rocks are blue when I make the clouds white.

Maybe post your picture to Play Raw and see what others can do with it?

Until now, I processed several hundreds of negatives with negadoctor since it appeared in dt master this spring. I did a lot of test shoots before I started systematically editing theese shoots in dt. In my experience it is essential to have a non-clipped area (holes in film) with the light source used for taking the shot. I am using a DSLR and as light source a LED flex panel with adjustable color temperature. Shooting the negative I choose an exposure keeping the “white” light in the holes unclipped. For this purpose I’m using the histogram view of my DSLR, adjusting the small peak the film holes create just below the clipping threshold. As input color profile I’m using “enhanced color matrix”. The results one can obtain this way are excellent.

My immediate thought is that if you keep the light source unclipped, you don’t use the full dynamic range of the sensor for actual image data. I’ll experiment further with this tonight.

I might, but if exposure is part of the problem, then there is no point in doing so until I get that part right. And if that solves everything, then there is no point at all. So I’ll first see what I come up with after some more testing.

That is correct, but in my experience (as the result of a large number of test shoots) it is much more important to get a correct white balance with regard to the light source used. Tweaking the white balance and exposure are my very first processing steps before activating neagdoctor and selecting the film base color.

1 Like

Now I have tried to expose the neg a stop lower so the light source is not clipped, and using the correct white balance for the light source in camera. Whether I let darktable use the camera WB or I do a spot reading in a sprocket hole doesn’t make any real difference. I still get the same result. I’ll post a Play Raw and see what you guys can come up with.

Edit: Here is the Play Raw thread: Negatives and color profiles

Well, if you are using a light that is adjustable in color temperature it should be enough setting the temperature of the color balance in the image to fit the light.
You should not need the light in the holes.
You can make a first photo in the session just with the light (no film) without clipping the light and messure in it the temperature and tint to use.

You can do that with any other source of light as long as it emits a stable light.

As you have used the 80D, you should use its colro matrix interpretation as input profile, if what you want is reproduce the colors in the negative.

The negatives have a strong color cast (usually orange in color negatives).
Negadoctor inverts colors and eliminates the color cast.

I think that the radiactive greens come from not properly eliminating the color cast or the cast being too strong in your negative.

It’s because the spectrum of light output by the iPad is so different from the light that was used to create the camera profile. if you think about an iPad screen, there are no white pixels, only red, green, and blue and the most recent iPads (those advertised as having a P3 gamut) have very narrow spectral peaks each color:

Compare that to the spectrum for daylight, which camera profiles are based on:

This is a VERY good thing for scanning film because it works with the camera sensor to create a spectral response that is much closer to film scanners and the photo print paper that they are designed to emulate. For instance, here’s the spectral output of the Fuji Sp3000’s light source:

Notice the gaps between the R/G/B channels. This is imperative for good scans because those gaps are the wavelengths where the infamous “orange mask” is stored. Scanners and photo paper are designed to have extremely low sensitivity to yellow/orange wavelengths of light in order to filter out the mask, but camera profiles expect a very high amount of yellow light, because that’s actually what camera sensors are most sensitive to.

In the image below notice how the cameras red sensitivity peaks at the exact point where photo paper’s sensitivity is lowest. This is the crux of why people have so much trouble getting good color with camera scans. Because the camera is so sensitive to yellow/orange light it is absolutely critical to eliminate the yellow/wavelengths from your light source, either by using a light that doesn’t emit them, or by using a special kind of filter that removes yellow/orange but passes red light. Normal dye based cooling filters remove yellow, orange, AND red, which is the same thing that digital white balancing does.

The iPad screen is a wonderful light for scanning, as are most of the RGB Leds on the market today. Normal LEDs, even the high CRI options, aren’t ideal because they actually emit more yellow light than they do red light. When you combine this with a camera that has more sensitivity to yellow than it does to red (and in multiple channels!) it becomes impossible to get good color without individually tuning the HSL balance of every single image and even then tones will still be muddy and off.

You really need to use a scanning light source that emits as little yellow light and as much deep red light as possible. Here’s an overlay showing the differences in spectral sensitivity between a digital camera, photo paper, and an ideal film scanning light source. Note that the spectral peaks of the photo paper response are actually much narrower than they appear here because they are plotted on a logarithmic y-axis while the camera sensitivity is plotted on a linear y-axis.

The reason that Rec2020 looks so much better is that (1) it is more similar to the gamut of the iPad’s native DisplayP3 color space. When you’re using a backlight with narrow band primaries the backlight determines the color gamut of the image rather than the camera sensitivity primaries as would be the case when photographing with full spectrum light. The goal then is to use an input color space that reflects the gamut of light output by the backlight. Secondly, REC2020 is also closely related to the color gamut of photographic negatives and print material, so the colors of the negative are being mapped very closely to where they are supposed to be. Here’s Rec2020 (white translucent frame) compared to Kodak motion picture print film, which is very similar to photo print papers.

It’s also a very close match to the gamut of this Kodak motion picture film:

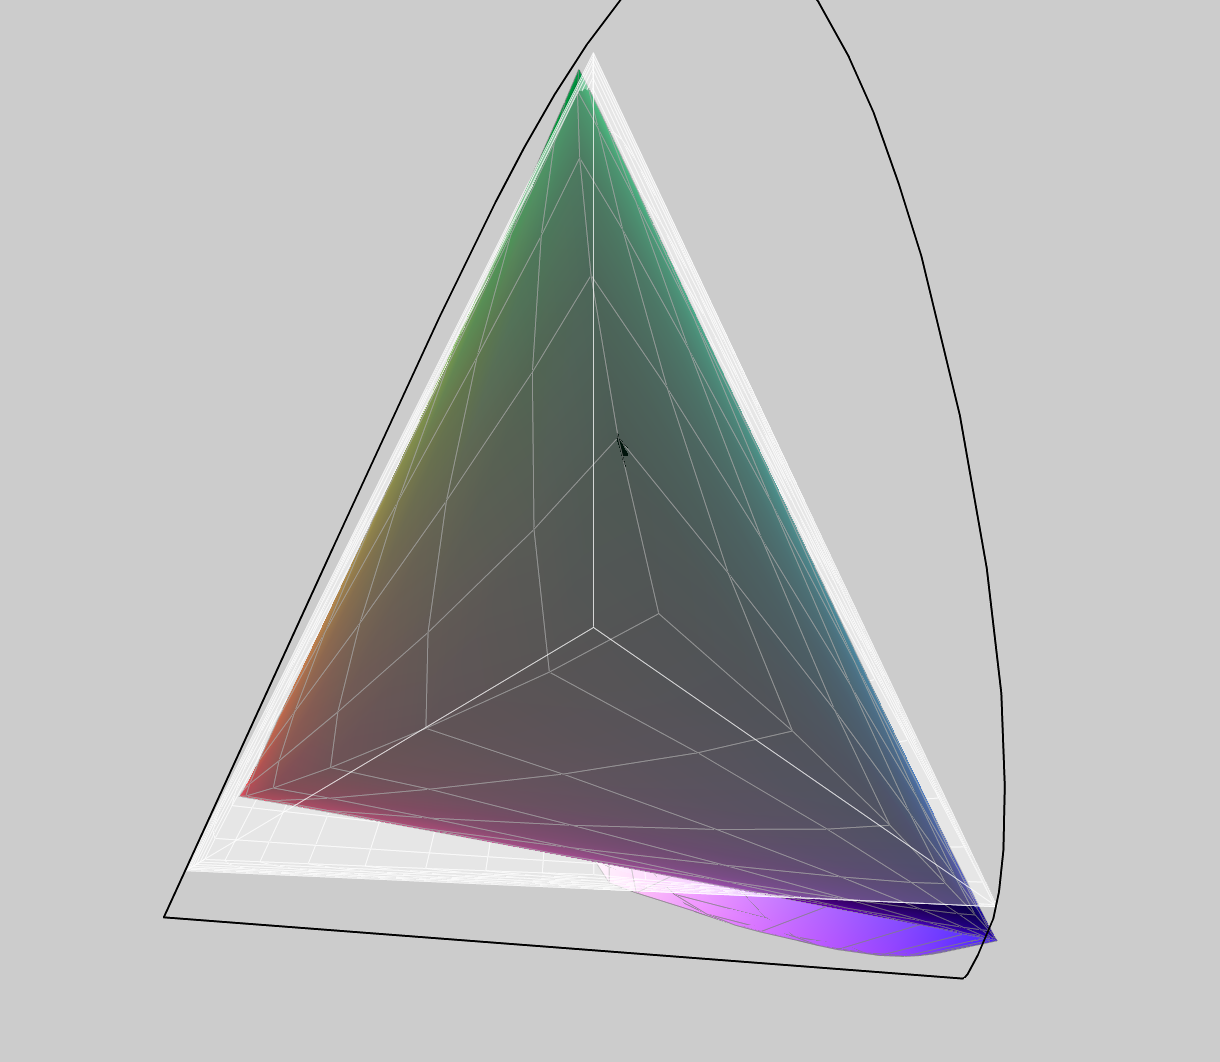
Compare that to ProphotoRGB, which most camera profiles are based on, and you can see how the primaries aren’t lined up nearly as well.

Anyway, as far as white balance goes, the ideal method for film scanning is actually to turn off Darktable’s white balance module entirely (or set R,G, and B all to 1.0) which will normally give a very green image) and use an app on the iPad (like Color Savvy) to adjust the RGB output until the unexposed part of the film leader (or image border if there isn’t flare leaking into it from the image) is the same for all three channels and within 1/3 stop of clipping . Write down the values for each film stock that you scan so you can set them quickly next time.

If you really want to go crazy, you could try using a print paper profile as either the working space or gamut clipping space. I haven’t done this yet, but I think it might go a long way towards getting really film-like color. Try one of these:

Fuji Frontier Scanner working color space:
Fuji_Frontier-PD_CA-HD_v3a.icm (175.6 KB)

Fuji Crystal Archive Photo paper profile:
Fuji_Frontier5-sRGB_CA-DPII_v3a.icm (175.6 KB)

Kodak 2393 and 2383 print film profiles:
FilmTheaterK2393PD.icc (391.1 KB) FilmTheaterK2393PD.icc (391.1 KB)

Hope that’s helpful!

6 Likes

Wow! It’s too close to bedtime to read this properly now, but I guess this is exactly what I wanted! The bits I have read sure make total sense.

Thank you, I’ll study this in depth soon.

1 Like

If you try any new methods, I’d love to hear your results. I’ve found that my results (or at least the amount of processing I need to do) is heavily dependent on the film stock. Some of my negatives have a very magenta/purple emulsion, while others are more orange or brown. I have the most trouble with the purpley/magenta ones.

As a light source, I’m using a smartphone with a special app to mimic a light table, so probably quite similar to your iPad. The colours are usually quite off until I get to the stage of correcting the highlights white balance in the corrections tab of negadoctor. Once I’ve done that step, my colours are usually very close, (except for those difficult purple negatives).

1 Like

I would really like to try this, but I’m unsure what is meant by “until the unexposed part of the film is the same for all three channels”. I have the Color Savvy app and an unexposed bit of film, but I’m not sure what I’m trying to achieve with the RGB sliders. Has anyone done this and can give me pointers?

I haven’t tried this myself, but I think they mean to adjust the iPad display so that the R, G, and B channels overlap in the histogram when viewed through the negative.

Thank you! Yes, I had suspected that. It seems very fiddly and very reliant on trial and error, so I wondered if that was really what was meant.

I tried your 2393icc, it’s great, the scanned raw tiff, can be used directly on this color space, I want to try 2383 when I find that both are 2393, maybe you upload the error, please share the ”2383 icc“ file with me again, please, the color space suitable for film is too difficult to find, finally found it, thank you so much!,my email:iojf@163.com

Here you go!
FilmTheaterK2383PD.icc (391.1 KB)

Would love to see some of your scan results!

@NateWeatherly none of these profiles can be used as color space or clipping profile in darktable, or am I doing something wrong? :man_shrugging: