ART
exposure compensation + 2 EV, tone equalizer, Adobe DCP, lens correction

1 Like
I agree. I’m working with compressed RAW files, what’s good enough for me and I didn’t test uncompressed RAW yet. Compressed RAW files are working good. Uncompressed RAW is new in latest Sony firmware, so that’s probably the reason it’s not supported yet.
Thanks for all of your comments and explanation!
I’m going to reproduce it…
Oh, I was thinking somewhat the other way around.
Uncompressed RAW is often working fine (I’m using it on my Sony A7 m2), and the old lossy compressed-Raw that Sony used for years is working fine (it has been around for ages now).
The newer lossless-compressed Raw (so compressed without drawbacks) is maybe not supported yet. I say maybe, because I have no idea since I don’t have a camera that can use that format.
There are 3 RAW in total
- Uncompressed
- Compressed lossless
- Compressed (but not lossless?)
What are you using?
Would you be able to confirm what works and what does not in DT 4.0.0?
Hi @vbs,
I just tested all three RAW file type options from Sony Alpha 7 IV for you. Uncompressed (~70MB/file) and compressed (not lossless) (~35-40MB/file) is working with darktable 4.0. Compressed lossless (~50MB/file) currently is not working/readable in darktable 4.0.
Kind regards
Alexander
1 Like
There can be multiple things going on, which I’d like to (still, after 8 days) point out. I’m guessing most has been addressed, but just to be sure:
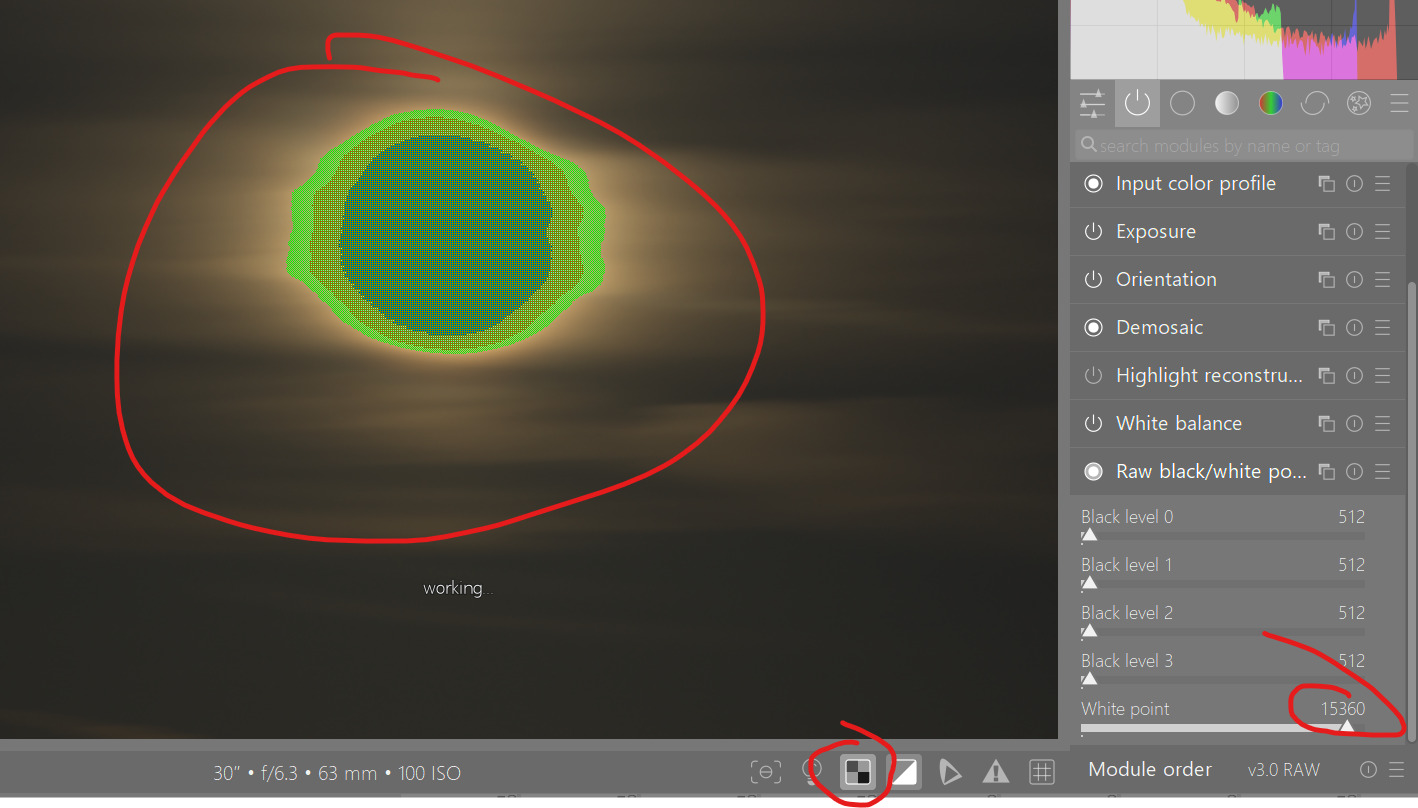
- At least on my Darktable, this file seems to open with the incorrect white levels, causing ‘highlight reconstruction’ to not work correctly. I’ve run exiftool on the file:
exiftool -a -u -g1 _DSC3128.ARW | find /i "white"under Windows - andexiftool -a -u -g1 _DSC3128.ARW | grep -i whiteunder Linux-like systems - will show you a white level of ‘16383’ (which Darktable is using), but also ‘15360’ for all three channels, which I’m guessing is the more correct one.
Setting the ‘white level’ in Darktable to 15360 will show the center of the moon as ‘clipped’ if you use the RAW-overexposure indicator.
That being said, most ‘highlight reconstruction’ methods actually secretly use a bit of a lower clipping threshold than the 1.0 UI will show (at least, I’ve read this somewhere. Or it’s only one of the algorithms,  ). So it might not really matter.
But, to show the ‘problem’: Disable everything that you can disable, except for ‘white balance’, ‘orientation’, ‘exposure’ and ‘color calibration’ (if it’s enabled). Particulary: Disable ‘highlight reconstruction’ and ‘disable filmic’. Now you get a more ‘raw view’ of your whitebalanced data.
Now, lower exposure, until everything is easily visible in the histogram. This already shows the magenta cast, caused by clipped highlights:

Setting the whitelevel to 15360, will show the sun as clipped (otherwise it will not) when viewing RAW-overexposure:
Now, in this view, you can enable ‘highlight reconstruction’ and see if you get a better rendition of the sun. But… none of them really work, except:
- guided laplacian on an extreme setting: clipping threshold to 0.6 or lower, iterations to 7 or higher, diameter to 1024px, making it extremely slow.
- the new highlights recovery that is yet to be approved for the 4.1 / 4.2 branch. Default settings will do.
You’ll then see the sundisc neatly fixed and a good gradient, even before doing anything to your data:

Now, raise exposure back to where your middle-grey should be. Ignore any clipping on your screen, filmic will roll them off later. Just focus on the mids (and shadows).
You could also compress dynamic range a bit, by using the tone equalizer and picking the compress shadows/highlights (eigf) preset. As an example, I go for a ‘night to day’ kind of look, by picking the ‘strong’ preset here. Then I drag tone-equalizer to before exposure (so under it):
![]() . I set exposure quite high to almost +3.2ev.
. I set exposure quite high to almost +3.2ev.
Then finally enable ‘filmic’, and hit the picker after the ‘white relative exposure’ slider to auto-set it, then directly disable the picker again.
It could be smoother, but it’s also not so clipped as the original jpg version:

Now, you can play with different ‘preserve chrominance’ modes - in the options tab - to see how they turn out (powernorm for example):

Less color but smoother without messing with other parameters.
You could also leave it at ‘max rgb’, set the ‘bloom <-> reconstruct’ parameter in the ‘reconstruct tab’ all the way to the ‘bloom’ side, and then carefully lower the ‘threshold’ till it hits a point which you think is OK:

Enable lens correction, chromatic aberrations, color balance rgb on ‘standard’ preset, local contrast.
I’m amazed by the pretty much absence of noise with things boosted like this. Still, I enable ‘denoise profiled’ to be sure, but enable a simple mask set to ‘chromaticity’ mode, to only apply the chroma part of it, leaving the luma alone.

To get closer to the dark out-of-camera jpeg look, I made a duplicate, and disabled tone-equalizer, and lowered exposure to 0ev. Disabling the ‘sweeteners’ like color-balance-rgb, local contrast, diffuse and others, I completely reset filmic to defaults, click the white-exposure picker again to auto-set it, then switch the norm to ‘power norm’ again, and call it a day :).
As an alternative - that the others probably explained as well - you can work this without using the ‘highlight reconstruct’ module at all. Normally the highlight-reconstruct can be needed if not all channels are clipped, and you want to get details back from the clouds for example. But in this case, the sun is a big bright ball, and you don’t want details, you want a smooth gradient into the sun and no magenta cast…
So, disable highlight reconstruction. And set filmic to ‘luminance Y’ norm mode. That one is way less prone to displaying the magenta (because it doesn’t try to preserve color in very bright areas, I’m guessing).
As yet another alternative, you can leave filmic’s norm to ‘power norm’ (or whatever you picked) and use filmic’s reconstruction. It’s less good as ‘using details from partially clipped’ channels, and more to ‘replace blown out parts with something a bit nicer’ as far as I know, but here that’s perfect. Leaving everything to default in the reconstruct tab, but lowering the threshold until it looks OK is enough in this case. If you have problems with it, raising the transition (to be smoother), raising the number of iterations in the options tab, or playing with the bloom / gray sliders can help. As i said, not needed here. Just lowering threshold to around 0ev seems to be fine:

day-style, guided laplacians:

night-style, guided laplacians:

night-style, filmic reconstruction:

What an awesome image to play with. Nice shot and a lot of ways to take it, and also a good way to test Darktable skills  .
.
Why go through all the trouble with the ‘highlight recovery’ module? Because
- if the new ‘highlights recovery’ mode is availble, it’s awesome and quick.
- If this wasn’t a bright lightball (the sun) but something with details (clouds), you probably end up having to use ‘highlight reconstruction’ instead of ‘filmic recovery’ to do the heavy lifting.
- I wanted to explain with the first steps how to show what is happening with your sensor data, how it looks ‘fixed’ and then continue with the edit from there.
3 Likes
Actually, the clipping itself doesn’t cause the magenta cast; it’s when the clipped channels get skewed around by applying the white balance multipliers.
I opened the raw with default processing, then changed the order around to illustrate. First, here’s the black-subtracted, demosaiced image cropped to around the sun so the clipping shows up in the histogram:

Note the color of the sun (white), and the three-channel pileup at the data max in the histogram. White balance is turned off; now here it is, everything else the same with white balance turned on:

Note the magenta cast, and note the three channel pileups - they’re moved in accordance with the as-shot white balance multipliers, R=2.024, G=1.00, B=1.841.
Clipping just piles data in the same place, R, G, and B. White balance is what introduces magenta…
1 Like
I know, I was trying to keep it simple ![]() Without white-balance, the clipped values are neatly ‘equal’ and would appear white. But the white-balance will multiply the red value the most, then the blue channel (often, not always of course), yielding magenta.
Without white-balance, the clipped values are neatly ‘equal’ and would appear white. But the white-balance will multiply the red value the most, then the blue channel (often, not always of course), yielding magenta.
1 Like
Don’t know why I get all pedantic about that particular thing, 'cept I’ve seen a lot of misconception about it. 
1 Like
Well, if you don’t understand the cause of the effect, how do you want to understand the solutions (or come up with one)?
Lots of discussions here go all over the place due to poor definitions/sloppy reasonig 
1 Like
Nice description 
There is one suggestion from my side. We have the “default” clip algorithm turned on by default while importing. In my experience that’s pretty bad and i don’t use it any more so i have a personal preset automatically applied.
- recovery mode (of course )
- candidating = 0, this avoids candidating first. it works safely with the vast majority of images, keeps some details in highlights, “repairs” a large part of magenta cast, is fast enough for me and last not least seems to be better than “reconstruct in lab”
- the combine is kept at 2
2 Likes