I think you’re right, I didn’t think about that:+1:
Your xmp is indeed interesting
@Dario On L*a*b* and L*C*h°: Introduction to the CIE LCH & Lab Colour Spaces. L* (0-100) and h° (angle) have defined ranges but a*, b* and C* vary depending on the color that they represent. They can be difficult to grasp at first but RT and dt do have tools that help make it easier for the user to manipulate.
Thanatomanic. An excellent example of color balence tool! Thanks!
this was a fun one for whatever reason
so my process darktable I did base curve adjustment and nothing else
the curve was just straight but pulled back on the top half way back to the left and in a bit on bottom to the right
mainly fiting the color space into the output without blowing anything or loosing
then working with the exported png in gimp first I did curve based color adjustment on RGB leaving value
then dup twice and set first to overlay 50% and transparency
2nd copy run c2g with 16 samples then set layer to overlay also
hide the c2g do new visible layer and desaturate with luminosity copy visible and hide
unhide c2g layer and add the copied layer as the mask
set to c2g layer at 50% transparency
(yes idea borrowed from: How to realistically brighten shadows in GIMP - Mantiuk and Retinex in G'MIC )
add new visible layer, run gmic items local contrast enhance
adding another layer with 50% gmic sharpen texture helps with details (attached picture is missing this)
if you end up with colors a bit off on the forest on the left say a bit yellow redo initial RGB curves and reduce the blue reduction
One thing I’d like to make note on the attempted improvements, be aware of color casts (eg. Atypically green color casts or blue color casts.)
Some color casts are sometimes not readily distinguishable by the naked eye sometimes. (eg. Purple color casts, indicative of too much red & blue saturation.)
In my first attempt, I just tried to salvage the raw image to get a decent starting point. Meanwhile, I saw so many interesting interpretations and it’s more like a “play raw”, so here is my second try (based on the first one).
DSC00989.ARW.xmp (12.8 KB)
So the +channel operator adds the equalized RGB channels back together?
Couldn’t find the +channel operator with “man convert”.
No. My ImageMagick command was:
“-channel RGB” is a setting that tells IM that subsequent operations should act on the RGB channels independently. So “-equalize” will do an equalize to the red channel, another to the green, and another to the blue. “+channel” restores the default situation, that operations will do the same thing to all channels.
In this example, “+channel” is redundant, but it is good practice to always have a “+channel” after a “-channel”.
IM operations and settings are documented at eg ImageMagick – Command-line Options
Thanks for the explanation and URL. I’ve used imagemagick fairly frequently, but I hadn’t seen this channel sync switch before.
Since imagemagick reads .ARW files I tried your command on the raw file and output to .tif, and it worked with the same effect as .jpg to .png.
My try with Rawtherapee.
Getting rid of the blue haze and getting more green form the bottom of the picture was no easy for me.
DSC00989.ARW.pp3 (10.1 KB)
Sorry people, I think that many of the posts here don’t really address the topic but rather are more like for a PlayRaw. @Dario has stated that he would like credit for the photo but it is okay to use it. See: post 23. Anyway, @patdavid @paperdigits, would it be wise to split this thread?
I think that most address the topic: remove the haze, bring back colors, and bring out texture. I think we are OK without splitting.
Never mind then: carry on  . I will turn notifications to Normal.
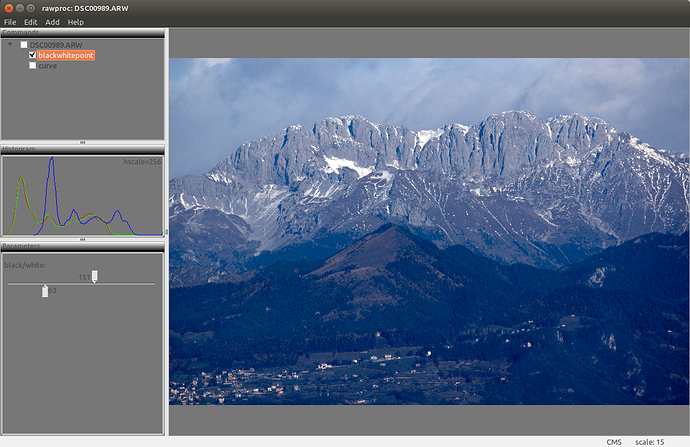
During my Sunday morning ruminations, I re-stumbled across this thread, decided to give it a go. I thought up-front the haze would be too much for my simple rawproc program, but the effort would be instructive. Well, it turned out to be very instructive, so I thought I’d post screenshots of the successive manipulations.
First-off, since I don’t have @Dario’s camera profile, I opened the raw in rawproc with the dcraw equivalent “-o 4 -g 1.8”, which converts the adobe_coeff assigned raw to dcraw’s ProPhoto, and applies 1.8 gamma. The relevant rawproc properties are:
input.raw.libraw.colorspace=prophoto
input.raw.libraw.gamma=prophoto
Here’s the screenshot showing that result:
The histogram is telling; the blue channel is definitely shifted right across the entire tone range. I messed a bit with shifting it with a blue curve with the data in this range (63-151 in the 0-255 scale), but the curve was so slight, so I “contrast-stretched” the data with a blackwhitepoint:
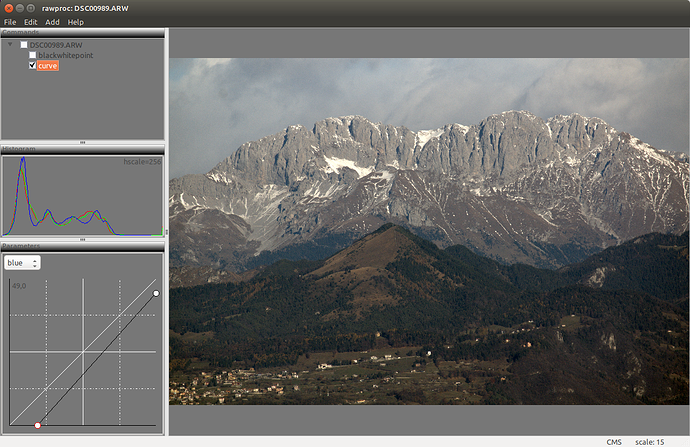
This is just like applying a RGB curve with the bottom-left (black) point moved right to 0,63 and the top-right (white) point moved left to 151,255. The blue channel shift is now more evident, and can be dealt with using a “linear” blue curve:
Note I had to move both the bottom and top points to keep the blue channel aligned with the other two.
I hope these screenshots show up in your browsers to effectively show the transforms. What I’m learning out of these exercises is the value of a RGB histogram of the working image.
Edit: It occurred to me the colloquial verb “scooch” wouldn’t probably translate well, so I changed it to more conventional english…
Hello.
After the great “success”, feel free to treat it like a Playraw. To me it turned out to be a profitable lesson, by the way:wink:
Ciao
For the play raws, we really request a creative commons licensed file, @Dario
I didn’t point this out earlier but has anyone noticed a dotted border at the edges of the image? 4 pixels in from top+left and 5 pixels in from bottom+right. Thoughts?
Honestly I can’t see any dotted border…


