Quick start
Hey! So this is a lot of text. I’ll summarize it:
This is a configuration for darktable that greatly simplifies the editing interface. For typical edits, you don’t have to mess with modules or figure out which sliders to use. It’s intended for both new users to darktable and even us more advanced ones, to greatly speed up our workflow.
Initial set-up:
- Make sure darktable is set to filmic & modern in the “processing” settings
- Import the module preset I linked
- Select the preset from the modules menu
- Switch to the first tab
Once you’re done, it’s just this one step
5.Set exposure (and perhaps highlights)
Also, not necessary: I suggest you switch the histogram to waveform! It’s great.
Interested in knowing more? Read on…
Intro
Hi all! I’ve made a configuration preset for darktable that’s quick and easy to use for standard edits and also promotes certain modules for more advanced edits.
It’s meant to be a way to get a great image with minimum work in a scene-referred workflow. (Additional creative edits are encouraged after that, but not necessarily needed.) It is a fully modern, scene-referred way to process images using the suggested “best practices”.
It’s intended for those new to darktable and also for us more advanced users of darktable who don’t want to switch tabs and expand/collapse modules all the time.
I’m sure it’s not meant to be perfect for everyone, but it has been working for me for a while and this can likely serve as a base for others. Additionally, even those who might not adopt these settings might find something useful in this post (such as the mention of waveform — I need to stress that you should really use the waveform instead of a traditional histogram).
Background
I’ve used darktable for years at this point (and had prior experience with Lightroom and even Aperture, many years ago). While darktable has gotten better every release, but the plethora of modules and even the modules themselves are still overwhelming if you’re not used to them.
This configuration works with and is optimized for both darktable 4.2.x and 4.3 (the soon-to-be released development version of darktable at the time of this writing). Appropriate controls for both versions will automatically show up in the quick settings.
General
This configuration:
- gives great results quickly, often just needing an exposure adjustment (and sometimes not even)
- has all critical edits happen on the quick settings page, where I hand-picked the best settings of the most important modules, so you can do almost everything there without getting overwhelmed
- has a selection of the most important and non-deprecated modules into two sets: main (the ones you generally want to use) and extra (the ones that are useful sometimes)
Overview
Here’s what it looks like by default (with an untouched image):

How to use
To work on an image, you’d generally:
- adjust the exposure by scrolling or clicking and dragging the waveform directly (important: only adjust the top 3/4, not the bottom 1/4 of the waveform)… alternatively, you can use the exposure slider by sliding or right-clicking to type in a number (which can even exceed the slider’s stated range)
- if the highlights need adjusting, then drag the slider for filmic rgb’s “white relative exposure”
…and that’s usually it for a quick edit!
I personally have auto-settings for lens corrections (which benefit some lenses more than others) and noise removal that I’ve included in the zip, but they don’t seem to auto-enable after importing (see below, at the end of this post). But each is one click to turn on in the quick settings, so it’s super-easy to fix manually too.
Optional basic edits after that might then include:
- contrast (which is using color balance RGB’s contrast, as Aurélien suggests using that over filmic RGB’s)
- vibrance for boosting or reducing the overall color intensity (so you have just one simple slider that you need for “saturation”)
- color calibration, which you can change from “as shot in camera” to custom or anything else and will have either a hue or temperature slider to make the image colder or warmer
- chromatic aberrations in case the lens profile doesn’t fix aberrations enough (most noticeable with trees against sky), you can toggle this on; the defaults are usually great
- denoise (profiled) to adjust the strength and to ensure it did find a match (or to turn it off, if you really don’t want it for a particular image)
There’s also a “diffuse or sharpen” entry on the quick settings, but as you cannot select profiles from the quick settings and this module is quite useful in so many ways, you’d want to use the link button at the right.
Here’s another screenshot with the same image as above with only these settings adjusted:

Waveform vs. histogram
One thing to note: I’ve personally, locally, changed the histogram to the waveform by hovering over it and clicking the second icon from the left (“waveform”). This lets you see the exposure of all the color channels and dial-in the best settings more easily than a traditional histogram. (The waveform has light at the top and dark at the bottom, as opposed to left/right. In the waveform, the left/right is the horizontal parts of your image. A waveform is a 2D representation instead of a (basically) 1D representation of a histogram.) You can make it smaller by hovering the waveform, holding down control, and using your scroll wheel, which will give yo more space for modules.
This change isn’t in my shared settings. It’s something you need to do yourself. But this change makes you much more confident that you’re doing the right thing when changing any of the sliders. It’s a much better visualization of exposure, highlights, dark parts, and even saturation of the image than a histogram.
More advanced editing
If you decide you need to do more to the image, such as crop, sharpen, work with masks, retouch, and so on, you can (and have to) go to the main modules:
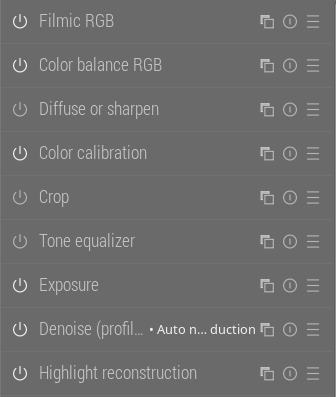
If you’re diving in to the more advanced settings (that the quick tab doesn’t provide), then these “main” modules are the modules you should get familiar with.
Main modules include: Filmic RGB, Color Balance RGB, Diffuse or sharpen, Color calibration, Crop, Tone equalizer, Exposure, Denoise (profiled), Highlight reconstruction
Or the extra modules:

These are usually not needed. But it’s a “grab bag” of additional useful modules.
Extra modules include: Monochrome (although you may use color calibration for better control), Color zones (although you should use color balance rgb with masks, but this is for quick, intuitive edits), local contrast (although diffuse or sharpen is generally better, this module is quicker and can be useful with masks for more aggressive edits), LUT 3D for toning afterward, Contrast equalizer, Blurs, Retouch (super useful once you get the hang of it), Orientation (usually does the right thing for most modern cameras), Rotate and perspective (I love the perspective detection and correction, but it’s more for architectural images), Demosaic (always on, but you usually don’t have to change it), Hot pixels (useful if your camera has stray hot pixels; generally not needed, except if your camera has a hot pixel or two or in super-high-ISO), White balance is usually set and not to be touched in a modern workflow.
Versions of darktable
I’ve made this with the development version of darktable in mind, as it has filmic rgb v7 and the “saturation mix”, which is super-useful for controlling way filmic rgb handles color.
I had been using something similar with previous versions of darktable, but this has been refined since. As a result, the configuration does work with both the stable (4.2.1) and upcoming release of darktable.
“Advanced” tone equalizer version
I also have another, more advanced version that uses the tone equalizer instead of color balance rgb’s for adjusting the overall midtones, dark, and light parts of the image.
It does require more knowledge about how to use the tone equalizer… but using the quick settings lets you adjust the mask exposure compensation and see (and edit) the waveform in the adjustment box at the same time! (You still need to click on the magic wand twice: once to turn it on if it isn’t already, and the second time to actually set the offset.) To use the scroll wheel when hovering the image, you do have to click the link icon on the top-right to open the module, however.

Installation
Configure darktable
To “install”:
Set up darktable’s configuration:
-
In darktable 4.2.1: Set up darktable with modern settings. In the darktable preferences window, make sure “auto-apply pixel workflow defaults” is set to “scene-referred” and “auto-apply per chromatic adaptation defaults” is set to “modern”.
-
In darktable >= 4.3 (current development): make sure “auto-apply pixel workflow defaults” is set to: “scene-referred (filmic)”
Import presets
Then:
-
Download the zip file and extract it.
Quick and simple.zip (4.5 KB) -
Go to darktable’s settings and select the “presets” section.
-
Import the presets.
-
Go to edit an image and select either “Quick” (the tone equalizer version) or “Quick and Simple” (the simpler color balance rgb version talked about first) from the menu.
-
Visit the first tab, which is the simple quick settings tab. Everything you need to process an image is there. (The other two rightmost tabs have the preselected modules ready for you as well, for optional further editing.)
Customization
Additionally:
- If this is almost what you want, but you’re missing something or don’t want something else, then you can use this as a starting point and add or remove items. You can do so by right-clicking on any of the tabs other than the power (showing the active modules) or the menu. (The menu also has “manage presets”, but it’s much more complex.)
Auto-presets for an even faster base edit
To speed up my workflow, I do also have a few modules that get auto-applied by default:
- “lens correction”
- “denoise (profiled)”: for >= 9mm, it sets it to auto and another preset for <= 8mm turns down the effect to be very subtle for unprofiled (as I’ve found most cameras + lenses have profiles, but smartphones do not — it may be different for some of you though)
- “exposure” (although adjusting the exposure will automatically turn it on and set it to what you want)
- “color balance rgb”: I have it turn on the built-in “basic colorfulness” mode to punch up the color a little bit
…but when I try importing them in fresh install of darktable, it doesn’t work for me for some reason. I have included the presets in the zip file still work regardless, although the image will need denoise and lens corrections turned on manually. (Defaults are usually great.) And it won’t have a little color boost by default, but global vibrance will still work.
I’d love some assistance to make sure they work as intended for others, so I’m including them in the zip. Perhaps I overlooked something or hit a darktable bug?
However: Since you’d need to manually make sure lens corrections and denoise are turned on (unless you can get them to auto-apply too), I’ve make sure both are in the quick settings, so at worst, it’s one click in the quick settings to toggle these modules on.
Therefore: I’ve included the lens module in the quick edits for now. (Screenshots are from before I added it.) Denoise was already there, as it’s often also useful to adjust the strength (although it usually gives wonderful results with default settings).
So: I’ll update this post (and the zip files) if I (or someone else) gets these auto-settings working for everyone on import.
FAQ
Nobody has asked any questions yet (as I am just sharing this now), so I’m going to imagine a few questions that someone might ask. ![]()
-
How is this different from available presets?
Great question. I think the available ones don’t show the right set of settings in the quick edit. And they are overwhelming with a bunch of possible modules in several tabs. I’ve tried to limit it down to the main modules in one group and then some post-processing ones in the other. And I’ve been pretty selective about which modules are included. -
I have my own opinions and I don’t agree with this selection of modules and settings!
Firstly, that’s not a question. But: I’m sure it’s not for everyone. You don’t have to use this. I wanted to provide a configuration for people to quickly make edits from the “quick settings” tab with just a few buttons and sliders, so they don’t have to navigate a ton of modules. Also: If this is close enough to something you’d like to use, you can set it up and customize it to your wishes.
 -
How do you know this can work for more people than just yourself?
I have had way too many cameras and lenses since 2002 from different manufacturers. (Canon, Fujifilm, Panasonic, Ricoh, etc.) and have a bunch of Play Raw images I’ve edited from Pixls.us over the years. I’ve tested it out on all of these images in different conditions and can get good results quickly, without having to navigate away from the quick settings tab or navigate modules. (Unless I really want to do more than basic editing.) -
What about sigmoid?
I’ve tried sigmoid a lot. It sometimes helps you get to a nice result more quickly, especially when images are extremely overexposed. However, in almost every case, filmic has given me better results, especially with highlight colors. This is especially true with the revised filmic rgb v7 in the development version of darktable, that will likely be released soon.That said, I’ve customized both to have sigmoid versions. You have to make sure to turn filmic off and sigmoid on. In darktable 4.2.x, you’d have to make a preset for this. In darktable >= 4.3, change the processing settings for this in the settings dialog. As you really shouldn’t have both filmic and sigmoid on at the same time, I’ve left a filmic rgb stub in the settings to toggle it off (in case it’s on). Additionally, I removed contrast from color balance rgb as sigmoid provides contrast itself. (So you’d only have one contrast slider.)
Here’s the modified set of presets for you: Quick and simple - sigmoid.zip (2.3 KB)
-
Why should I trust your opinionated decisions?
I’ve been into photography since the 1980s (as a kid), have processed images in darkrooms, have used multiple raw editors for years (Aperture, Lightroom, darktable), dabbled in a bit of pro photography on the side, and majored in design and computer science. I was first an illustrator starting in 1993 and then UI/UX designer since the 1998 and part of the Free Software / Open Source community starting in 1996. My goal is to make software (especially FOSS software) easier to use.Since darktable is quite flexible, I figured a simpler configuration that promotes editing basics makes sense and should help people get great results from darktable more quickly. Of course, this is just some settings and the darktable developers are the true heros. I’ve been happy to see darktable get better and better every release.
-
This is too much text. What’s the point?
The goal is to highlight what is needed to do basic edits. It’s to make it so you don’t have to know which modules are good and which are “bad”. And you also don’t have to memorize what parts of each “good” module are important and which you would (usually) ignore.The quick summary is to set darktable to filmic and modern white balance, then import the presets from the settings dialog’s presets tab. And then rely on the quick edit tab for either all or most of your work (if you need more advanced features).

