@troodon your screenshot shows that the “Default” profile was used, and that profile runs auto-levels.
I would highly recommend the logarithmic display, it’s easier to lop off the top few octaves of headroom that way and give you more room to work on the actual curve you need make.
“your screenshot shows that the “Default” profile was used, and that profile runs auto-levels.” I opened it up in default values (to avoid previous settings), then applied custom settings. Wouldn’t that override the default?
Okay, it seems there’s a difference between “base curve” and “tone curve”. You’re right - it works in tone curve.
Ignore my “history”. I’m just experimenting and learning the program.
Don’t worry, we are all learning, and I learned a lot in this thread. Never had a b/w negative to process before.
In the given context, the difference between the curves is that the base curve is applied before the input colour profile, the tone curve afterwards.
Just to head this off, Filmulator won’t be able to handle negatives.
Why?
looks good  You are using the monochome module, don’t you? Here is my take on it, which only inverts the tone curve and applies a spot white balance:
The “scale chroma” option in the tone curve module is set to “manual” like you did. But I think it doesn’t have any effect, when using the monochrome module. The spot white balance can bring it closer to a monochrome look. (BTW: base curve is deactivated)
Depends on your custom settings, but your screenshot shows that exposure compensation and black levels are still not-0.
The invert module does two things: It inverts the colors and removes the tinting of the film stock. It’s more or less the same as inverting the curve and using white balance, however, having both in its own module in the very beginning makes it easy to dial in good values once for a given film stock, create a preset and use it every time you scan/photograph negatives. Then you can use regular basecurve/tonecurve and whitebalance ontop per image.
Hi chris,
I am new to this forum, many thanks in advance!
I scanned color-negatives via vuescan as “pure raws” (selected “image” as medium type). Now I am struggling with removing the orange mask and inverting it: If I click on the pipette with the “invert”-module It marks the area of the picture WITHOUT the area around - which contains the pure orange mask. I am not able to measure a spot in the orange mask.
Maybe you can give me an advice doing it right. I attached a tiff I am now spending hours with…
Thank you,
omipo
Hi Omipo,
first of all, your VueScan-TIF contains 4 channels / pixel. Probably RT ignores the 4th channel. You might want to setup VueScan so that it already incorporates the IR-channel into the RGB-image (i.e. applies the dust and scratch removal).
Inverting in RT is easy in the Colour management tab with the RGB-curves. Removing the orange mask needs to set the shadow and highlight points for each channel to where the histogram is really occupied. Unfortunately I see no easy way to do this in RT – perhaps somebody can point out how to do this.
I used imageJ to do all this to your image as follows:
image crop
move to channel 4
image stacks delete slice
select channel 1
edit invert
image adjust B&C auto, apply
select channel 2
edit invert
image adjust B&C auto, apply
select channel 3
edit invert
image adjust B&C auto, apply
file save as tiff
The resulting RGB image can then be processed further in RT.
Why not do the inversion and removal of the orange mask in VueScan (which would also incorporate the appropriate film profile!) and then process the resulting image in RT?
I get best results using ColorPerfect on “raw” images from VueScan or SilverFast for inversion and removal of the orange mask and then by process the resulting RGB-image in RT and also with the Nik-collection.
Hermann-Josef
Hi @omipo and welcome!
You can easily change that area into anything you want:
with pipette selected, left click the starting point of your new area,
drag to the end position, and release left mouse button. Now, your new
area is active.
OK?
Have fun!
Claes in Lund, Sweden
Hei Claes,
sorry, doesn’t work.
If I click on the pipette the picture immediately turns blue…
Thx,
Alex
Hi Alex,
Hm… let us try to dissect this problem, one step at a time.
- You did manage to get a new “pipette rectangle”, right?
- Using darktable, please apply the enclosed dtstyle to your neg scan image.
Hopefully you will be able to use the style as a starting point for your
further experiments.
negScan.dtstyle (2.4 KB)
Have fun!
Claes in Lund, Sweden
… and here are almost the same steps for RawTherapee:
fa24f9eb4277e1ee9003824cccb4d4eb0eda1db5.tif.pp3 (10.3 KB)
Have fun!
Claes in Lund, Sweden
Linear inverted tone curve, for use in inverting the colors of a scanned negative, as described in RawPedia: http://rawpedia.rawtherapee.com/Negative
linear_inverted.dcp (954 Bytes)
I tried your image and I was able to pick a rectangle on the left border which I assume only contains orange mask. Your picture is a bit tricky since it has different areas on the border which I don’t know what they are, but since you own the negative you should know which part is really the orange mask.
What I found difficult as well is that I had to tweak the exposure a lot for every of the areas. I tried all of them, but none seemed to be a good reference.
In the picture you can see (it’s a bit difficult to observe) a rectangular frame on the left side, where I used the colour picker of the invert module to select an area. Just hold your mouse button while you are “painting” the rectangle. The white balance is a bit off, but in principle it works.

Please, don’t do that, you will loose a lot of flexibility and VueScan’s scratch removal algorithm is, let’s call it, basic. I did a lot of tests and was able to get so much better results with G’mic (see this thread: Scanned image scratch removal with “ICE”, especially the later results).
@Chris
I completely agree that the dust and scratch removal in VueScan is not ideal. In fact, for the strong application it does not really create a mask but instead seems to scale and subtract a thresholded IR-image from the RGB-channels. You can see this, if you subtract two image versions from the same original, one with scratches removed, the other not. In the difference image you can see all the faint structure in the IR-image, e.g. stripes along the scan direction:
For a setting of low or medium there obviously is a threshold set in the IR-channel, since the stripes are not seen there. Using a real mask does not show these structures, e.g. as SilverFast iSRD does. For Kodachrome slides the VueScan method is just not applicable since it corrects everywhere in dark areas, considerably reducing the contrast.
Thanks a lot for the discussion of the G’Mic script to remove scratches with the IR-channel. I just want to understand what inpaint exactly does. I will have to look at the manual.
Concerning removal of the orange mask:
How does one set shadow and highlight points in the histogram individually for each channel in RT?
Hermann-Josef
This may not specifically help with RT, but it illustrates what’s going on with the black-white point reconciliation. In that respect, my rawproc software may not be ‘production quality’, but I’ve found it to be a decent platform for tutorial development.
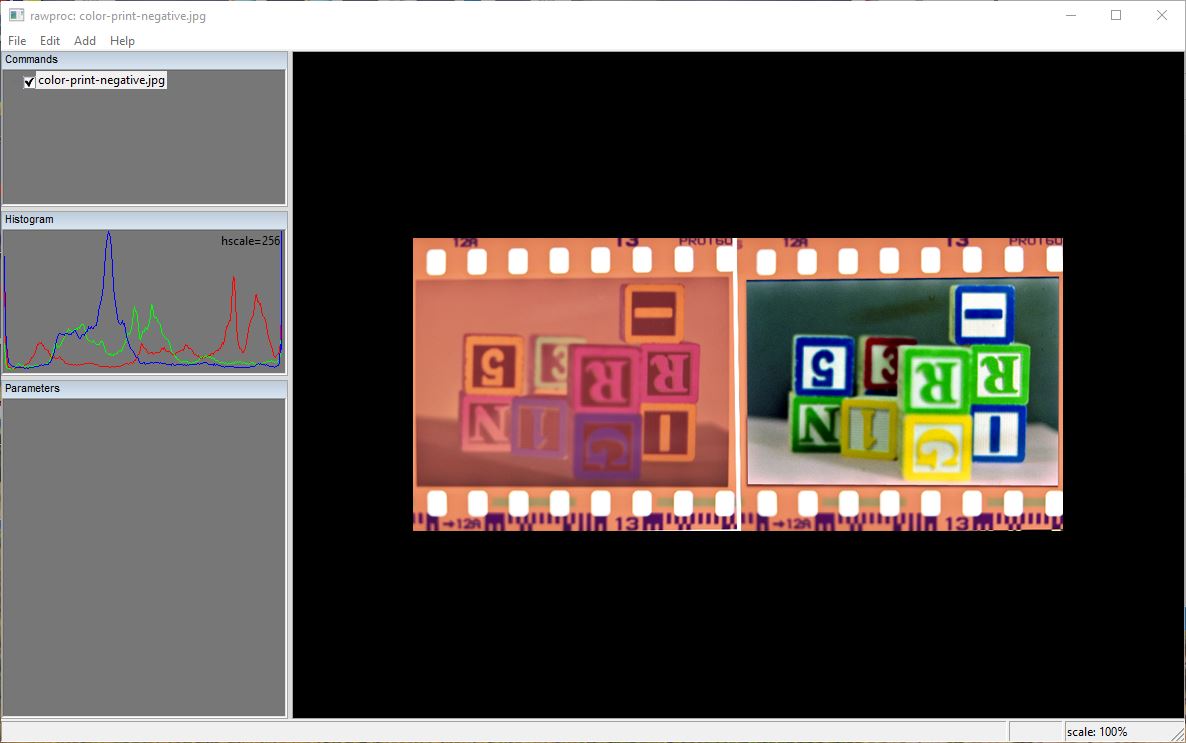
So, starting with an innocuous color negative/positive image I found on the internet:
First, you can see the color shifts in the individual channels of the histogram, but they’re not really indicative of the image proper until we crop to it:
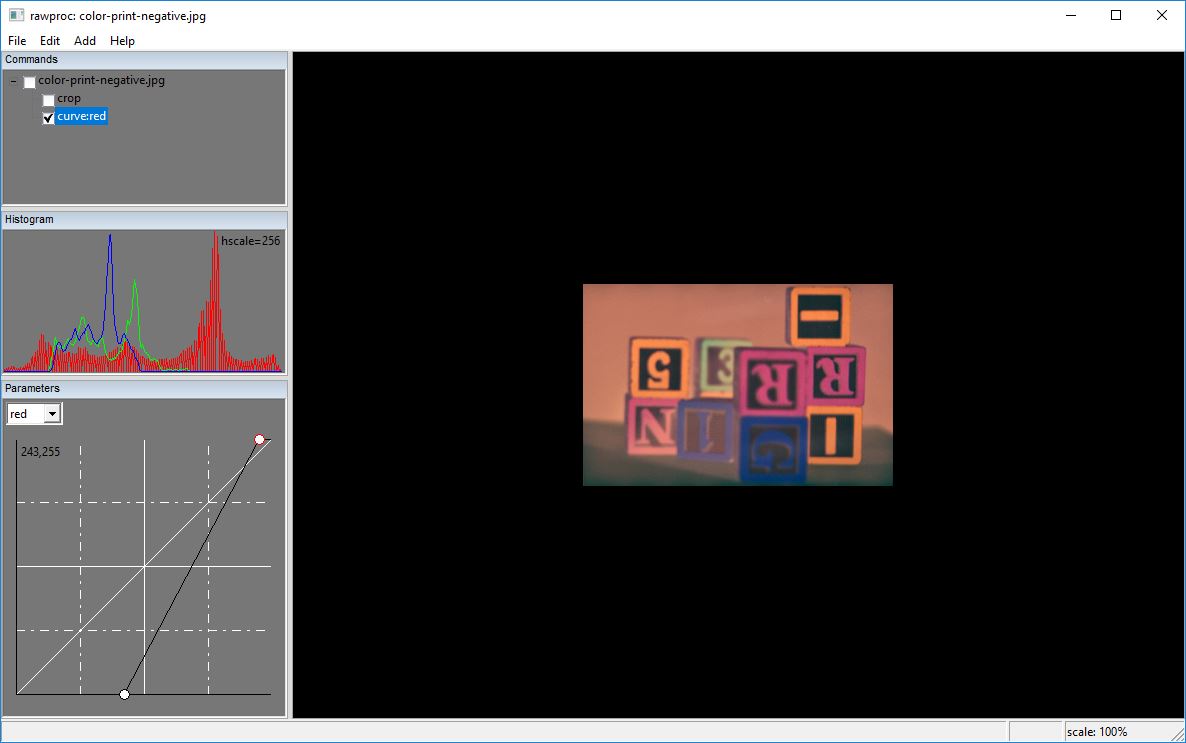
Now, the nature of the color cast becomes evident, particularly in the intensity offset of the red channel. The black and white limits of each channel are also evident; for this particular image, all three blacks appear to be at about 40 on a 0-255 scale (internally, rawproc is working on 0.0-1.0 float, but the histogram and tone operators work on 0-255 for convenience). With rawproc, we’re going to now add three curve tools, one for each channel. First, red:
Note what I’m doing is to scooch the black and white control points along the bottom and top bounds of the curve box until the data starts to pile up at the respective side. Now, green:
And blue:
Finally, the rgb curve to invert the negative to positive:
There’s a lot of writing on the internet about knowing the film stock to do this conversion, but the compelling thing about just normalizing the black and white points is that it doesn’t depend on such consideration. Also, once you become familiar with the dynamics of the adjustment, you can also handle white balance in the same operations; however, I’ve found that just adding a white balance tool after the conversion is more intuitive.
I used curves in the above missive to illustrate, but rawproc has a separate black/white point tool with an auto-calculate option that i would use instead. With that tool, I can do color negative conversion with my img command line program like this:
$ img neg.jpg blackwhitepoint:red blackwhitepoint:green blackwhitepoint:blue curve:255,0,0,255 pos.jpg
I’ve got a box full of 35mm color negatives from my mother, pictures of people long gone whose names I don’t know, so I’ll be doing this in volume pretty soon in order to get images in front of folks who still know the names. My plan is to shoot the negatives raw with my D7000 and macro lens, and process the images with the above command.


