Refined unsharp masking for local contrast

Refined Unsharp Masking for Local Contrast

This tutorial is done in Gimp, but the basic ideas could be applied in any other layer based software (like photoflow, etc…)

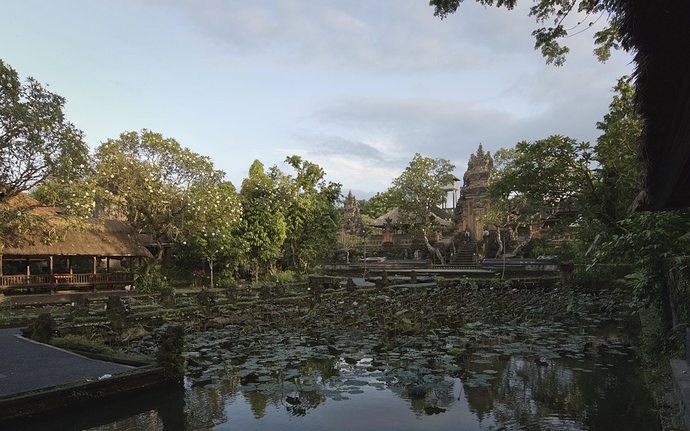
Original Image

Notice that all images shown in this tutroial, except the original image here, were resized for faster upload speed. The original is in it’s original size so that you can use it in case you want to try this yourself.


Creative Commons License
This work is licensed under a Creative Commons Attribution-ShareAlike 4.0 International License.

What we need

For this tutorial you will need a basic luminosity mask and a detail mask stemming from the unsharp mask process.
For the luminosity mask follow the steps in this awesome tutroial by @patdavid until you have your L mask.

To get your detail mask do the basic unsharp masking:

  1. Copy your base image
  2. Blur your base image. In this example I chose a radius of 100.
  3. Set the blurred image to grain extract.
  4. Create a new layer from visible. (you might just cancel the blurred image.)
  5. Desaturate the layer.
    This new layer is your detail mask, which I’ll just call mask from now on.

Let’s start masking

If you look at it’s histogram, you can see it is centered around neutral gray and has some slightly darker and some slightly lighter parts. Using this layer in grain merge mode will darken the original image where the mask is darker than neutral gray and it will lighten the original image wherever the mask is lighter than neutral gray.
So let’s set it’s layer mode to grain merge to see it’s effect on the original image.

You should now see, that it has added a lot of local contrast. Too much actually. It doesn’t look very pleasing and there are positive and negative halos visible. What I like to do generally is to add local contrast or sharpness to the dark part of an image. So lets start by doing this here as well.

Duplicate the mask, we will need this one later, and call this one “lights”. Add a luminosity mask to the first mask, which we will now call “shadows” and invert it. Now the added contrast is only visible in the darker part of the image.

It’s nice but there are still some problems. For example this image has some areas which are already quite dark. Adding local contrast in these areas will push some of the dark parts even closer to black. As I don’t want this to happen I will now select only the part of the mask, which is brighter than middle gray in order to only add some “highlights” in the dark parts. This will also get rid of some negative halos. You can do this by using a curve on the mask itself looking like this:

5 Only brighten_sm

Using our “shadows” mask on the original image should now get you this:

You might want to donwload the original image and the one above to compare as the differences are quite subtle.
Now we could do the same to the brighter part of the image. Use the mask called “lights” in grain merge mode and add a luminosity-mask. This should look like this:

Again we see the problems mentioned before. There are some positive halos (see the tree tops to the left) and some of the already quite bright parts are pushed even further towards white. This time we’ll use the same curve tool on the mask as before, only that this time we select only the parts of the mask, which are darker thatn neutral gray, as we just want to add some “shadows” to the bright parts of the image.
Here’s the curve setting:

8 Only darken_sm

And here is the image with only the “lights” mask active.

Activating both masks, “lights” and “shadows” will give us our final image.

Your layers in gimp should look somewhat like this:

Layers

Now in this image the effect is more visible in the darker parts of the image as there is more contrast in those areas and the unsharp mask only heightens contrast where there already is. If you want your masks to add even more local contrast you can just duplicate them or use the curves tool to add some contrast to the mask itself.

I hope you enjoy this little tutorial.

6 Likes

Very interesting technique @McCap, thanks for sharing!

It was quite easy to create a simple PhotoFlow preset that reproduces your steps.

Like in your case, I used a large-radius Gaussian blur+Grain extract to generate an high-pass image, the splitted it in two versions containing only pixels below (dark halos) or above (bright halos) 50%. The two versions are re-combined in Grain merge mode through a luminosity mask that selects either the light (in the dark halos case) or dark (in the bright halos case) portions of the image.

Being non destructive, the presets offers the possibility to tune the gaussian blur radius as well as the luminosity masks, with immediate preview of the result.

Here is what I obtained with your test image:

The link to the refined_usm.pfp preset is here.

2 Likes

@McCap Another interesting tutorial :slight_smile:. I do want to mention that I kind of got lost the first time reading it. I had trouble tracking which layer or mask you were talking about, so maybe make it super duper obvious for the dense and / or dead tired. And perhaps some screenshots of the layer panel, etc. Anyway, I will eventually give it a go. Thanks!

2 Likes

That is the great thing about your program!
I did something close to what I presented here, but never saved it as a preset, so thanks for that. :grin:
I’ll look into it when back home.

First of all I wouldn’t call you dense, just tired…second that is a good suggestion and is actually exactly what I was thinking after I posted this. I’ll add this info later.

I just checked your preset. Nicely done.
I have one question though. Why do you need the layer called input clone?
It is basically referencing the layer called local contrast, which again is referencing the original image. Wouldn’t the local contrast be enough?

local contrast input is a buffer layer that provides the input image data to the subsequent layer clone operations. That is needed because a layer clone inside a preset cannot reference a layer outside of the preset itself…
Then the gaussian blur layer applies a blur and extracts the high-frequency components using the Grain extract blend mode.

In order to increase the local contrast, the high-frequency part has to be compined with the original image. Hence the input clone layer, which puts back the original image above the gaussian blur layer.

Finally, the high-frequency image is cloned twice, by the two hf layers inside the dark halos and bright halos groups. Those groups are blending the high-frequency components back into the original image (the input clone layer) in Grain merge mode…

Note that the layer cloning as used here boils down to a memcpy of image data, and therefore is computationally quite inexpensive.

Hope this clarifies the logic…

1 Like

This technique is interesting and i love that you shared it, thanks!

The final image is great for some purposes and not others, and although it may be slightly off-topic in a way, think it’s worth thinking about. The most effective processing doesn’t exist in a vacuum, but takes into account how the image will be used, of course, so this picture illustrated your technique really well, but if i was going to try and sell the image (for example), for stock or for a poster, or to make a fine art print for a wall, i’d probably do a little more (probably you would too, this isn’t meant as a criticism of course!)

For selling, you need a thumbnail that “pops”, which means higher contrast and saturation in a picture like this. For a print (whether sold or not, of course), you may want the primary subject (arguably the pond in the foreground) to be the most prominent, so for that i’d maybe lighten the mid shadows. And then to highlight what makes the pond unusual, maybe increase the saturation in teh reds a little. I’ll upload an example, although how strong the reds and blues look will depend a lot on your screen.!

Going further probably requires giving different areas of the picture different treatment, and i’m not saying that the version i’ve uploaded here is “better”, but that it’s processed for a particular purpose (to “pop” a little more, in this case, even at the expense of starting to look artificial).

poppy|690x431

1 Like

I don’t think this was meant to be a complete image, but rather part of the edits, and this mini tutorial demonstrates an interesting technique.

Yes, i agree.

Yes, makes sense…I overlooked this when watching your preset.
Also the buffer layer in order to reference a layer outside of the preset, now makes sense.
The rest was clear.
Thank you.

@barefootliam: As you mentioned this was just to show the technique. Feel free to use this image (it is CC-BY-SA) to make a new topic about how to process images for which environment. It could be interesting…

@afre, sorry didn’t have the time yet to redo this in Gimp and add the layer screenshots…

No need to address it right away: could be clearer but it is okay as is :+1:.

updated the luminosity mask script for gimp 2.9 so it complains less
attached for those that are interested

sg-luminosity-masks-2.9.scm (5.2 KB)

1 Like

Thanks, Luminosity mask Saul Goode now works with no complaints. Much appreciated.