tone-equalizer Masking

OK … now understood … thanks

I wonder if this is the issue I sometimes get with the tone equalizer. After setting up what I think is a good mask covering the whole range of my image’s tonal values, I hover over the darkest parts of the image and it shows on the advanced tab as somewhere in the middle of the histogram, and other brighter parts are very close to the darker parts on the histogram. In other words, it sounds like a contrast problem (or lack of it), but adjusting the masking settings doesn’t seem to get me anywhere. Of course, it might be that I still haven’t mastered the art of masking though…

I really like the idea of the TE and have had some good success with it, but I agree with OP that masking could still be made easier. I’m afraid I don’t have any constructive suggestions though. I would be interested in seeing a false colour or posterization implementation…

No, this does not apply to how the mask is applied, only how it is displayed.
Since the filter applies smoothing, it means that a bright spot will alter the local average, brightening darker areas around it (and the dark areas lowering its brightness in return).
You can play around with the edges refinement to make the filter follow edges more exactly. Or, you may be better off with manually adding masks to exposure (that’s kind of like what tone EQ does).
Turn on mask display (but turn off the modules that come after tone EQ in the pipeline) to see your actual mask.

1 Like

That kind of statement is unusable for me as a designer, it’s too broad.

Please, let the solutions (false colors, posterization, whatever to massage the mask) for later. The first stage of design is to accurately frame the problem and split it down into elementary, specific and achievable tasks. For this I need to understand at what stage the problem is: masking internal algo, GUI, wiring between both, or user education/misunderstood expectations.

From specific problems, I can derivate specific solutions. But making things easier – although a valid user expectation – doesn’t bring us anywhere closer to a solution. There is no “make things easier” handbook.

Please provide specific examples : what initial image do you have, what did you do, what did you expect as a result, and what result you got. From there, I can do my job. Otherwise, it’s just empty goodwill.

3 Likes

I understand, I just wanted to add my thoughts to the thread, and I’m aware that it may simply be that I haven’t yet mastered the tools already at my disposal.

But I’ll share a file here that may show some of what I’ve experienced. This photo is not great but has some tonal variety in the vegetation that I wanted to play around with. After leaving the default scene referred options alone (exposure, filmic, etc.), it is already decently exposed, if a little flat. If I then enable the tone equalizer, go straight to masking and click the eye droppers for both exposure comp and contrast comp, I get a good distribution across the histogram. But turning on the mask, you can see that the vegetation is pretty much all masked in the same tonal range. Hovering over a dark hedge puts the line somewhere in the middle of the histogram, and it doesn’t change much when hovering over a lighter piece of foliage. In fact, I even get some inversion where some of the lighter leaves show up as -6 EV and some of the darker ones at -4 EV.

This is obviously a mask contrast problem, but increasing the mask contrast comp quickly results in the mask clipping. I end up juggling all the sliders and getting some improvement, but it’s finicky and I have trouble getting much contrast between foliage tones. I guess this is what I meant by “could still be made easier”, which I realize is not very helpful.

So, is this simply user error and/or my expectations wrong?

IMG_5488.CR2 (25.4 MB)

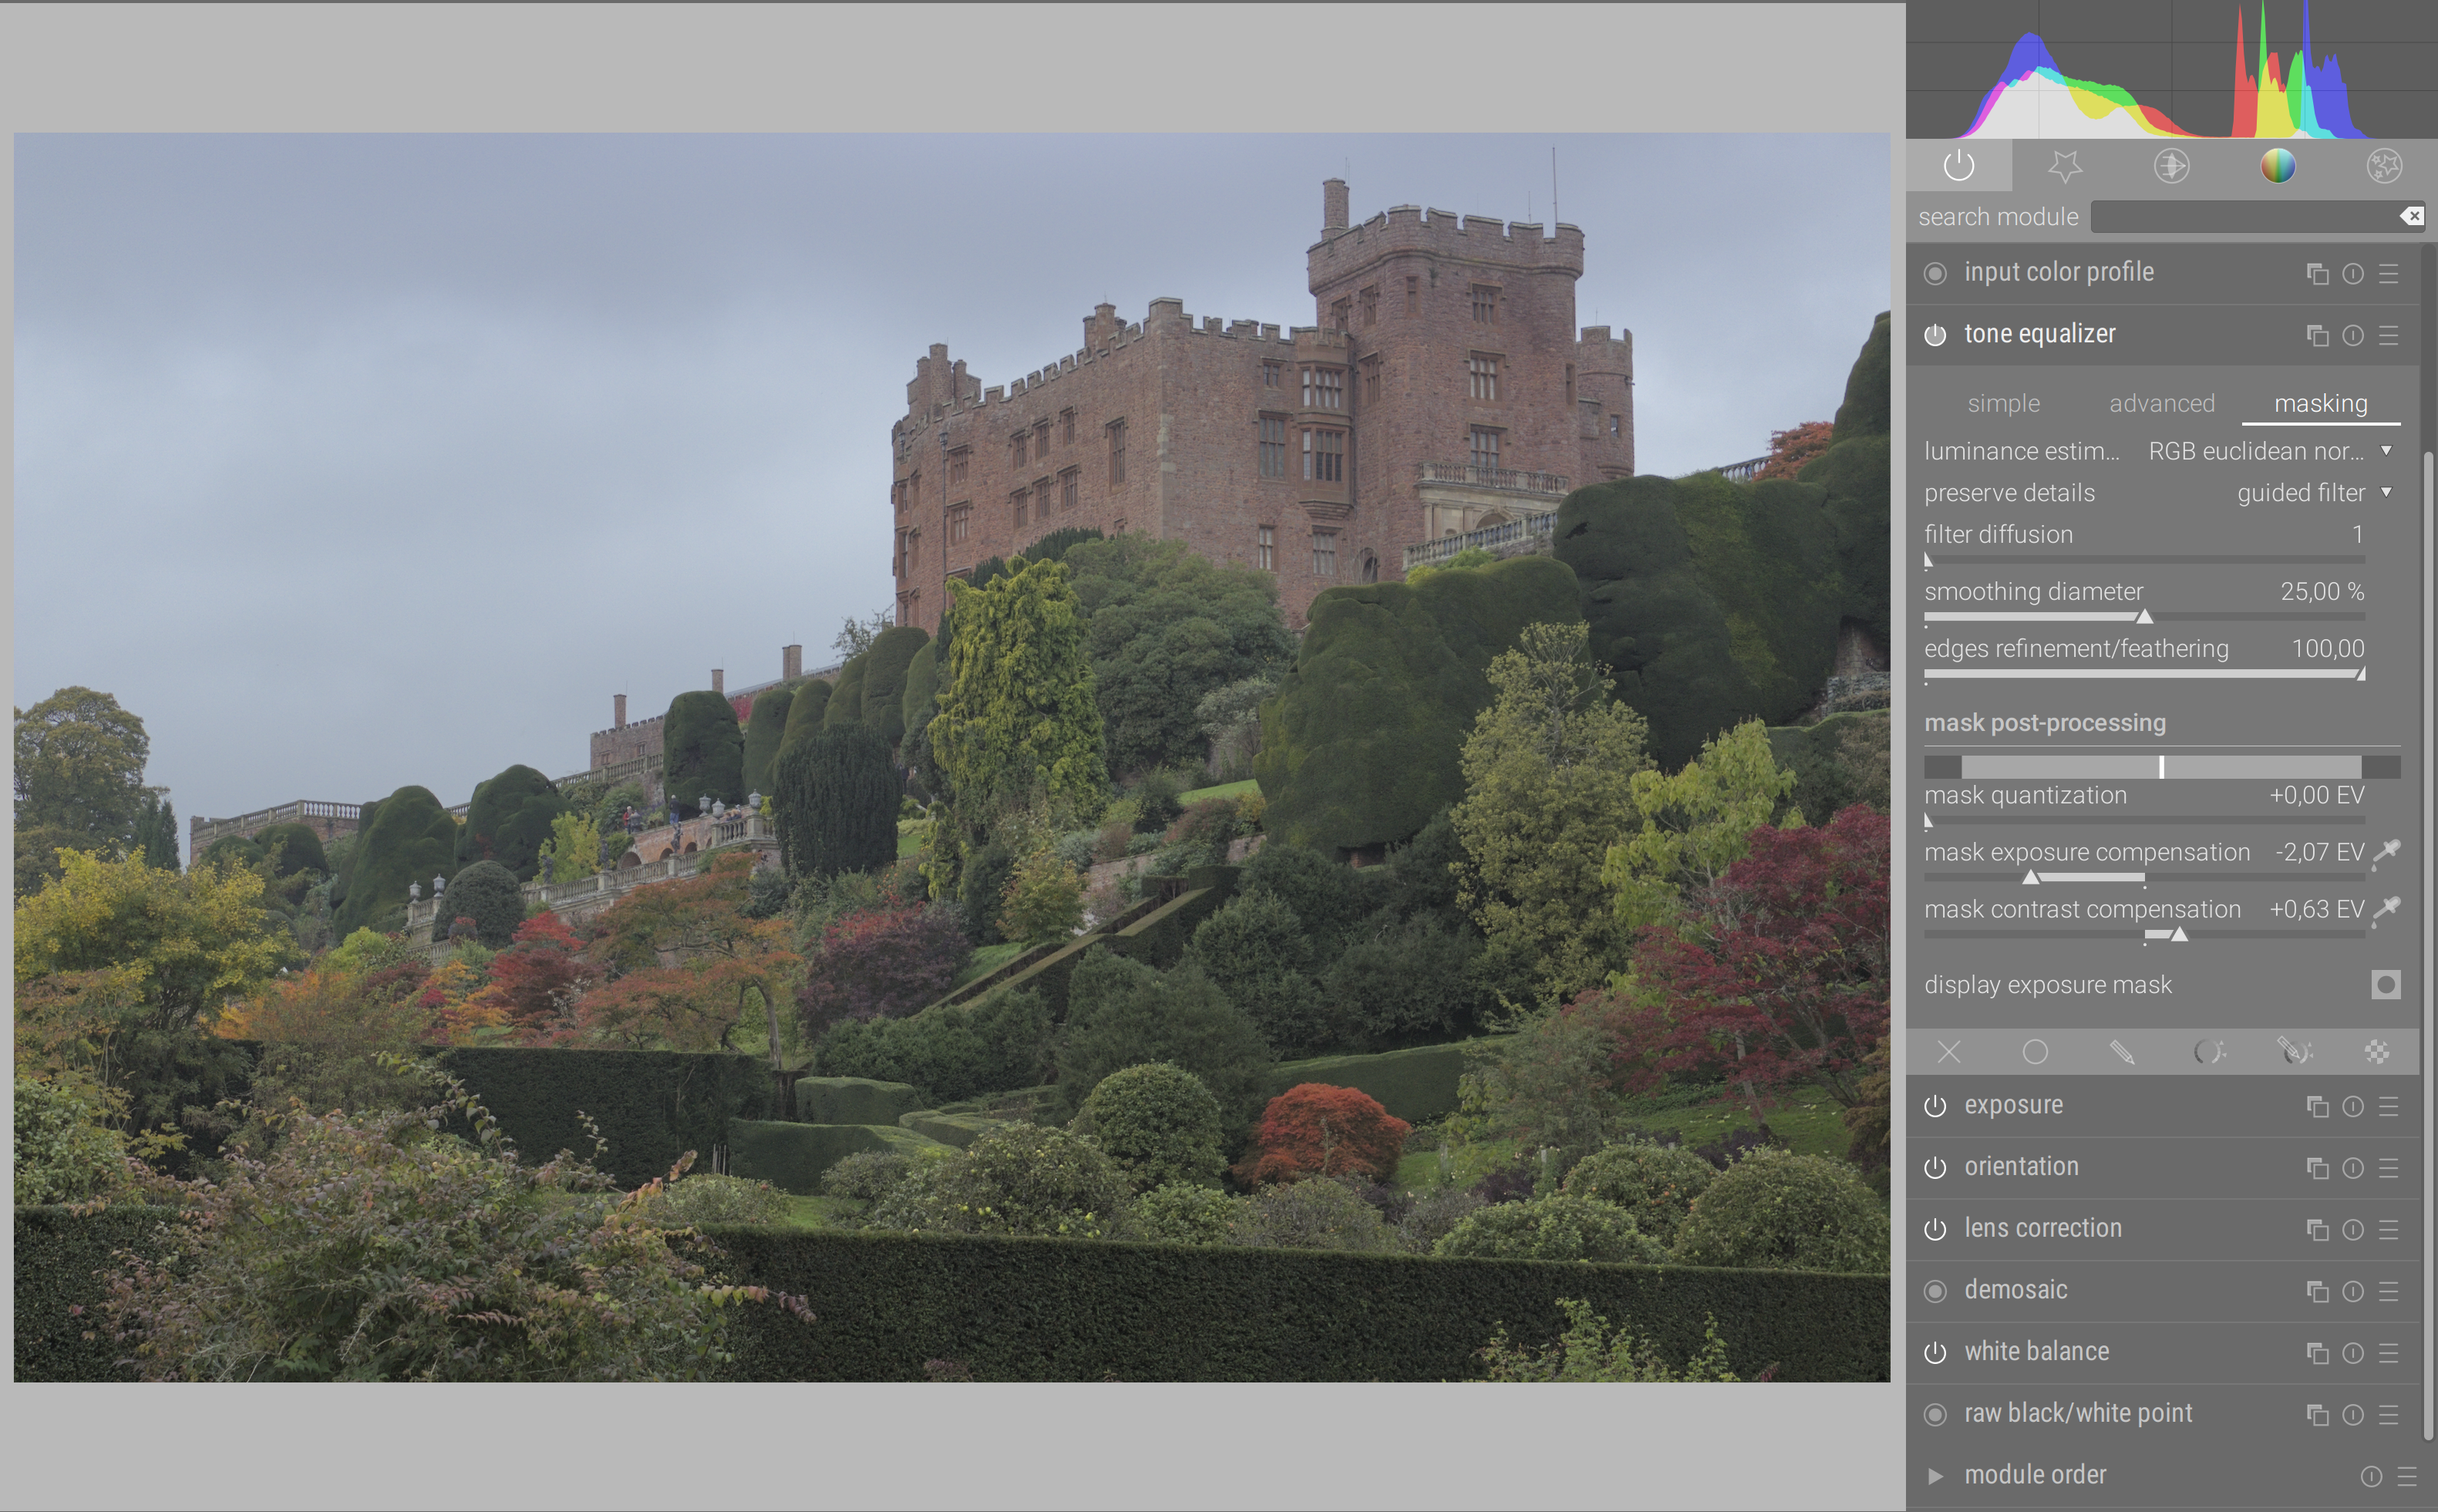
This is what I get using your process (and disabling filmic, that is applied later in the pipe on top of the mask – so maybe that is the problem):

(For reference, not disabling filmic gives this:)

The mask does mostly what it is asked : splitting features (sky vs. ground). The overblurring of the dark areas is a side-effect of the guided filter, which is not exposure-invariant, and as such will blur more the lowlights than the highlights (that’s a math problem with the internal variance computation, algorithmic fix is on the way with @rawfiner and needs testing/refining).

Meanwhile, if you want less blurring, hence more details, you will have to tape the mask more closely to small features (using higher feathering value) and perhaps brighten it a bit:

Now, the problem is the sharper the mask is, the more local contrast you may remove from the picture, with contrast compression settings like:

Actually, having a blurry mask is the guaranty that local contrast will be preserved, since the exposure blobs will get the same exposure compensation.

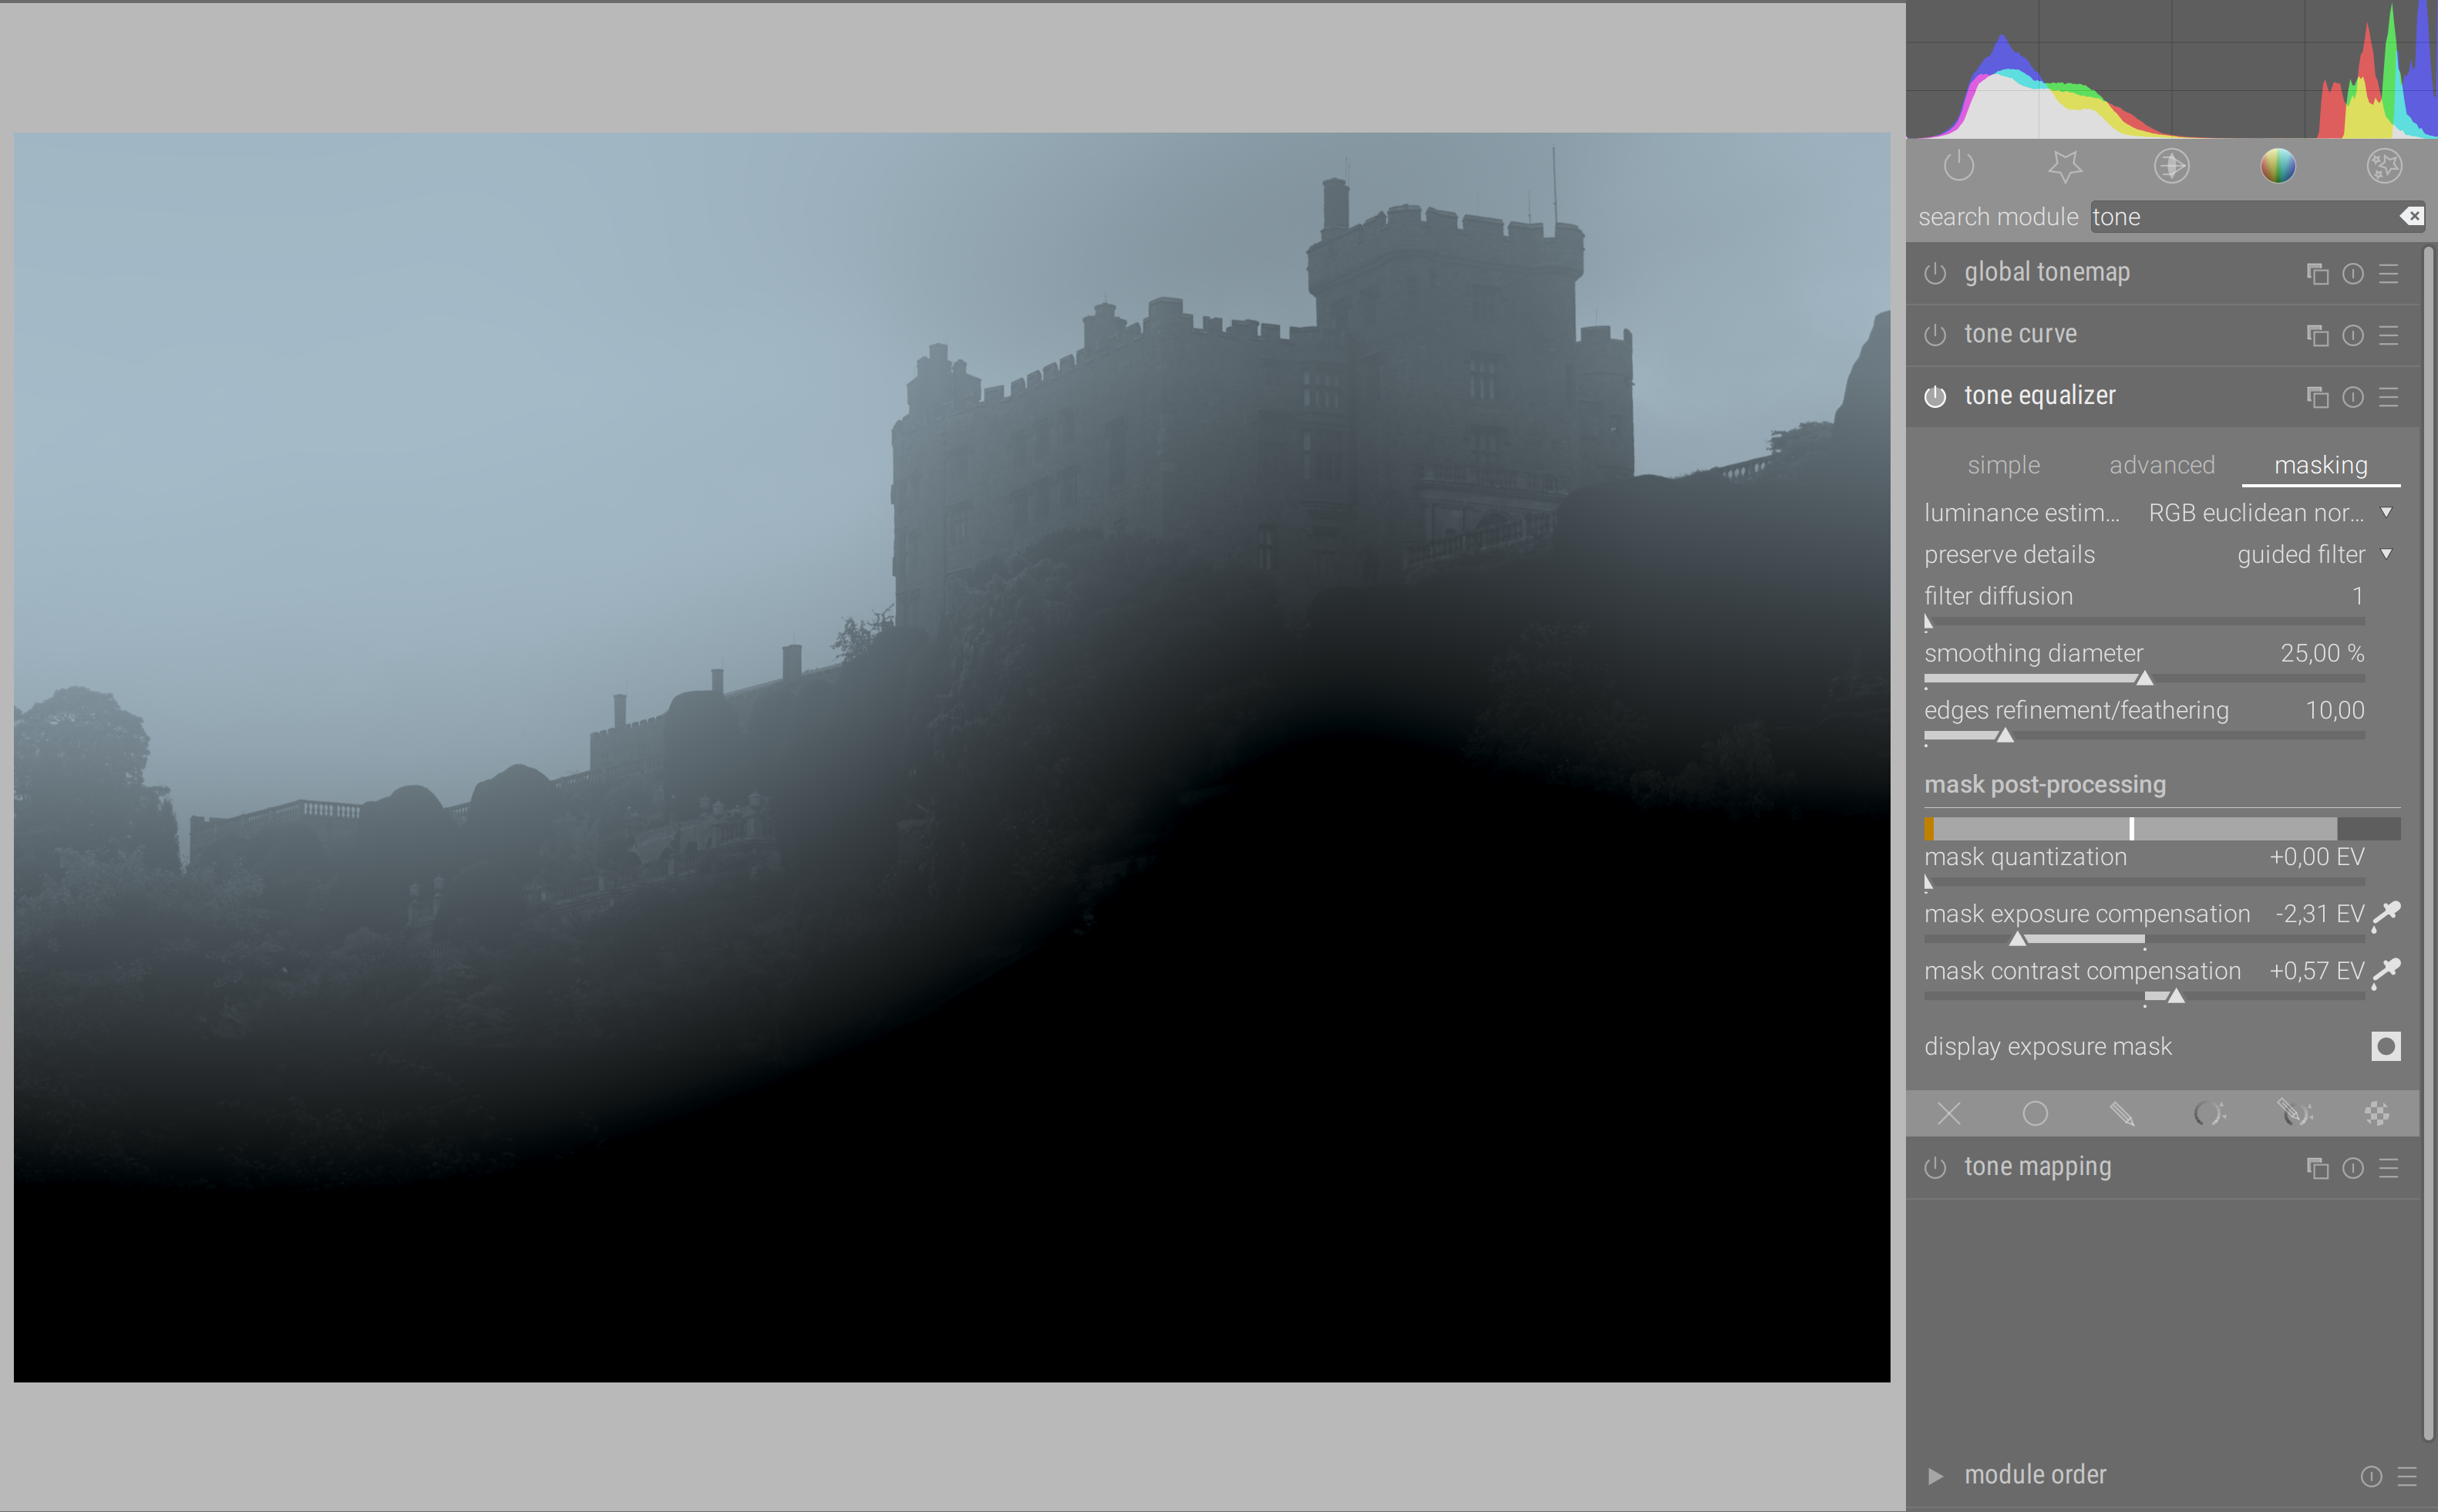
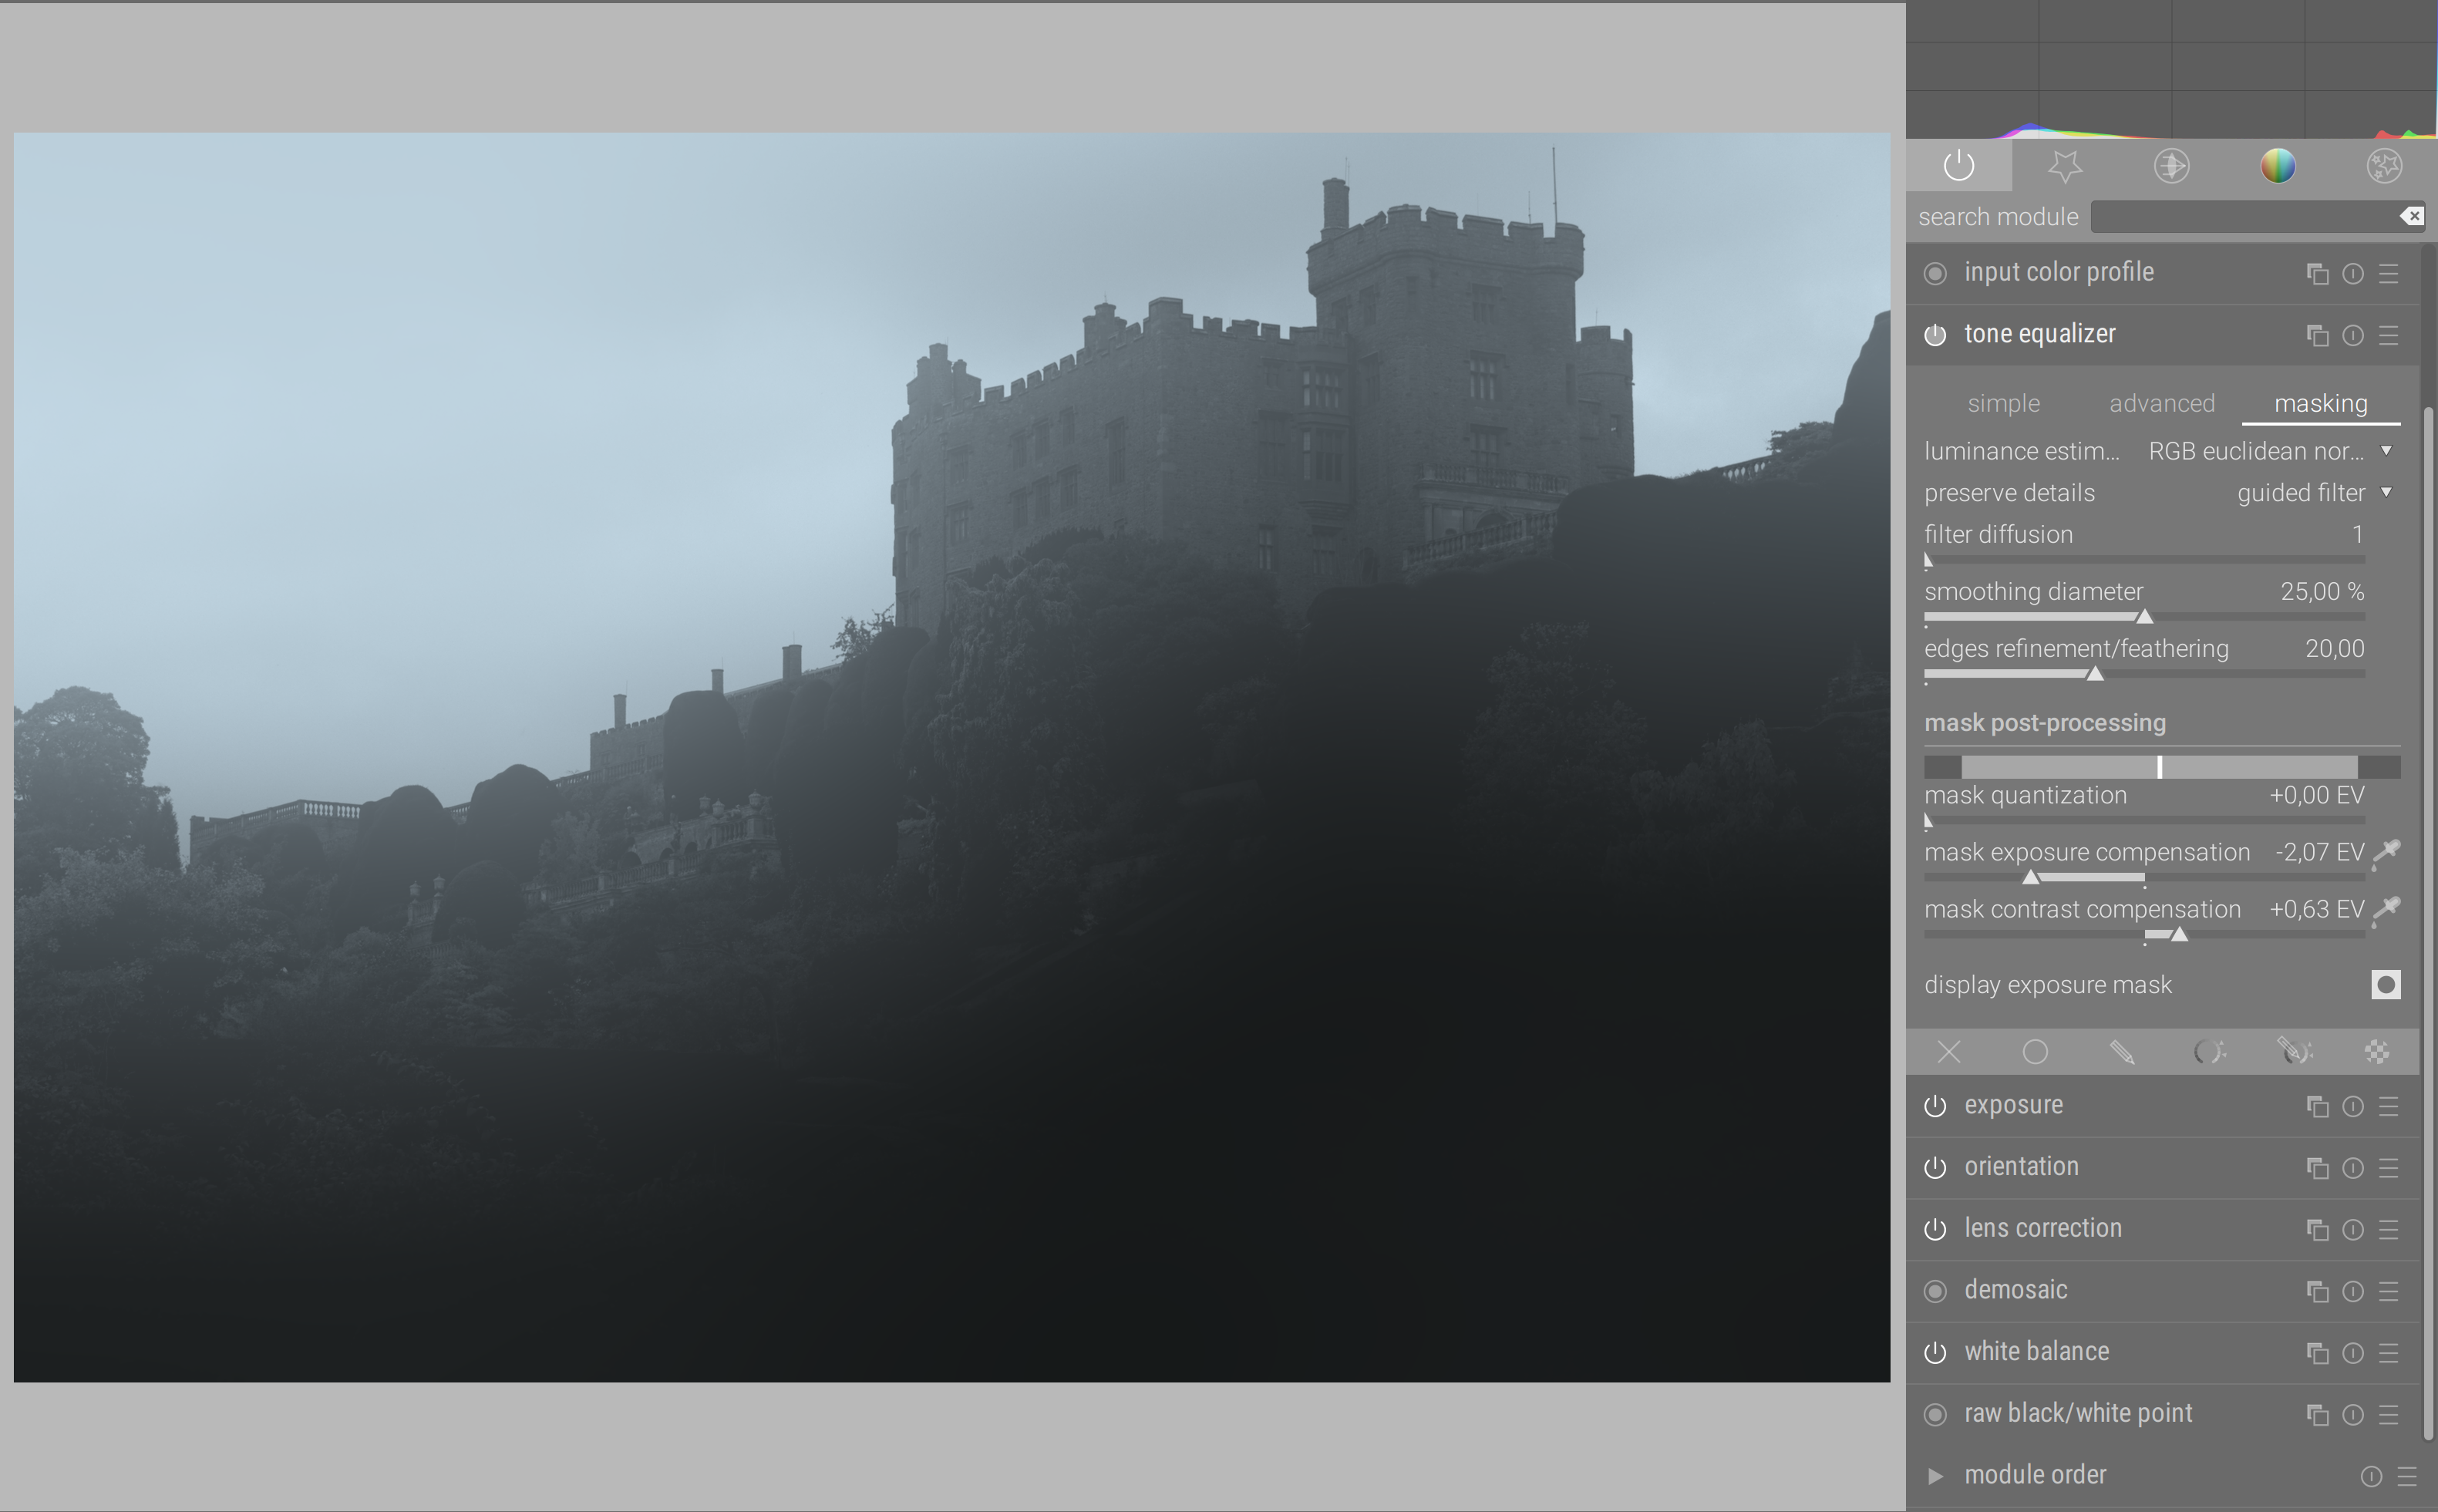
For example, this is the result of the default mask feathering = 10 that gives the above blurry mask:

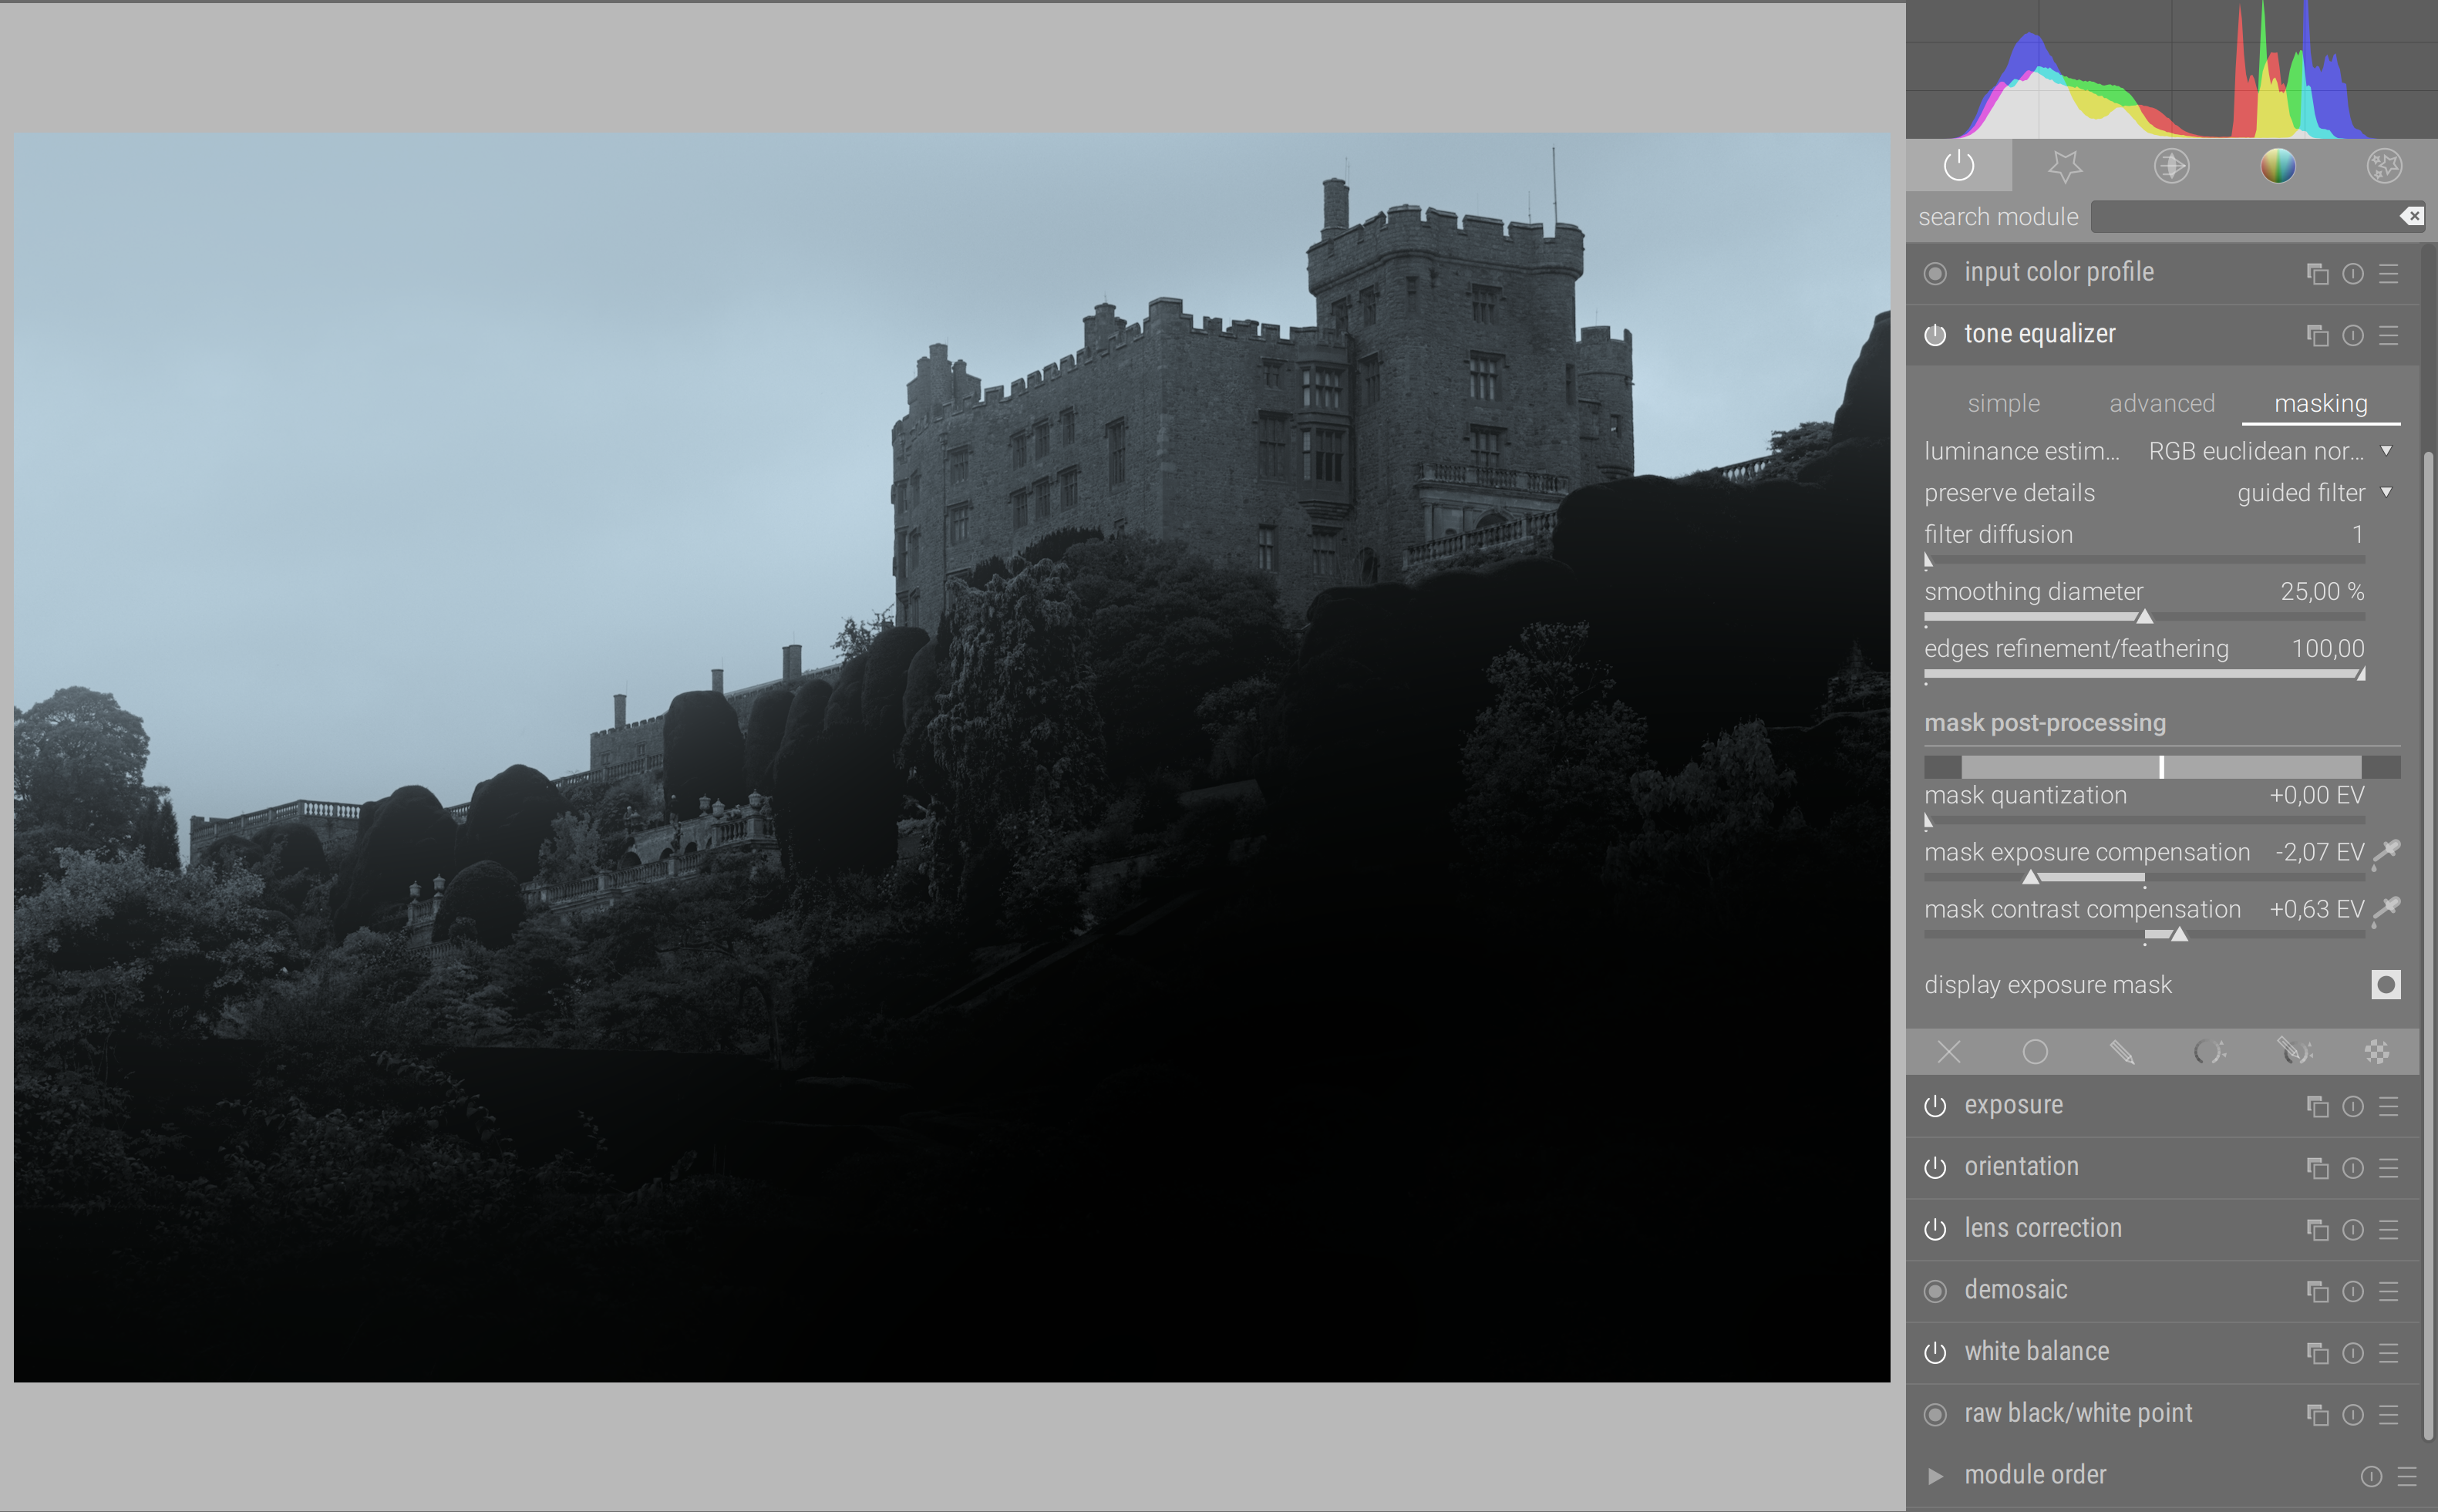
And now, if I push the feathering all the way to 100:

(here is the corresponding mask for reference:)

So, again, I’m not sure if this is understood : a blurry/blotchy mask is actually better preserving the local contrast of the picture than a sharp/detailed one. Having details on the mask is usually bad news, except if you plan on increasing contrast through the tone EQ, in which case it will also increase the local contrast aka acutance aka perceived sharpness – but you might consider ditching the guided filter (details preservation) at all in this case and use the simple 1D tone curve approach.

Then, having balanced the sky exposure vs the ground one, you can use filmic to restore perceptual contrast:

IMG_5488.CR2.xmp (8,3 Ko)

4 Likes

Many thanks for your detailed reply.

I do understand this. I think my expectation is to get a bit more variance in the shadows (blurry, but distinguishing between the lighter and darker shades of foliage). Something a bit like this, which I’ve hacked together using the soften module just to show differences in foliage tone:

Perhaps this will change a little with the refinements you say you are working on with @rawfiner.
Thanks again. It’s a great module. I think I just need more practice with it and to alter my expectations.

Ok, so if it is the result you are expecting, indeed fixing the variance computation to make it exposure-invariant should be the key.

2 Likes

Hi all, @anon41087856,

I’m posting in this thread, because it’s linked to my issues with the ToneEQ & the masking tool … and I wonder if I’m not in the same situation as the OP.

To my great disappointment, I was struggling yet again with the “Tone EQ” module Aurélien indulged us with … and once again foolishly checked (old) the “Zone system” module.

Correct me if I’m wrong, but I believe the “zone system” (not the module, Ansel Adams’s) is the foundation of Aurélien ToneEQ.

And it looks like the “Zone system” module is trying to achieve the same as what Ansel Adams proposes, as the image is split in x (10 by default, an be customized) zones by luminosity/lightness. Is that correct ?

I now know that Aurélien’s ToneEQ is working in a Linear space (in RBG, I think), while the Zone System is in Lab (so in Log, if I get things properly).

The thing is, I find it way (repeat) easier to achieve the desired result with the Zone system module than with the ToneEQ.

And I think it may be due to the “preview” that the Zone system module has
image

Aurélien,

  • have I misunderstood or overlooked anything in my above sentences ?
  • is there something inherently different between the 2 modules, i.e. neither from a space (linear, log) nor from an algo one, but from the tool/module intent perspective ?
  • Once thing that tickles me is that, in ToneEQ the user sets the exposure correction of the selected (Ansel Adams’) zones. But in the “Zone system module”, it seems the user chooses the zones he want to give more space to (i.e. more EV) or less space to( less EV) … by keeping the same spectrum of lightness from 0 to 1 (or 100%) … I thing I get that the “compression/expansion” of a zone to the benefit of another could be seen as the slope use from one zone to another. I’m not sure this is correct …
  • is such a previewing utility something your ToneEQ could (theoretically) be using/proposing ? I’m always struggling with the Masking tool. Always :frowning: Thought I think I watch all your videos.

Many thanks … and don’t hesitate to kindly indicate if anything in the above is badly stated or if one of the questions is unclear ?

Guillaume

2 Likes

No. First of all, the zone module of dt works in Lab, where L is the cubic root of the luminance Y, and splits the display-referred range (from 0 to 100%) into as many zones as requested by user. Meaning the width of the zones changes.

Adam’s zone system relies on log2(luminance), which is EV (each zone has 1 EV of width). Tone EQ process pixels in linear but masks the zones in log2. So it’s consistent with Ansel Adam’s and analog darkroom legacy, and the zones have always the same width.

But the main difference is Tone EQ works in scene-referred, between almost 0 and + infinity. That’s why the masking needs to be adjusted to the current dynamic range.

The other difference is the zones module doesn’t blur surfaces and doesn’t preserve local contrast. That makes the (invisible) mask behave in a more intuitive way, but may flatten details quite a lot. However, local contrast preservation is optional in Tone EQ (although enabled by default).

Zone system module doesn’t care about geometric zones, actually. It’s a different way to produce a tone curve. What Tone EQ does is closer to analog dodging and burning : build a geometric mask by splitting the image into luminance intensity, and assign an intensity change to geometric regions selectively.

The mask is the preview, there is nothing else to show. Tone EQ shows the mask as used in the processing. The zones module shows a lie, the nice blurring and segmenting doesn’t match anything done by the algo and is only a GUI thing. If you configure the Tone EQ masking properly, you should get a preview that matches the zones module.

Again, a bit of history will put things in perspective :

Tone EQ is only an exposure module where the mask is built in an automated way. Nothing more.

4 Likes

The problem that I typically face is trying to develop ‘texture’, mainly in the highlights (for instance snow or clouds). I have 'till this time relied on the use of shadows-and-highlights, which does work but can also be fraught with problems (edge artifacts). I find it frustrating that t-e, that is such a fine tool, will not allow me the precision of making this kind of adjustment.
The t-e interface is really superb, is there any way that it can be more precise like a scapel rather than a blunt brick?

I already answered that many times. Either disable the details preservation, in masking tab, or increase the feathering parameter by a lot (which should end up the same if > 100).

1 Like

You are right … using a guided mask and feathering set at 125 I was able to perform substantial cloud shading.
A few things noted: It would be nice if the feathering scale was extended to some reasonable level so that this could be a more ‘normal’ usage. The mask does not reflect this more subtle shading so is less useful. Lastly I tried to restrict the cloud shading with a parametric mask … the mask worked fine but problems were indicated.

I should have said I am running the daily git.

That doesn’t look good. Could you explain what are we looking at? since I don’t use dt, let alone the git version.

There appears to be some sort of conflict between t-e and parametric masking at this time. If you are not using dt then it should be no great concern to you.

Are you changing the model used for the mask…it can make quite a difference in the range of tones that are produced??

You sound like you would be more comfortable with the zone module display…I think the exposure blending of the TE is a huge part of its functionality and that would be hard to convey with color would it not…the way I look at it I just try to get a mask that has the biggest range from dark to light and a very smooth transition…I don;t care exactly what is where but then when I apply changes they will be smooth and have the widest range of ev possible…just my way of looking at it…

I have the same issue switching back and forth so I think I am going to see if there is a set of dymanic shortcuts that could allow you to change contrast and exposure while looking at the histogram…I am not sure it can be configured but I think I will try…

but feathering > 100 is equivalent to simply disabling details preservation, while being much heavier on the CPU.

I need to see your curve and mask to diagnose. This looks like user misunderstanding, what is the goal you try to achieve ?