Flatpak vs debian package install explains it.
Thanks.
Thats why I posed the question - I had tried quite a few different “attempts” at various ideas within what I knew - and was not always successful. It is always great to see what other people can do - maybe they have a better technique or methodology. I appreciate learning and playing with play raw - knocking brain-cells together.
- filmic, just the basics
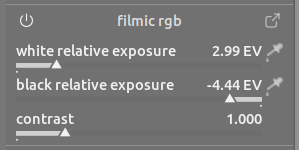
- 1st Tone EQ: inversion curve

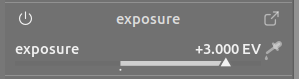
- set the exposure
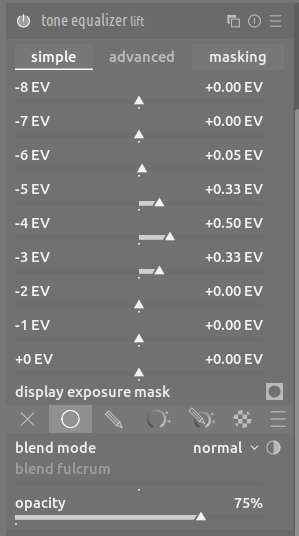
- 2nd Tone EQ: mid-tones lift
Don’t exaggerate: what is in shadow remains in shadow.

1X1A5669.CR3.xmp (9,5 KB)
Fine tune colors and detail to suit your taste ![]()
3 Likes
Thanks for the pointer - I’ll queue it up and watch it tomorrow.
Thanks for the recipe - it is much appreciated. I’ll go away and play.
I find this very interesting - to me, this looks rather unnatural, and I’ve found this before on other images too, when people correctly white balance different parts of the same image.
Is it just me?
No criticism whatsoever intended to your edit, @Terry - just curious as to what others think on this point.
I welcome the criticism and feel this is a really valid point. I like how the new color calibration module can handle this, but should it be used just because it is able to adjust this shadows coolness? Maybe not, but the beauty with the option is that the opacity slider can be adjusted to tone down the effect to an individual’s liking. I toned it down a bit, but not enough. I could have also used the rgb curves to achieve a similar effect. I feel the shadows needed some warmth, but I have been too heavy handed.
1 Like
AP does an episode featuring the CC module and managing a dual WB situation for shade and sunlight… I think it’s a park next to some train tracks… this question of how to manage this situation reveals the perceptual nature of color
2 Likes
I decided to have another play with this image. I am still not happy with my edit. It feels dull and flat looking.

1X1A5669_01.CR3.xmp (29.7 KB)
4 Likes
I like this one ![]()
I feel I need to play with the contrast more in the sunlight. An extra instance of rgb curves should suffice. I like this image to play with as it is challenging. BTW, any color correction here in the shadows was done with the rgb curves to warm it a little but not too much (I hope).
1 Like
The shadows are too bright, it looks HDR tone mapped.
1 Like
Todd, do you have a name for that episode or a link? I went to his video collection on YouTube, but couldn’t find what you have described.
Yer…I agree. I am struggling to balance the shadows and highlights how I like the look. But we learn from challenging images. Thanks for the constructive criticism.
1 Like

Get to the image around 27 min after the explanation of illuminants…
1 Like
I am a sucker for punishment. So here is another attempt. This one relies heavily upon the tone equalizer module for lifting the shadows. However, I used my inexperienced hands with the color balance module to warm the shadows a little.
1X1A5669_02.CR3.xmp (13.9 KB)

2 Likes
shadows and highlights is an ‘LDR’ (display-referred) tool that works on data whose dynamic range has already been compressed. Some swear by it for smaller modifications (I mostly just swore because of it, when I used it ![]() ). tone equalizer has access to the full dynamic range captured by the camera (it is scene-referred).
). tone equalizer has access to the full dynamic range captured by the camera (it is scene-referred).
2 Likes
You should be careful with the non-pixel-wise operations, such as tone mapper and local contrast.
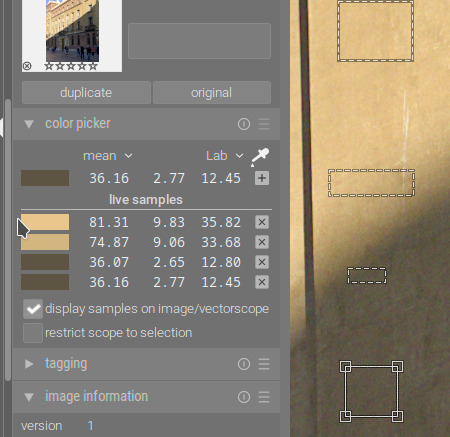
Here is an example. It is easily visible, but also measurable, that in the area where the directly sunlit area transitions into the shadow, the shadow first drops too deep, before becoming a bit brighter again, creating an artificial dark outline.

Note the L value is <9 in the transition area, >10 in the shadows.
Approximately the same area in the original image, without tone mapping/equalising (only exposure is boosted):


L is slightly above 11 in the transition area, slightly below 11 in the shadows.
Looking at lower zoom, this is even more visible. Top: tone eq/local contrast; below: only filmic (pixel-wise).


1 Like
@kofa I was about to comment on that effect but you actually explained why it happens and how to avoid it. ![]() Not that I could personally do any better with darktable though (or even as well). I’m just not practiced well enough these days.
Not that I could personally do any better with darktable though (or even as well). I’m just not practiced well enough these days.
Colour pickers with just filmic applied:
With a heavily blurred tone equalizer mask to lift the shadows:
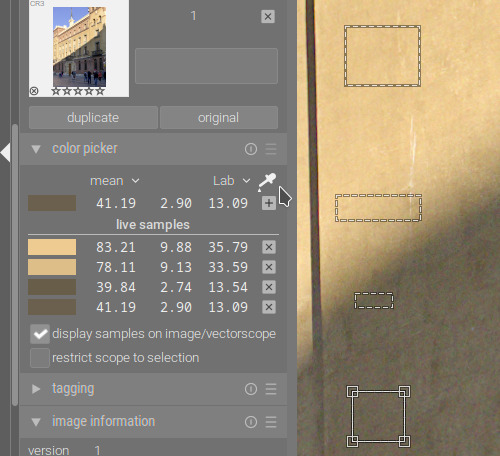
The transition (brightly lit, well above the boundary → brightly lit, just above the boundary → shadow, at the boundary → shadow, further away) is preserved (the L order is always 1, 2, 4, 3 (81.31; 74.87; 36.16; 36.07 and 83.21; 78.11; 41.19; 39.84)).
The tone equalizer mask:

And the gentle curve to lift the shadows:


1X1A5669_01.CR3.xmp (11.3 KB)
A more heavily pushed version (I shifted the mask so it only covers the shadow parts, as I didn’t want to affect the highlights).

1X1A5669_02.CR3.xmp (11.9 KB)
1 Like