Otherwise, create a xmp file drom both Linux and windows and share them so we can have a look.
In your screenshots you are searching for modules in the one, and showing active modules in the other. So I can’t see if the processing is the same in both .
From the info I have, I am stumped :). But I hope it’s something simple .
To see “true” clipping in DT it must be tweaked …there are other threads and some discussion on the Git forum but not for some time…it is explained in one way here… @LateJunction try setting both OS with this configuration and see where you stand… https://github.com/darktable-org/darktable/pull/8051
Thanks for this link. In my usual fashion my inability to sensibly parse complex documents means that I have understood at least 5% of it, happily enough for me to discern one important clue - a revelation almost: that the clipping indicator is invoked by both luminance and gamut conditions. Up to now I had thought that the indicator was linked to solely to luminance issues. However, indeed, the user manual corrects my mis-conception: “…From darktable 3.4 onwards, the clipping warning indicator has some additional modes to help you to differentiate between luminance and gamut clipping, so that you can make better decisions about how to address any issues…”
Sadly, my acknowledged condition, of being unable to adequately parse sentences which have been crafted in a certain style, leaves me unable to appreciate the significance of this statement. What is a ‘mode’? Where are these modes exhibited? What precisely do they signify, such that I can deduce some appropriate corrective editing actions? None of this is explicitly stated, in the user guide, for us intellectual ‘slow developers’.
Anyway, the clue is that the clipping indicator doesn’t just show issues with luminance - which goes a very long way to explaining to me why my image, when viewed under Linux, was extremely dark, but at the same time was (supposedly) luminance clipped. Subsequently, my proven method of problem solving (stumble around, click buttons at random, rage at the world, use intemperate language, make unsubstantiated allegations about the documented relationship between the parents of the code creators or the manual authors - etc. You know - the typical unsuitable user reaction stuff) answered most of these not-so-difficult questions. I now know that all the red was caused by saturation clipping - almost certainly caused by my decision to set my camera to use Velvia film simulation The mere act of opening the color balance rgb module fixed it…
Now the only problem I am left with is: why? Why does the problem show in the linux version but not in the Windows version, when they are set to the same clipping indicator mode and the same pixel pipe line? And I guess that the answer must lie in the above responses to my original post
Well, that opened up another opportunity for embarrassment: my first reaction to this advice was to ask how the same icc can be used for these two install when they are using vastly different monitors, from different manufacturers, using very different technology (one designed in about 2003, the other about 2013). I decided to demonstrate this by just checking which iccs were in use: they WERE the same, both set to use the icc for the very old monitor. I corrected that (on the Windows machine) and, of course, it made no difference, since the problem was on the linux machine.
Both are set to use Linear Rec2020. I tried SRGB on the linux machine; the images looked awful so I reverted to Linear REC2020.
May I still request that you click on the ‘write sidecar button’ in the darktable organizer , in both Linux and windows, and then share the created xmp files with us.
If possible - it would help a lot - with the raw photo in question.
Ah, sorry about this - I lost sight of your request. I’ll attend to this later, but just to be sure, I am assuming that “click on the ‘write sidecar button’ in the darktable organizer” actually refers to turning on the option for ‘write sidecar file for each image’ in the storage category of darktable preferences? That setting is permanently on anyway, as part of my backup strategy.
I should also say that the raw files that were giving me a problem under linux have been ‘fixed’ (or worked around) by the simple expedient of resetting the exposure module. Will you then be able to find anything significant in the history stack in the .xmp?
We might be lucky, as I don’t think I have processed all these raw files in Linux and, in addition, I still have the images on the SDHC card if needed.
He is just requesting a copy of your xmp by writing it…
Basically if you have one of the files edited you should be able to copy with overwrite that xmp to the file on the other OS …if you still see the issue then your display profile or a mismatch of your Darktable gamut settings must be producing that difference you are seeing…
Yeah, I think that process was one of the things I tried on first discovering the problem and was further confused to find that image appeared fine in Windows. Anyhow, I have just now found an image on this film roll which I haven’t touched in Linux, which still exhibits the problem and I’m in the process of delivering it to this forum.
I’m sure I’m talking nonsense; I don’t actually understand what a working profile is so I think I am talking display profiles; I set this by right clocking on the ‘soft proofing’ icon, between the clipping indication icon and the gamut checking icon, to the right and beneath the image area when in the darkroom. Having right clicked this icon the top line is labeled ‘display profile’. Here i have chosen linear REC2020 RGB for both installations
Well it should only be this for testing the gamut checking and only if your display profile is not unbounded…… Setting display working and histogram profiles all to rec2020 give you a pass through with out any colorspace mapping …that is what the pull release was explaining…. Setting your display to this will often give you a poor looking image.
Normally color management takes care of things but for DT because the display profile is processed before the data goes to the histogram profile if it is not well behaved it can clip the data and so the histogram profile is not accurate…
So you should be using the icc that comes with your monitor or the one intended for your monitor or better yet an icc created with a calibration device… to ensure what you see on the screen is accurate
Your data from the camera is handled first by the input profile which should be the correct one for your camera or again one from a calibration. The working profile is the space that your modules work in and so should be wide gamut….rec 2020 or prophoto…
Your output file will usually be sRGB for viewing on the internet or a pc . It will correctly map the wide gamut data to the smaller colorspace for output….
Histogram profile would normally be rec2020….this would show true data clipping while processing in the pipeline…The issue with DT is the working profile data passes through the display profile before going to the histogram profile and so this is where the problem can be with gamut……gamut warnings come from histogram profile data and if the display data is clipping then basically you will hardly ever see anything out of gamut as the wide working space gets mapped to the smaller display gamut before being remapped to the histogram profile……
To compound this as you noted there are different gamut warning and you can set the limits so when comparing you need to be sure all that is the same……
So basically normall operating conditions would be input profile ….as assigned for your camera by DT, or a calibrated one from a color checker, then working profile most often linear rec2020, output profile as needed but most often sRGB for most jpg exports. Display profile will be icc for your device or an icc prepared from calibration, and finally histogram profile will be rec2020.
From this you can swap linear rec2020 for your display profile…your image should look crappy but now this will be the true gamut reading. If this setup is much different than what you see with your display profile as it pertains to gamut then for sure you have issues with you display profile impacting data passed to the histogram profile…
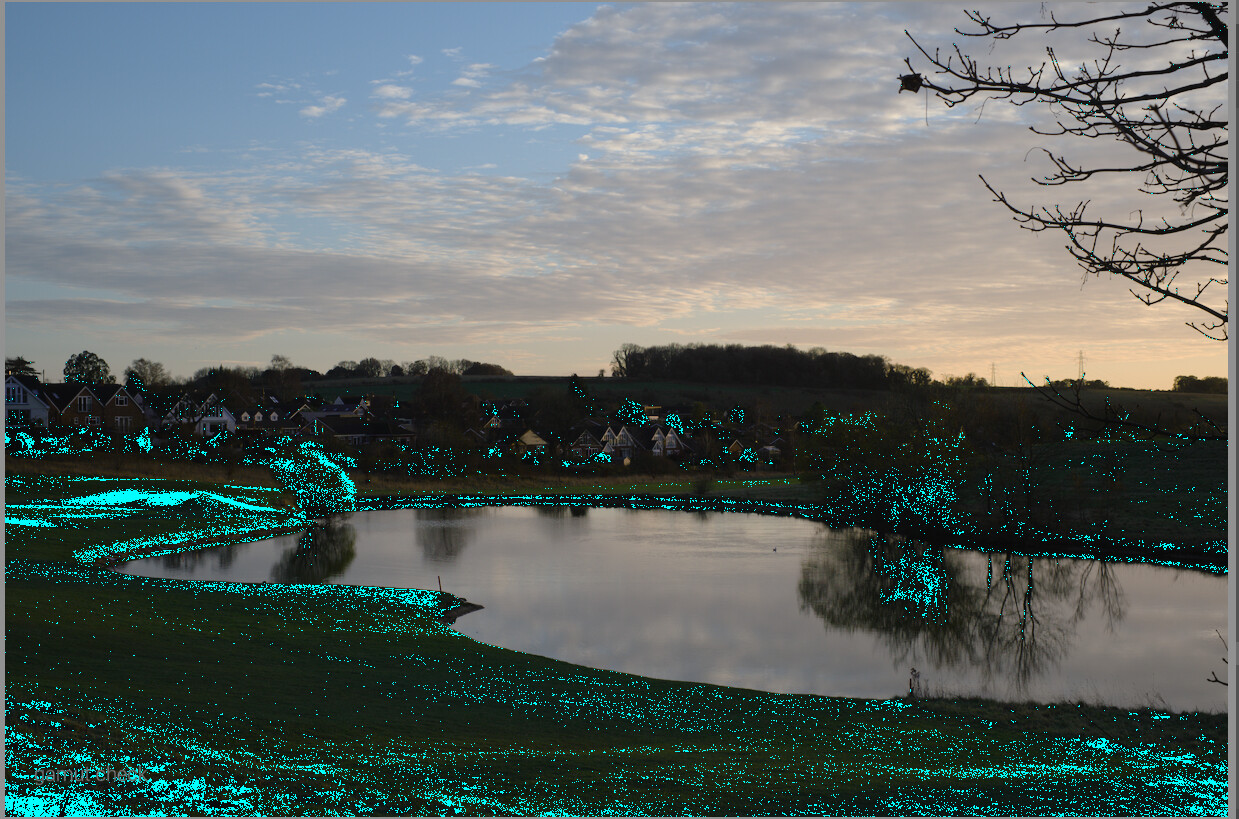
Thanks for your continued analysis. If I have read correctly I think you are saying that my adjustments in color balance rgb cause the out of gamut colours in the sample I sent. Please this the following screen shot which is another image taken at the same time, but which I don’t think I have touched (history stack at default; no sliders in color balance moved; display profile set at 'system display profile, which I hope is the ICC for my BenQ monitor which I installed yesterday) but is showing out of gamut pixels right away. is this caused by the combination of shutter, aperture and ISO I chose the image?
btw I purchased a Datacolor SpyderX Pro a year ago for obvious purposes but, having given it my best shot, I have been unable to make it work in Win 10, or in Linux, via the ArgyllCMS system, the documentation for which is utterly beyond my ability or patience to master. It seems that I don’t have big enough intellectual gonads to use this system - or to understand the language of responses to help requests on various forums. It seems nobody has the power to talk down to my level!
Edit: Hah! At the time I decided to take a screen shot the history stack did not - I think -contain the top 2 lines: the image opened in the colorbalance rgb module immediately after I double clicked on it in lighttable.
Well… the 'write sidecar ’ button writes a xmp file, even if that option you refer to in the settings is disabled . So you always get the latest fresh version, for sure.
Amd I was asking to do it once , under Linux. Safe the file you have there. Then do it again under windows, and safe that xmp file.
So we have two xmp files , for the same RAF . And I want to compare them , because I honestly think there is a local setting different in your darktable (preferences, system display profiles, etc… ) or there is a difference in the processing.
Maybe I’m just annoyed that I can’t think of anything that might be causing this :P.
By the way, I think people might want you to specify a sort or license for a raw file you post. Take a quick peek at a play-rae thread , and think if you agree with the idea (of putting your file out there in the public domain, or something stricter … ).
Thanks for the reminder about the licence requirements - I forgot because I couldn’t understand how to specify such a document (I last looked at software copyright issues in 1984, if I remember correctly).
Are you clear that I am running the linux and windows version of dt on two entirely separate computers, with quite different monitors? What I have sent is from the linux version. I have attached the windows .xmp for that same raw file, but I can’t be at all sure that it has been through the same modules, in the same order, with the same options/settings as the linux version you have. I assume this file, being open text, does not need a licence.
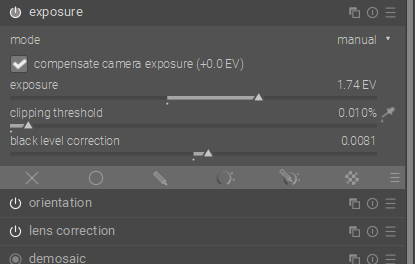
You have black level compensation on in your exposure…you must have added that …if you go to duplicate manager…make a duplicate and choose original…there is no issue…so I started to look at your modules…and you have that tweaked in exposure…For comparing between systems just look at originals with default workflow…perhaps scene referred…don’t do anything …now compare them…you can get those on each system by doing as I said…make a duplicate and make it original…black level in exposure I think is only ever user adjusted so that must be something you added…it might not be on the other machine and that alone could be what you are seeing…
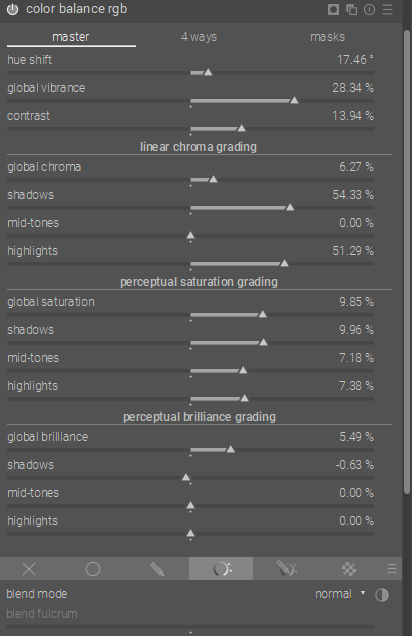
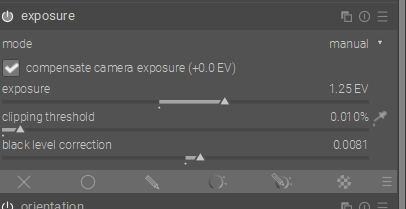
Your windows xmp has quite different exposure settings …black level is responsible in this case for your gamut… this edit also has lens corrections and your linux xmp has different settings for exposure (less and no black level adjustment) and you have cranked up most of the settings in CB…removing CB removes the gamut warnings…basically you are comparing apples and oranges not apples and apples between machines adding to any hardware differences you might have…
Windows…
Linux (if I have the xmp with the right machine)
EDIT: as suspected your black level adjustment has been added to 1824 as well so that is why it is triggering gamut warnings…