Hey, everyone. I’d like to submit a few images for consideration in an upcoming show and the rules state the images must be “1200 pixels @72 dpi”. The “1200 pixels” part I can grok but how do I go about exporting/reducing images to guarantee they’re 1200 pixels @ 72 dpi? I’m thinking I’d toss this at the gimp.
I’ve used both gimp’s “Scale Image” tool and ImageMagick to resize images but have never had to set specific dpi and need to get this right. Any help is appreciated.
“dpi” is relevant only if they are going to be printed. This would be quite large, as 1200 pixels at 72 dpi is 16.67 inches. But they would look horrid. Even the cheapest printers have at least 300 dpi.
It seems strange to quote only one dimension. Do all images have to be 1200x1200 pixels, or 1200 pixels on the longest dimension, or perhaps 1200x9999999 would be okay?
It is possible, of course, that whoever set the rules didn’t understand them.
With ImageMagick, “-density 72 -units PixelsPerInch” should do the trick.
Only use the scale tool to get that 1200 by xxxx image.
Good that the spec is given in pixels, Gimp works in pixels. 72 ppi is an old value that comes from when computer monitors were that pixel density.
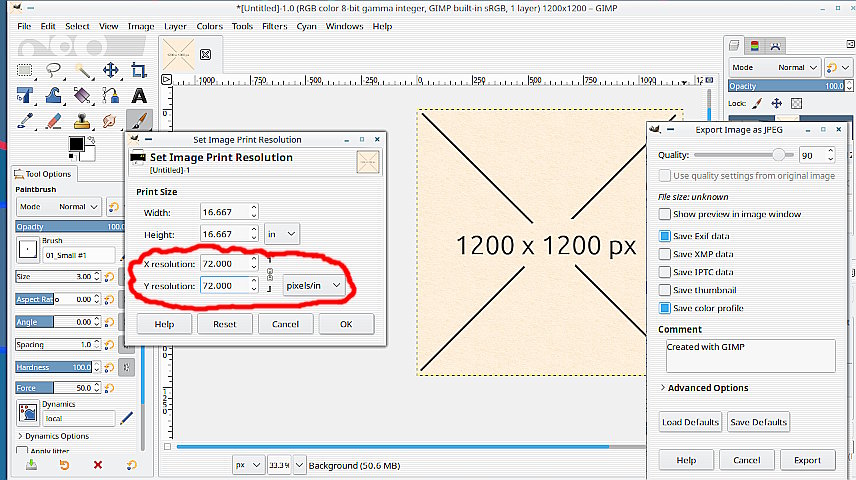
For any image width pix x height pix the ppi value is set using Image > Print Size and change the value to 72 (if it needs changing) This is an internal setting and does not change the image in any way.
Export as a jpeg, As a check re-open that jpeg and look in Image > Image properties and Resolution - xx ppi.
It’s nice to know I wasn’t too far off the mark with my ‘how to do this’ guess but the info everyone supplied was great. Getting process confirmation before I committed myself was a load of my mind.
To reply @afre first, this is only one show of many that have the same requirements but here are the instructions right from the site:
“For best results, make sure your image is 1200 pixels @72 dpi on the longest side, Images should be in JPEG format, sRGB color space.”
Replying @snibgo’s “they would look horrid”, I agree and I think this show is using them for screening purposes only. Other shows seem to be on-line exhibitions and I suppose “1200 pixels at 72 dpi” is more than sufficient for web use.
Thanks, too, @snibgo for the ImageMagick “-density 72 -units PixelsPerInch” string. I run Debian so I’ll add a script to reduce shots to these parameters automagically from now on.
This will make the output 1200 pixels in the longest dimension (enlarging or shrinking as required), at 72 dpi, JPEG. If the input is sRGB, the output will also be sRGB. If the input isn’t sRGB, the process for making it sRGB is (sadly) a bit more complex. If you need advice, just ask.
Pixel height and pixel width is all there is to resolution in an image file. PPI, DPI, centimeters and inches are just metadata there to help you calculate print sizes.
That being said most people producing exhibitions and printing magazines don’t understand this, so you’re probably best off complying by setting PPI to 72.
If you’re sending JPEGs and they already have the right pixel dimensions this should just edit the metadata (JFIF:XResolution if tag exists, Photoshop:XResolution if tag exists, XMP-tiff:XResolution if tag exists and IFD0:XResolution):