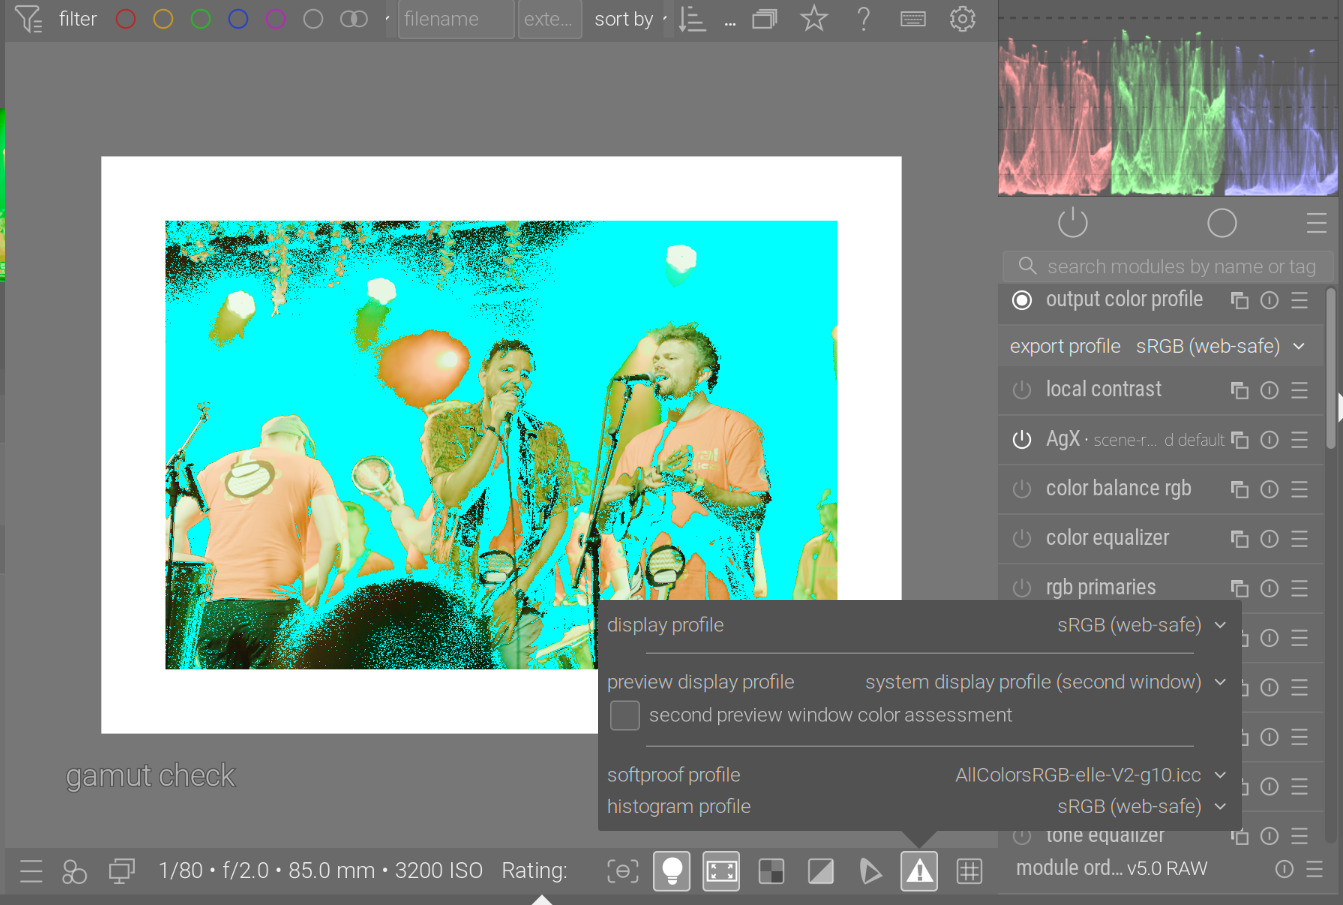
I always thought the clipping indicators used the histogram profile as a reference and the gamut control used the softproofing profile. It certainly changes when you change the softproofing profile and I thought that was a sort of swap with the display profile when you enabled soft proofing… Makes sense I guess if the output profile is involved too…
I rarely (never) use filmic anymore, but inspired by the nice blue sky in Tim’s edit I redid my edit using Filmic instead of AgX. I had to also use color balance rgb with filmic to get the final look, but filmic has done a nice job with this image. Especially the blue sky. DSC_0116_02.NEF.xmp (14.7 KB)
This is the part I am not sure of. WRT the warnings to me there are 3 control points in the software that impact what you see… Clipping warnings, this uses the histogram profile to reference gamut and the mode as you noted above and finally the threshold used in the reference space.
The gamut check uses the softproofing profile and would appear to be the same as the clipping full gamut when both use the same profile.
I usually set the clipping warnings to the working profile, feel like this is based on AP suggesting that for the most part as long as you don’t clip in the working space then the colorspace conversions will handle things and the output profile will map to the lower gamut…Of course if you push way to hard or see banding or artifacts then that might not always hold. I set the softproofing profile to srgb so that I can check that profile as well because that is what I typically export to .But truth be told mostly I just visually assess the image areas where over saturation is degrading the look otherwise if So like the way things look all good.
The output profile will handle gamut for the exported file but I could not see that changing it from one profile to another had any impact on the warnings shown on the display
Finally because of the pipeline a display profile can be checked to see if it would clip the gamut and change the warnings…Setting it to match the working profile and histogram profile you can see if the histogram changes when you swap it for say linear rec2020. The image will not look right on the screen but that is not the point you are checking your display profile for clipping. If the histogram doesn’t change your profile is good. If it changes then it introduces clipping.
As I’m sure you know, after things like highlight reconstruction and demosaic, effectively dt is operating in a “linear” rec2020 space until tone mapping. I would guess your approach is similar but different.
And (as you may also know) dt has a 3D LUT module, which as I recall is after tone mapping in the pipeline. But if you want to experiment you could try disabling tone mapping and add a LUT. But even if you had a technical LUT that was appropriate, I think it would lack the flexibility that dt users expect and use. Even if you put some creative adjustments after the LUT in the pipeline.
FYI I’ve been dipping my toes into video editing, and color grading can be challenging. It’s different than raw photo editing. RAW video footage exists but only at the very top end of the market due to huge datasets, and typically most footage is in a compressed log format. There may be an early transformation into a working color space, and one toward the end of the workflow to transform to a display color space. The latter transform may use a LUT that inverts the log. But as I’m learning most color correction and grading comes before this LUT.
Yes, LUT camera profile. Its sole purpose is to take the data in “camera space” and transform it to XYZ, per the ICC specification for the connection space.
I have my own raw processing software, lets me do things in any order I desire. One such thing early on was to defer the color transform to the end, camera → export profile, for me usually sRGB. That means I do all the raw processing work in camera space. I also have LUT profiles for my cameras, which I use when I have gamut challenges the camera matrix profile can’t address.
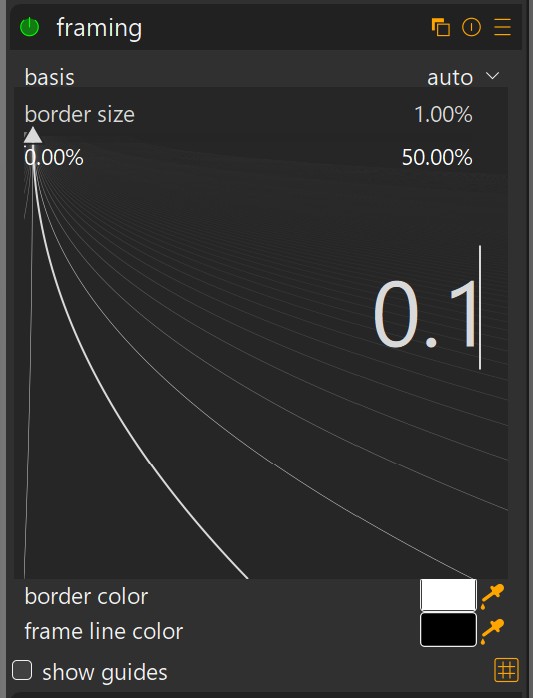
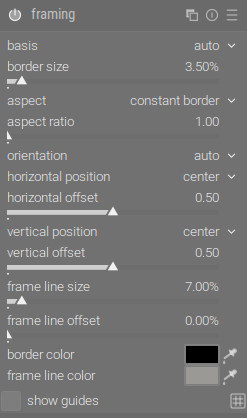
Thanx, I know how to put in smaller or more precise values in. But I don’t know how to export them to a smaller scaled picture. For me, only quite large frame lines survive my exports to forum conform sized pics.
My way of working within the inner frame is to set the frame line size to the thickness I like best and then, in frame line offset, I position it where I like best in relation to the outer frame, usually 0%.
Ah OK, found it:
In the clipping indication, the mode any rgb channel checks if any channel exceeds the upper threshold, but only triggers the lower bound warning, if all channels are below the lower one:
gamut checking does a few things; if I understand correctly:
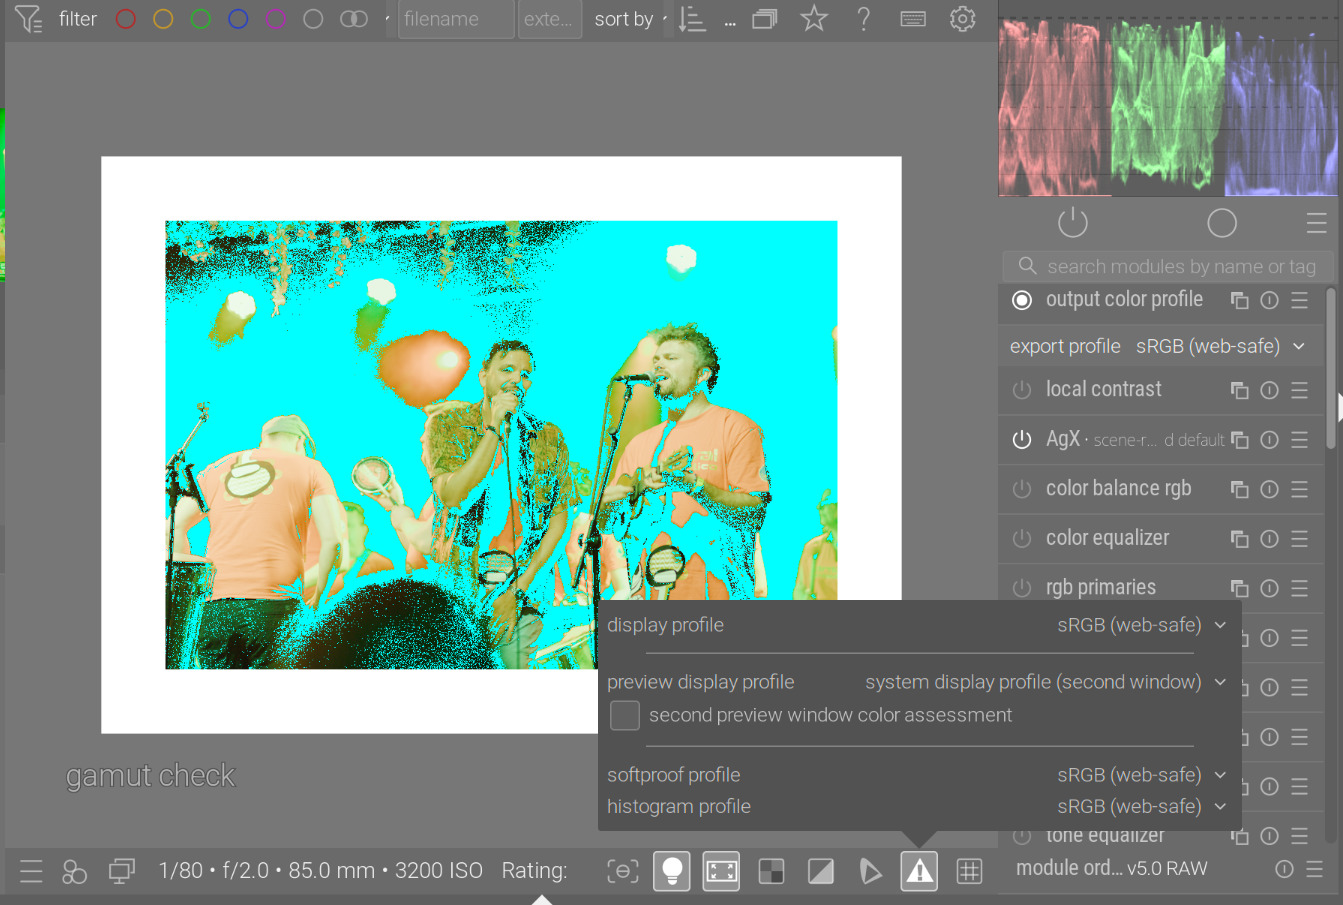
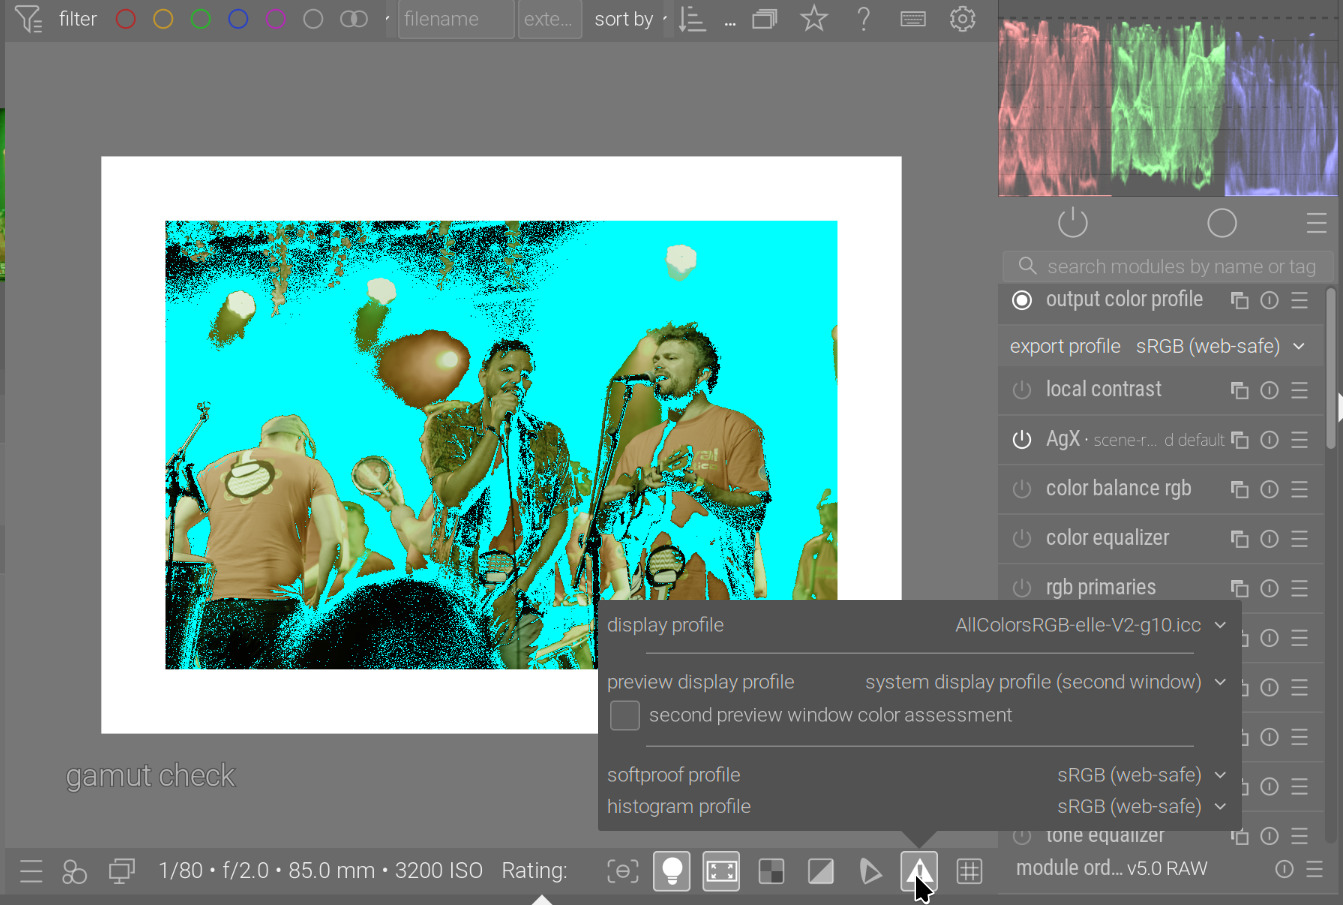
it asks LCMS to do a conversion to the display space, with an extra conversion to the soft-proofing space sandwiched between input and output. Normally, LCMS would mark pixels that don’t fit inside the soft-proofing space, but this does not work very reliably for matrix profiles, as I understand. (But darktable tries to get LCMS to quantize the soft-proofing profile, which, if I understand correctly, turns it into a LUT profile?) Based on the demo images below, it works fine for the built-in sRGB, as, even if the display profile is set to AllColors, we still get the out-of-sRGB pixels marked.
we then do a negative RGB component check in monitor space (which is the final result of the LCMS conversion).
Some demos:
gamut check with everything set to the built-in sRGB profile:
Based on this: for gamut check, as long as your display space is larger than sRGB (or you temporarily set something like Rec 2020), the gamut check works if the soft-proofing space is set to sRGB. If the display space is small, you get extra pixels marked as out-of-gamut.
The clipping indicator’s ‘saturation’ mode (which is also part of ‘full gamut’), can mark very saturated in-gamut pixels as clipped.
My advice: in very dark areas, gamut issues are invisible. I usually watch out for bright areas, which become ‘flat’, losing details, or show weird colour shifts.
(Again, my understanding:) There’s also an overlap between the various checks, I think (and also between gamut check and clipping check); and the logic of which space is used when is somewhat confusing. If I read the code correctly:
The output color profile module is involved in soft-proofing and gamut checking (it asks LCMS to do those). In the darkroom, it does *not" use the output profile, it overrides it with the display profile as the target.
I don’t know the internals of LCMS. The clipping indicator can trigger if you are close to the edge of the gamut (see upper and lower threshold, and how they are interpreted in the different cases). The LCMS check, if I understand correctly, is a Lab → soft proofing → Lab conversion, checking for differences between initial and final Lab values.
And yet in practice I believe if you change the display profile, a good one or the output profile the warnings do not change no matter what profile you set it to …they change when you use the clipping warnings and change the histogram profile CS and they change when you use the gamut warning and change the softproofing profile …
The processing that goes on at the output doesn’t seem to reflect the warnings as far as I can see… though the code may do things correctly for output of exported files… I’ll have to work through your examples above and maybe I will come away with a different impression of what dictates what you will see for warnings on the display preview…
I had read these in the past and thought I understood it but maybe not…
Time for some review maybe…on my part…
Edit
Okay I think all of your logic rings true now…My display is a little better than srgb and I have only tested my calibrated profile or linear rec2020 as the display profile in similar comparisons that you have made… I never tried the combination with srgb as an input profile and a wide gamut softproofing profile so I never saw any interplay there with different display profiles …