AgX EV slider "mid-gray"

Hello, AgX is awesome!
I have played around with it for some time, and I’m starting to get a good feel for what each slider does to my picture.
I’m able to get nice-looking results relatively fast.

But I’m also super curious and want to understand how this works and why, on a technical level, and not only as a vibe-based user.

One of my vibe-based observations is that the AgX module seems to make the exposure module unnecessary.


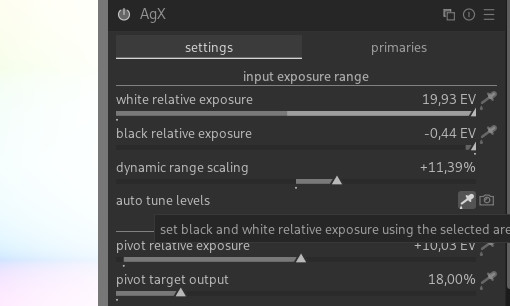
Pressing the auto-tune level picker and then adjusting “pivot relative exposure” seems to have (almost exactly?) the same effect as applying exposure compensation in one module before.

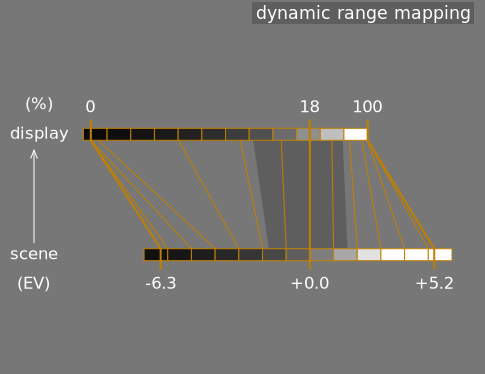
This brings me to the next and main question: what does black/white relative exposure in EV actually mean?
I’m aware of EV as a logarithmic unit, Exposure Value.
1 EV = 1 stop = doubling of light.

But the “relative” part makes me (over)think this. Relative to what?
The tooltip and the manual refer to this as “relative exposure above middle gray.”

OK, so I assume “middle gray” is fixed at 18%?
If so, 18% of the raw file? (max.) RGB value? Luminance value?

But to know (calculate) what middle gray or 18% is, one needs to know what 0 and what 100% are.
Saying 18% or “the middle” implies the upper and lower bounds must already be known.
So then why do I need to manually or automatically adjust the slider?

As a creative control, I see the point of “clipping” highlights or “crushing” blacks.

But in these cases, would it not make sense to make the slider relative to the black and white points?

For example, set the black point to 1% and the white point to 99%,
or the white point to −1% from 100% and the black point to +1% from zero?

In any case, I would love to see the clipping/crushing point of highlights and blacks from this slider in a working color space–referred histogram/scope :slight_smile:

The last question is: why is the “default” dynamic range of this module more than my camera or a 14-bit linear raw file can deliver?
Is there dynamic range gain because of white balance coefficient gains?

Thanks for reading and any help I hope someone can point me in the right direction to understand this better.

Hi,

No: it’s a non-linear control, effects the output only, does not affect the white and black point, and also not modules that come before AgX. You should always start with exposure, so e.g. color balance rgb, which allows you to tune shadows, mid-tones and highlights, interprets the parts of the scene (tonal regions) correctly. Use the controls in AgX for the final touch.

‘Mid-grey’ is 18% relative to perfect diffuse white (reflection) (which would be at 100%). It’s linear channel value, so not really ‘grey’, and ‘white’ and ‘black’ are also per-channel values, so not really ‘white’ and ‘black’. However, that 100% is most often not the brightest point of the input: with unbounded scene-referred input, there is no ‘absolute white’. Take an underexposed image to protect highlights; then increase exposure until mid-tones are back at around 18% luminance. On the linear scale, your highlights could be 6 or even 8 EV above mid-grey, so at linear value 0.18 * 2^6 = 11.52 or even 0.18 * 2^8 ~= 46 (6 or 8 EV was just some guess, but you get the idea). Theoretically, there’s no upper limit (the sun disc, at noon, on a cloudless day, would be at around +18 EV, I think). Therefore, we anchor around mid-tones, as reference.

Because those were the defaults in Blender. :slight_smile: You can use the picker to set the actual values.

3 Likes

That range is actually a bit misleading, in that it may cover 16.5 EV, but only 6.5 above “middle gray”. And it’s a log scale, so that corresponds to 6-7 bits over middle gray when using integers. And with a log scale, you can’t reach absolute black (0 on a linear scale, -\infty on a log scale)

3 Likes

The concept of scene-referred and the tonemapping is an attempt to match how something that looked gray in the scene to what you will see on your display under your viewing conditions…

So DT has a color assessment mode. You get white and middle gray borders on your image for evaluation. Essentially the process would be to add or subtract exposure so that a the middle gray patch on a colorchecker in the scene or your chosen subject or reference for gray will tonally be in the ballpark using the assessment reference.

From there you now need to manage the whole DNR of your camera to the display and this is where the relative white and black come in to it …This is how you map those to the display deciding how you will position them expanding or compressing to obtain the look you want…

There is a display version that you can show for filmic that sort of graphically shows by changing the values how you change the compression for example to be steep or more gradual…

5 Likes