… ooops 
Hi Rom9,
First of all, let me thank you for developing such a great feature! I have a couple of years of experience scanning negative film using different programs (Silverfast, Vuescan, NegativeLabPro) and I must say I’m now able to get THE BEST results using your code, as opposed to that other closed source & paid programs. I was really in awe when I saw the colors I could get out of my color negs using RawTherapee, it was literally the second time I saw them correctly (the first time was with my eyes, when I shot the frames…).
You really hit the nail with that formulas, and the idea of obtaining the correct coefficients from two shades of gray on the film looks very cool.
That being said, I must admit that I get such good results only while paired with Photoshop.
And if we could solve that last part, it would be the final solution.
Let me explain what I mean.
First of all, I’ve built manually the latest code you have on your personal github, so I’m working with the latest version, the one which works past demosaicing, has film base sampling etc.
And the problem is with subtracting the film base, it still never gets me real black point, and this makes impossible to achieve correct looking results via RawTherapee usual controls (exposure, black, etc). For example, if I push Black too much I see it also dulls the other colors, it’s not purely black level. And if I push Exposure too much to the left, it becomes too dark.
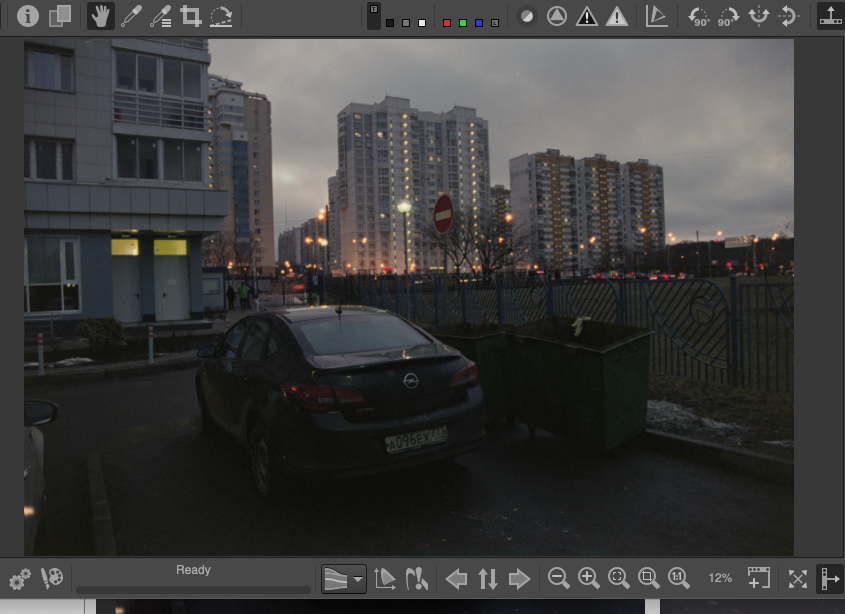
Let me illustrate this with pictures (please forgive dull subject matter…). It was shot on Fuji Pro400H and digitized with Nikon D750.
Here’s unedited version from RawTherapee with negative inversion & film base point picked up:

If we open it in Levels in PS (Ctrl-L) and check color channels we’ll see that there’s plenty of space left to the left and different channels have different amount of that space, so simply dragging Exposure/Black in RawTherapee to the left will not fix the color cast!
Now if in PS I edit each channel individually by dragging left pointer so it reaches the left edge of each color’s histogram (each channel has different amount!), save it to tiff, and then apply exposure/WB corrections in RawTherapee I get this almost ideal version which looks just how my eyes saw this scene:
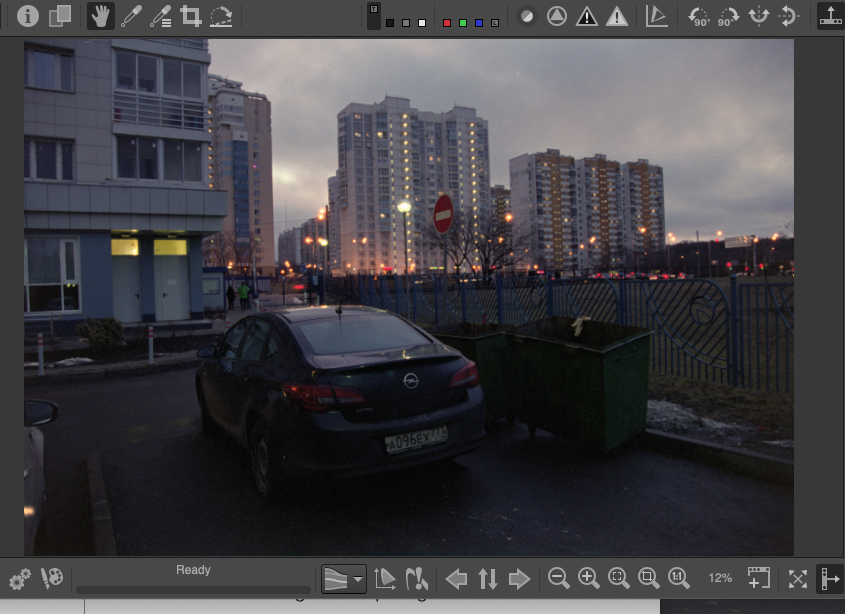
But imagine we don’t have PS, RawTherapee doesn’t allow to easily cut the histogram to the right, there are controls but you don’t see the histogram so it becomes hit and miss, in PS you just dumbly drag down the left slider until it goes up to the left edge of histogram. So if we use RawTherapee conversion alone, with film base applied, and dial down Exposure/Black we’ll get this, much duller, version. It may look ok until you see the potential that was obtained from the same source in PS with purely mechanical action.
So pure RT variant:
I see two problems with the last picture (apart from it being a bad photo):
- No black is really black
- I cannot bring it down with the Black slider more than it currently is because it would make the car’s rear lights very discolored and whole look overly dark
So my proposition is this: what if we
- Remove film base picker altogether
- Instead, after you calculate the inverted pixels, you just do what I’m doing manually in PS, i.e. find the first leftmost non-zero point in each channel’s histogram and subtract it from corresponding channels data and then rescale each channel back so that its maximum level stays the same as it was before subtraction - this is what Photoshop is doing, I’ve checked it today with pre-generated picture and then seeing its processed data.
- The reality is that current film base picker is very dependent on each picture and the contrast (green) used for each particular frame. The approach I’m proposing allows to get rid of that ever changing factor. I’ve processed about 60 frames in the last days in this way so I’m certain it works better this way.
I would be interested in hearing your thoughts and thanks again for the feature! Even if you don’t implement what I propose I can still work around with Photoshop postprocessing, just it would be more manual effort.
P.S. Saved the source negative NEF here:
https://www.dropbox.com/s/1kd7gyq2lczr8kl/Dslr0329.NEF?dl=0
2 Likes
Hello @Ilya_Palopezhentsev and welcome! Thank you for testing ![]()
If i understand correctly, it is certainly possible to do level adjustment in RT: just set a straight segment in “Tone Curve 1”, like this:

With the endpoints at the desired min and max values of the histogram; this should do exactly what you need ![]()
One question: when you say
what repo/branch do you mean exactly? Because if you used rom9/dev, it is terribly out of date, since i forgot to push to it, sorry ![]()
The latest film negative version is in the official upstream repo, dev branch.
With that, results should be pretty stable among different frames, provided the backlight and camera settings stay the same.
Edit: i’ve just pushed to my personal repo as well, just in case ![]()
2 Likes
Hi rom9,
- You see, the curve you are showing affects all channels in equal manner, but my point is that after inversion different channels have different offsets from zero, and that’s what I’m resetting in PS, in each channel individually. If not done, it leaves color cast which then gets in the way in all RT manipulations. In this particular picture this is not extreme, but I’ve seen cases where difference in offset is quite prominent between the channels.
- I used the filmneg_nonraw branch from your personal github, is it wrong? It had commits from april…
- What do you think about my proposal which automates this? It would allow not to bother selecting the film base/working with curves and anyway as I say RT doesn’t yet have convenient per channel curve editor with overlapped histogram.
Oh, ok, i see. The filmneg_nonraw is indeed up to date, but the Film Base Picker doesn’t work in that version (sorry about that, basically i made i mess in the code while hacking together a solution for tiff files…).
Also, keep in mind that, if you give it a raw file, that version still does its processing before demosaic, as usual.
So, if you digitize your negatives using camera raw files, please build the official upstream dev branch: the film base picker should work correctly and “anchor” the picked spot to black, no matter what reference exponent (green) you choose.
Thanks, will try that branch!
So I’ve tried the latest official dev. It works a bit better but alas I still don’t see complete cancelling of black. And when I increase the exposure, it pumps up the black point - which I assume it wouldn’t had it been truly zero (if I’m right thinking Exposure in RT is multiplicative in nature - in LR it seems to be so). And when I pump up the exposure, the effect of the curve is undone, black becomes gray, I have to move the curve slider again to match the new origin of the histogram. Also when I touch the Lightness slider the background histogram in the curve screen doesn’t move despite the brightness is clearly changed.
All of this makes editing unconvenient, I still think had the negative conversion after its main step subtracted the minimum value from each of the channels (that would be tailored to each individual picture), rather than subtracting some film base color (perhaps sampled from another frame, with potentially different S/N ratios causing sampling imperfections), the end result would be better and faster.
True, the values can’t go down to absolute zero since the film base adjustment applies a coefficient. The film base becomes 1/250th of max in the output, if i remember correctly.
I don’t think you should ever touch Exposure comp. when using the film negative tool. After you selected the film base spot (which goes to near-black), if you find the rest of the picture to be extremely dark, you can raise the Reference Exponent a bit; you’ll see that the near-black spot will stay at the same level, while the rest of the picture becomes brighter. Then, you can fine-tune just using the tone curves.
Here’s an example to apply to your raw file above; note how exposure comp is zero:
Dslr0329.NEF.pp3 (12.2 KB)
Lightness is applied after the Tone Curves, so their histogram does not change.
The film negative implementation is based entirely on the formula from the Wikipedia article; if i throw an offset into the mix, it becomes a polynomial, not a simple exponentiation, and i’m not sure it would be correct.
Moreover, after you have picked the film base spot, the channels are aligned (you will have dark gray in the output), so you would have to subtract the same quantity from all channels. This is exactly what the Black level compensation does; if you don’t boost the exposure, you would only have to bring that 1/250th film base level down to zero; for such a small adjustment you won’t lose any saturation, and you can achieve absolute zero black if you want ![]()
Finding the “minimum value” automatically is not that straightforward, as some images might include the film sprocket holes or other spurious lights.
Ok, thanks for mentioning not touching the exposure (would be good to indicate it in manual somewhere, because it’s the first thing to instinctively touch when the image is too dark - and in LR it gives the expected results).
I’ve now reedited the image without Exposure and indeed it’s fairly close to manually postprocessing in PS:

But note the extreme edits to Black, Contrast and Shadow compression I had to take to keep it good looking - you mention I have just to drag Reference Contrast slider up, but for such scenes as this it’s impossible - it quickly clips street lamps turning them to very digital look. So I chose the maximum possible reference contrast of 1.416 and the picture was still very dark so I then still had to reach the final stage using the regular sliders.
Note that in the curve editing pane I also cannot move white point any closer to the left due to the same washing out of lamps (best visible in 1-1 zoom).
On the weekend I’ll try the new approach on more frames and whether it’s really enough to choose film base one time for single roll
Yes, because the film negative tool doesn’t do any “smoothing” before clipping, so it’s better to choose a lower reference exponent (i would choose 1.2 or even lower), and then use the tone curves. What i usually do is use Tone Curve 1 for rough level adjustment, and Tone Curve 2 to apply an S-curve, like so:

then just a minimal black level adjustment in order to get “zero” black.
You might also want to try out different tone curve modes (Standard vs. Film-like), which handle highlights differently.
2 Likes
Woohoo! Thanks for the tip regarding the curve 2!! I’m just playing with the roll further and was desperate because I noticed that using curve 1 alone and bringing other controls to extreme levels greatly increased digital color noise which is very visible in 1-1 and which was not present if I did postprocessing in PS/LR (no noise reduction enabled).
But then you have mentioned curve 2, I did it, it allows to set the other exposure controls to more moderate values and the noise is gone! And the frames are not worse than after manual PS/LR!
So now I need PS just for spotting dust, as there is no spot healing brush in RT, but that’s another story…
Just love it, the colors are so real!
RawTherapee:

NegativeLabPro with its plastic alien look which looks bad however you fiddle with it:

3 Likes
Hi!
Couple of observations made through converting ~10 films with the latest dev branch:
-
At first I thought it would be enough to sample two grey shades for one roll of e.g. Portra 160 and then reuse the coefficients for all other Portra 160 rolls. I was a bit wrong. They differ from roll to roll. As example, I have two rolls of Portra 160 shot and developed in August 2018, and two rolls of Portra shot and developed in August 2019. Coefficients are the same for both 2018 rolls (1.276/0.798), and the same for both 2019 rolls (1.265/0.783), but different between 2018 and 2019 groups. I can think of two reasons: a) sampling error while picking neutral spots, i.e. choosing not perfectly grey shades or different between two films, b) different chemistry was used in 2018/2019, like different states of freshness etc, c) Portra was reformulated between 2018 and 2019 - which I find not very likely. I wonder, does this leave the possibility to present a drop-down picker in UI for common emulsions so people not understanding correct sampling of greys could have better starting point… (apart from the current Kodak Gold default)
-
Even on one roll, the coefficients differ for overexposed/normally exposed frames (on film, not on digitizing stage). I recognised this from a couple of frames on different rolls which I knew gave me trouble with inversion with other tools and which I remember I overexposed while shooting.
Luckily, I have neutral spots in highlights on such frames and when sampled I proved the coefficients needing to turn colors to correct are indeed quite different from the normal frames from the same roll! So now when I see a stubborn frame which gives bad results I try settings taken from overexposed frame and it’s good again. Probably this has something to do with non-linearity of film near highlights (‘shoulder’)
So probably it’s worth shooting color checker chart with both +0 and +2 overexposure to find both sets of coefficients.
All of this are minor points, just worth keeping them in mind. I continue getting amazing quality from your feature @rom9, you should be really proud of yourself!
Here’s one of my recent results (from consumer Agfa Vista 200!):
")
2 Likes
Hi, thanks for the feedback.
-
Yes, i’ve also noticed some differences; i guess that, by being a physical medium, film response won’t exactly follow the formula, it would be a reasonable approximation at best. Also, it could be due to differences during film processing (different temperature, different chemicals, etc.).
Having a dropdown for film emulsions would be extra difficult because, in addition to these differences between film rolls, there are also differences between digital cameras and camera profiles. At the moment, the film negative tool works directly on raw data, before the camera input profile is applied. This is very convenient, because it allows for the exposure and WB controls to behave as expected and not working in reverse, but it’s also technically wrong, because the input profile conversion gets applied to the inverted data, which is not what the profile was designed for.
So, this also adds to the approximation.
Currently, i’m trying to move the tool downstream in the processing, after the input profile conversion; if it works, the results could get a bit more accurate. -
Absolutely correct, there is a curve “shoulder” in the highlights. Good idea about taking strong overexposure test shots, i think i’ll give it a try.
Very nice picture, by the way 
Maybe working togehter with @CarVac would be good idea… ![]()
1 Like
Thanks for your reply.
Regarding your point of inverting past raw conversion. You know what I‘m fearing? That you change this and colors suddenly become worse for me compared to the current algorithm. So please at least leave the possibility of using the old approach too. A check box for example.
Also one thing I wanted to understand. When working with flat field file specified, is it applied even before inversion and do film base/neutral spots refer to values post or pre flat field subtraction? I think it’s important when sampling film base or neutral points near frame borders as it’s the same area which is affected most when applying flat field.
Flat field is important for good camera scans, without it people often get visible light leaks/color changes near the borders.
There’s already a mechanism for backwards compatibility based on the .pp3 file version, anyway since you process many negs, i would strongly suggest to export to high quality 16bit tiff once you are happy with the result. This way, if you want to do further adjustments in the future, you can always resume from the tiffs, even if the film negative tool evolves in incompatible ways (think years from now…)
Regarding the flat field, the spot values are taken pre- subtraction unfortunately, so yes, applying a flat field file can slightly alter the estimation of channel exponents.
Personally, i think it’s wiser to invest some time in building a good backlight, instead of trying to fixing it during processing. It’s not too difficult, i had pretty good results using a normal flash bouncing off a piece of paper. You can quickly evaluate the “flatness” just with the in-camera histogram (you should see a single thin line).
With the flat field, on the other hand, you have to make sure it’s correctly aligned, you might have to re-take it if you move anything between shots… i mean it’s one more thing to keep track of…
In any case, this is one more reason to move the code after raw conversion ![]()
1 Like
In my experience, it’s easier to build reasonably good backlight, i.e. one that is mostly good masked, and then still capture & apply the flat field - and it will improve the image even more - as you see on my last example, there’s no sign of any vignetting/lightleaks whatsoever in the corners, without flat field it’s a bit worse, so I just always capture it when scanning a roll, so I can always have a reference of what the backlight set up/ambient room light was at the time of capturing any given roll.
So yeah, sounds moving inversion after demosaicing will improve that.
By the way, is it already available somewhere for the raw files? If you want my help with testing/opinion on how it compares to the current one, I’m ready to build any branch you say and test it!
1 Like
Regarding ambient light, here’s my ultra-high-tech solution ![]()

Not yet, unfortunately, i’m still shuffling code around…
Thanks for your help, stay tuned! ![]()
3 Likes
Morning, @rom9,
I do like your ultra-high-tech solution!
Just a minor, nit-picking complaint: you have used metal staples
to keep the ring from unfolding. Theoretically, they could induce
unwanted reflections. Presumably would be wiser to use sticky tape
or glue on the outside only?
Have fun!
Claes in Lund, Sweden