It works! thanks again! I’ll report if unexpected things happen…
Great! Thank you for testing 
Aaah, it was just a doll. ![]() and not the evil works of a satanic death sect… creepy none the less…
and not the evil works of a satanic death sect… creepy none the less…
@rom9 and testers, many thanks for this!
Now I’m able to slowly digitize many negatives I have, in a more consistent and informed way.
I’m not a Rawtherapee user, so what I’m doing is enabling Film Negative, then tweak White Balance, and export as 16-bit tif to finish editing in darktable.
I’m lazy, so I’ll wait for the base color button to show up on the next RT stable. Without it I’m already able to work.
Thanks once more!
2 Likes
Hi everyone and thank you very much for this wonderful module 
Long story short, I think I’ve read the entire thread 
I’ve also read the documentation of the  Film Negative module on rawpedia. And digging a bit further, I’ve also found the auto-levels limitation (or bug?) with regards to actual crop.
I’m not sure I understand the exact ideal setup I should use in order to get the most accurate results or, at least, the “best” basis (from a signal manipulation perspective) for inversion and further interpretation.
I currently digitise with a Nikon D750 and a neat LED light source. Then I open the .NEF in RT, invert, do some levels, saturation, noise reduction, sharpening. Then I export to 16-bit .TIF and move to Nikon Capture NX-D (free and works on .TIF files ) for dust and scratches and an additional auto-levels that works quite nicely too. Then I export to (sRGB) JPG.
Right now, I’m struggling to find guidelines / indications / recommendations when it comes to choosing:
-
colour/colour management:Input profile: which should I pick? I work with “No profile” but from this comment, I wonder if I’m doing the “right” thing. -
colour/colour management:Working profileversusOutput profile: this is probably out of scope (and out of my depth as well), but just to be sure I get what I see (especially in the saturated reds, for instance) when exporting from.NEFto.TIF(for further dust and scratches removal), should I not match both profiles?
Thanks for your input.
If my questions are too stupid or if they should address a broader reflection, don’t hesitate to let me know.
I’m really curious about all the prerequisites when it comes to setting up RT for the best results.
Hello, and thanks for testing! ![]()
Unfortunately i can’t give a very scientific answer, because i’m totally ignorant about color science ![]()
From what i’ve seen, it seems that the best results are obtained with the standard color profile for your camera, the same that you normally use to develop normal digital pictures.
“No profile” is definitely not a good setting, i always get strong color deviations with that. This is true for my Sony A7, my Sony A6000, but also for many other sample raw files that i got from other users here.
The Nikon D750 profile should be included in RT, so in your case just selecting “Auto-matched camera profile” should be enough. Otherwise, you can look for the suitable DCP profile online, or take it from Adobe DNG Converter.
Be sure to enable all the available checkboxes after selecting the profile, especially “Look Table” and “Tone Curve”.
These have nothing to do with the negative inversion itself, as they come into play later in the processing pipeline.
Working profile is what RT uses internally for calculations, after the picture is already converted to a positive (with happens before demosaic); i always leave the default setting.
Output profile will be the color profile of your output file. This is also not related to negative inversion, but rather to what you plan to do with your output file. If you want to export a tif to do further editing in a different software, you might want to use a wide gamut profile, in order to retain as much color information as possible. Still, i’m not an expert on this, so please take a look at the wiki for more accurate info ![]()
There’s no need to match the Working and Output profiles. From what i understand, it’s normal to have the Working profile being wider gamut than the Output, in order to leave more headroom for intermediate color calculations.
Not at all! Feel free to ask, and thanks again for testing ![]()
alberto
3 Likes
@rom9 has the truth of it. You can just leave Input profile on “Auto-matched”. Having “No profile” means that the RGB values your D750 produces are not correctly transformed to the colors they represent.
The Output profile you select gets embedded in the exported file. It is probably best to set this to Rec2020 or ProPhoto if you’re going to do post-processing. However if NX-D doesn’t read this embedded profile, the colours will be messed up when you open your file. If everything works properly, the TIFF you import in NX-D should be identical to what you see on screen in RT before export.
3 Likes
@rom9, @Thanatomanic, thanks for your responses ![]()
 I don’t really shoot on my DSLR - most of my work is colour and monochrome negatives
 about the
 auto-matched camera profile, I think I understand - but I still am thrown off balance when I choose the DCP/Tone curve option (huuuge impact). I was afraid that RT would attempt to mimic the baked-in Nikon Custom Picture Control… just as Adobe Camera Raw (ACR) gives that “landscape”, “portrait”, “neutral” mode, depending on what’s read from the file, though it’s imperfectly done.- thanks for clarifying the Working VS Output colour profiles. I would just add a quote from rawpedia/colour management addon article
Do you have a very high quality monitor which has a gamut close to AdobeRGB or WideGamutRGB? in this case take a wide gamut profile.
OK, so, since I do dust-n-scratches ![]() in Nikon Capture NX-D anyway, I’ll set my RT output profile to
in Nikon Capture NX-D anyway, I’ll set my RT output profile to NKAdobe, or something like that. I initially tried RT flavour of sRGB (RTv4) and while the resulting tif file is successfully opened by Nikon Capture NX-D, it kind of fails in processing it. It just remains stuck (that piece of software is far from perfect, so I’m not really surprised).
Now, mostly for the RT newcomers / newbies (aren’t there many people looking for alternatives to LR+NLP?), I’ll summarise (and add a few elements of) my workflow. Feel free to comment. Maybe that could walk people through and be an addition to the rawpedia, especially in the film negative article.
- to digitise, I use a Nikon D750, I do Expose-to-the-Right + Universal white balance (#ETTR #uniwb are the usual hashtags) + Neutral* (
-2saturation) “picture control” (because I heard “flat” is less further away from linear than Neutral is).
- Open RawTherapee. In the “File Browser” tab, navigate to where the file you want to process is.
- Right-click the file and choose “Open”. This gets you to the “Editor” tab.
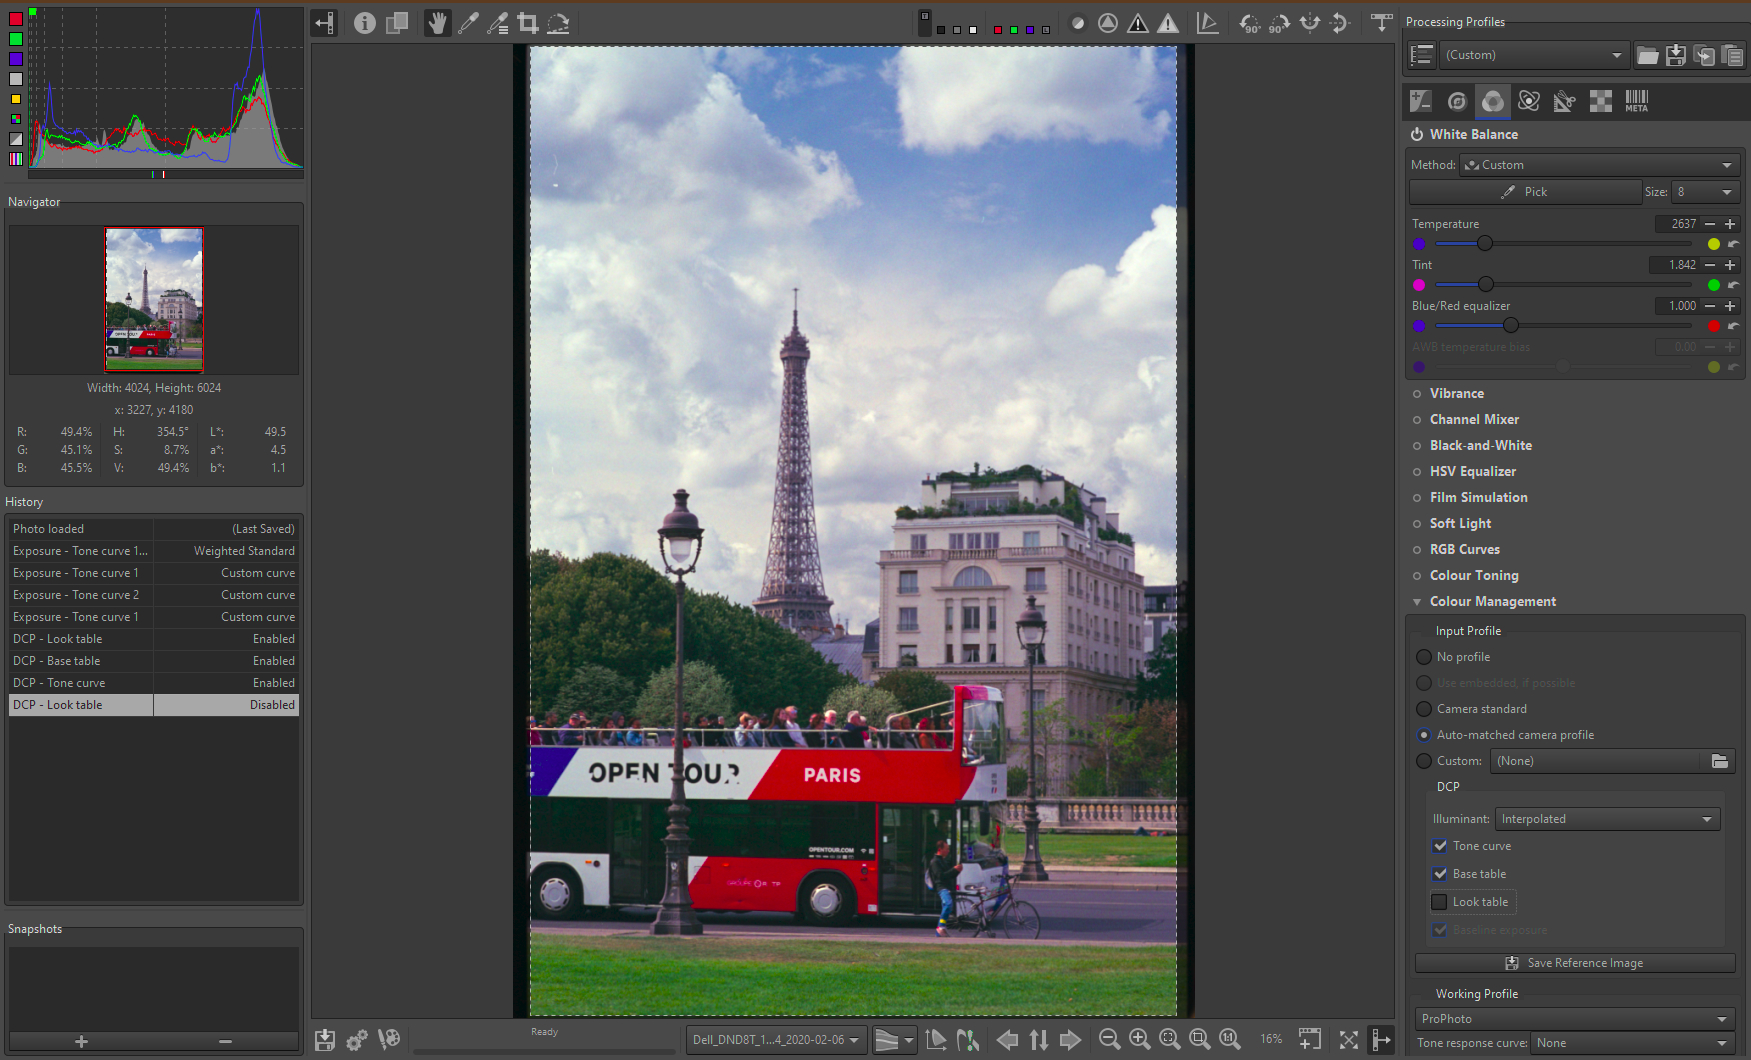
- In the panel that sits on the right, click the “colour” button.
a. Scroll down to the “Colour Management” section.
b. In the “Input Profile” subsection, pick the “auto-matched” option
c. In the “Working Profile” subsection, pick a wide-gamut profile, such as ProPhoto (provided your display has sufficiently wide gamut too), without any “Tone response curve”.
d. In the “Output Profile” subsection, since we are going to use Nikon Capture NX-D, pick “NKsRGB”, or “NKAdobe”, or some other profile you know your next post-processing software can handle. The idea is to keep the gamut as wide as possible until the moment you generate an 8-bit JPG.
e. I leave the “rendering intent” and the “Black Point Compensation” as they are. - In the panel that sits on the right, click the “Raw” button.
a. Activate the “Film Negative” section. Inversion happens automatically in the preview image. ==> output preview looks nasty, as film base compensation has not been refined, yet.
b. For further tweaking, if you have such reference points in your image, click the “Pick white and black spots” button and with the eyedropper tool you now have, pick one neutral highlight and one neutral shadow. ==> output preview undergoes subtle changes. - In the panel that sits on the right, click the “colour” button.
a. Activate the “White Balance” section.
b. If you are feeling lucky, in the “Method” dropdown, pick “Auto”. ==> output preview looks fine, now.
c. If you want to do it manually, you can “Pick” the eyedropper tool and sample the black border. Or any other target that is supposed to be neutral in your final image. - In the panel that sits on the right, click the “Exposure” button.
a. In the “Exposure” section, right after the sliders, you may have already tone curves set up. Set them to “linear” and “standard”.
b. If you want to proceed to curves and levels adjustments, “Auto Levels” can give you a good place to start, to stretch the overall contrast. Note: known bug, it works much better if you don’t have a border in the first place and the blacks in your picture differ from the border itself (hello, overexposure)
c. Then play with the sliders and the curves (+ blacks and whites clipping indicators)
d. Quite possibly, there are many options you can play with, for most of the colour adjustments. The flexibility it offers is literally overwhelming. - In the panel that sits on the right, click the “Detail” button to adjust sharpening. The “Transform” button allows you to crop, straighten…
- Proceed to saving the file to TIFF (floppy disk icon on the bottom bar, on the left of the main screen)
- Open this TIFF file in “Nikon Capture NX-D”
a. do the dust and scratches,
b. do the final adjustments to your levels (e.g. with RGB curves, …)
c. convert to JPG.
d. post online, get

 and comments, be sleep-deprived because of it.
e. shoot more fresh colour negative film.
out-of-scope EDIT: seems I can’t figure out how to export from Nikon Adobe RGB to sRGB in Capture NX-D ![]()
If you want the widest gamut possible in transferring the colors, don’t go for anything less than ProPhoto. Especially if you put sRGB or something, you restrict your gamut on export and you lose color information for the editing in NX-D.
I just tested NX-D and it correctly recognizes ProPhoto RGB as embedded profile.

So, in RT set things up like this:

P.S. Even now I only needed NX-D for less than a minute, I was vividly reminded what a crappy software it is ![]() You know you can do retouching in darktable as well?
You know you can do retouching in darktable as well?
Understood, thanks again and thanks for testing, @Thanatomanic. I apologise for the vivid memories it brought back.
I’ll give this a try. I know Nikon Capture NX-D is crappy
The reason I still have it is for the occasional digital shot I do; since “Nikon Custom Picture Control” is part of my workflow, I like to be able to replicate it exactly as it’s set in-camera.
Anyway, off topic  sorry for that.
Honestly, I haven’t really tried my luck in DarkTable (apart from the film module that I can’t use as nicely as RT). I’ll see what I can do there!
BTW, is this thread the only one that discusses this module, overall?
No, here are some other threads that i know of:
alberto
1 Like
OK, @rom9, @Thanatomanic, I’ve been playing with colour negative inversion (mostly on fuji superia 200 and some kodak gold 200) for a few weeks, now.
Again, thanks for your initial responses that were very helpful to get me started.
I have more questions, if you do not mind, as I find it difficult to understand where we are, simply by following all the posts, here.
-
film rebate or frame border:
- is it necessary to have one for the inversion to work “properly”? how clean should it be (do I need to crop a bit to avoid unexpected darks?) ?
- how colour-neutral can it be? is it suited for scans that are balanced before acquisition (i.e. with proper lighting, be it dichroic, RGB, …)? if it’s completely balanced (i.e. almost clipped white), will this cause issues?
-
about the “pick neutral spots” button (that “dual-spot white balance”)

- I’m not sure I understand why it is supposed to work (and not cause shifts in colours) if, as a neutral dark, the film rebate is sampled. While it can be black (and it’s better than having nothing to compare to), it’s not as reliable as a gray colour that’s in the picture itself - i.e. something that actually has density. ==> is it still true that you would recommend sampling the film border?
- what about the neutral white? why would it have to be dense? why not something just a bit lighter than the previous spot?
-
DCP question: When it comes to camera profile, I’m usually more than happy with the settings you’ve suggested, i.e.

but in some cases, for colours I know (or I have a “reference” of, as in an iPhone shot), I’m struggling a bit.- I want to be sure nothing “distorts” the channels, relatively to one another, such as baked-in curves (hello, Nikon Custom Picture Control “landscape”, “neutral”, “portrait”, “flat”, “vivid”) ==> is it then really safe to tick all the boxes?
-
Exposure correction: what are the sliders / curves / modes you would recommend, for further processing? Exposure / blacks and then Lab? or mostly tone curves within the exposure section (which mode, btw?)?
This is all with colour rendition in mind.
Thanks!
Hi ![]()
There is no need to crop, since the calculation works on the entire raw image (before cropping is applied).
With the current 5.8 release, you should try to take a close picture of the negative, with small borders around the actual negative image.
If you build the current RT dev branch, instead, there is a new “Film Base” button that lets you pick an unexposed part of the negative so that the calculation is not influenced by the border anymore.
no issues at all, that’s even better ![]()
totally agree. If you have 2 spots in the negative, that you know were neutral gray in reality, by all means pick those (the typical example would be a picture of a macbeth chart or some other reference target). But when you don’t have a dark gray or black spot available, the unexposed border should work good enough.
that would work too. Since we are estimating a curve from 2 points, choosing distant values should (in theory) give a better estimation.
Unfortunately i have no idea… i’ve simply noticed that if i deselect “Look Table” with my Sony profiles, i always get cyan sky or other weird colors. And similar things happens with other profiles for different camera models. Tone Curve should not (if i understand correctly) alter the colors, but just the contrast.
Don’t know about Base Table though, since my profiles don’t have it. Judging from the checkbox tooltip (“HueSatMap”), it might boost some specific hues? That would be bad… you can try disabling that one.
Sorry, i know nothing about color profiles, so my approach is just trial and error… ![]()
Typically i just use exposure and tone curves (either Standard or Film-like modes) and nothing more. But i’m not a photographer, so i’m not very skilled in judging the result ![]()
alberto
@rom9,
hi and thanks for your quick feedback.
EDIT: the screenshots are yuck, way over the top
to crop or…
- ok for the crop.
- Now what if the captured image does not have any border? how necessary/mandatory is the film base in the calculation? I am asking because in some cases - due to light bleeding through sprocket holes into the film base - it is very desirable to mask out everything that is not the image to scan in order to avoid nasty bleed into the image itself.
estimating curves
- are we estimating a curve or merely a slope in the log domain?
contrast (Reference exponent adjustment)
I had totally forgotten to ask this. From a signal processing pipeline standpoint,
- should I strive to maximise the contrast (Reference Exponent) in the Film Module itself?
- or should I not even bother and use low values, such as 1.0 instead of 1.5, and do my contrast and exposure with the exposure section?
example:
A. film module inverts and gives me a bit too much contrast once final WB is achieved. Should I reduce the Reference exponent value? or should I play with the exposure / highlights and shadows compression sliders instead?
B. film module inverts and gives me a very conservatively stretched histogram once final WB is achieved. Should I then proceed to increasing the Reference exponent value in order to adequately stretch the histogram? Or should I just do it with curves mini. and maxi. levels?
exposure sliders
- ok, I’ll spend some time reading how the sliders work
 as I don’t find the exposure and blacks combination very intuitive.
DCP settings
-
 too bad you don’t know. Maybe people involved in this thread would know? do you know anyone in there? Also found this.
 -
I honestly abhor the trial-and-error approach for this kind of signal processing related issue - I need to grasp the compromises I make when I activate this or that.
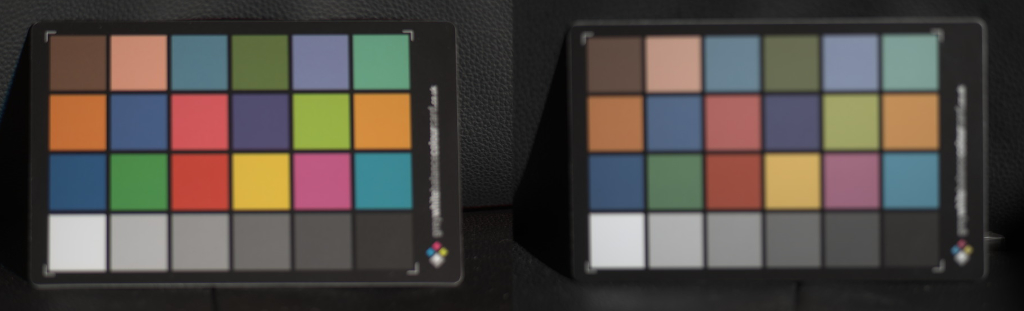
But, just so you see what irritates my eye, here is an obvious case of dull reds. The reds are not the only hues affected but they’re the most obvious in this picture.-
“Look table” deactivated:
-
“Look table” activated:
-
-
how I adjusted the neutral blacks, neutral whites and white balance:


Here’s the folder containing the .NEF and .pp3 files.
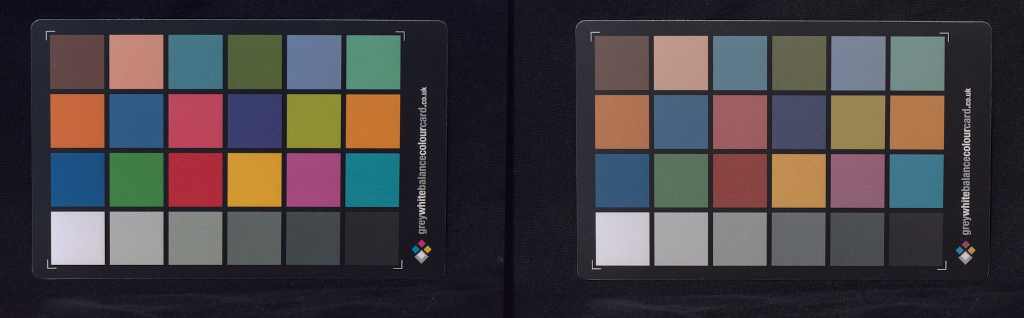
One additional example: look at the paint of the car and at the tail lights.
- “Look table” deactivated:
- “Look table” activated:


==> I am not saying it’s “perfect” without the look table but… here’s, for what it is worth, a slightly contrast-boosted iphone shot taken at the same moment: https://www.flickr.com/gp/franekn/yK3oZL
Reference:
![]() anybody knows the “advanced uses” mentioned here?
anybody knows the “advanced uses” mentioned here? ![]()
Thanks for reading and, in advance, thanks for your help / pointers.
side note, that I want to appear clearly (and not just as an edit to a post):
1 Like
That’s perfectly fine, borders are absolutely not necessary (in fact, i also cover the sprocket holes myself, because of light bleeding). If you build your DIY film holder, you can cut it a bit wider than the negative frame, in order to include the tiny slice of unexposed film between frames (16 pixels would be enough), so that you have an unexposed spot handy in every image.
On the other hand, you should not include much of the film holder itself, because being completely dark, its reciprocal tends to infinite, and these huge values alter the channel medians that are used to calculate final multiplers. So, the more film holder you include in the picture, the more you will have to compensate manually afterwards.
With the dev branch of RT, the Film Base sampling is persisted in the processing profile, so you can even take a shot of an empty space at the start of the film, sample the unexposed spot from that, and then apply the same film base values to the rest of the roll. This also makes the calculation insensitive to the dark film holder portion.
sorry, i don’t know the correct mathematical terms; we know that the function is a simple exponentiation, so the procedure is calculating the correct exponent starting from 2 known points.
If the values are very close to each other, the signal-to-noise ratio (where “noise” could come from the film grain, imperfections, uneven backlight, etc.) would be worse, so i think it should be preferable to choose more distant values, if available.
Definitely not. The Reference Exponent should only be incremented to get an additional contrast boost when you have a very old, faded negative, and the output is so low contrast that is difficult to manage with the standard controls. The film negative tool only applies a simple exponentiation without any “smoothing” at the extremes, so if you maximise contrast with it, you might get very noisy highlights. Moreover, keep in mind that it works before demosaic, so boosting the raw data too much could also affect the demosaic algorithm.
The usual contrast and tone curve controls, instead, happen after demosaic and already do a wonderful job of smoothing out the highlights.
So, your “B” example is definitely the way to go ![]()
I think this might explain the problem. My camera profile doesn’t have a base table (the checkbox is grayed out), so when i tried disabling the look table, i got bad results, as predicted above. This lead me to the wrong conclusion that the look table must be enabled.
Instead, it turns out that, when a camera profile provides both, it might work better with the look table disabled. I tried your raw files and agree that those reds are way better.
Anyway, i doubt that this tool will ever produce perfectly accurate results, since it works by altering sensor data, before the camera profile is applied.
If you want more accuracy, maybe you could have more luck by processing your raw image normally, producing a (negative) output TIFF, and then opening the TIFF file and applying the film negative tool to that, instead of the raw file.
This is not yet supported in the current release, but is in the works on a separate branch.
2 Likes
Hi @nonophuran, sorry for the delay. Here’s an example of what i was referring to in my previous post: processing the raw file to a negative tiff (with “Camera Standard” as input profile), and then inverting the tiff (using this experimental RT branch) :

Note how the yellow licence plate looks more similar to the iPhone shot, although the red shade is still not the same.
Regarding the Medium article about tri-color scanning, thanks for the link, it is very interesting indeed. I had to try it myself
I tried using one of these cheap RGB bulbs, by taking 3 separate shots, with red, green and blue light respectively.
Then i created a composite, “fake” raw file, where for each corresponding pixel i kept the larger value among the 3 images (should be analogous to what “Lighten” does in the Medium article).
This is easily done with existing tools. Let’s say we have 3 raw files test_r.ARW, test_g.ARW and test_b.ARW.
Extract each raw file to a grayscale, linear tiff, without demosaic or colorspace conversion:
dcraw -v -T -o 0 -4 -H 1 -d test_{r,g,b}.ARW
Combine the 3 tiffs and keep the larger value for each pixel:
convert test_{r,g,b}.tiff -grayscale Rec709Luminance \
  -evaluate-sequence Max test_comp.tiff
Now rename the composite tiff to dng, and add some metadata to mark it as a mosaic, RGGB raw file:
mv test_comp.tiff test_comp.dng

exiftool -DNGVersion=1.1.0.0 \
  -PhotometricInterpretation="Color Filter Array" \
  -IFD0:CFAPattern2="0 1 1 2" \
  -IFD0:CFARepeatPatternDim="2 2" \
  test_comp.dng
At this point, RT can open this DNG as a normal raw file from an unknown camera model.
So first of all, to check if it could work, i’ve tested with a standard, positive picture of a color target (no film negative involved). I took three separate R,G,B shots and the same picture with a normal xenon flash for comparison.
I used a linear sRGB input profile (this one) for both the composite DNG and the flash picture to make sure colors were treated the same, despite different metadata. This is the result (RGB composite on the left, flash on the right):
The composite DNG is much more saturated, but besides that, there doesn’t seem to be any huge color deviation, which is good news.
So, i’ve tested with an actual negative. Here is an example with Kodak Portra 800 (left RGB composite, right xenon flash backlight):
In order to make a fair comparison, both pictures are processed using Linear sRGB as input profile.
Even if i try to boost Saturation and Chromaticity in the right picture, trying to match colors on the left, the result is never as good (note especially the yellow and yellow-green patches):

Here’s a real-world example, Kodak ColorPlus 200 (please excuse the artistic quality, i’m not a photographer :-D)

This is also processed with Linear sRGB as input profile, and just some tone curves and chromaticity boost.
My impression is that using this method, it’s more straightforward to get a good result. Using a white backlight, it is also possible to achieve a comparable result, but in some cases it may require more tweaking. The obvious disadvantage is having to take 3 shots each time, and being more sensitive to vibration: if one of the shots is slightly offset… bye bye demosaic!
Anyway… maybe you could try this method on that Audi TT picture, and see what comes out…
alberto
2 Likes
? monochrome ?
well, that would require a different processing in the filmneg tool that currently only supports mosaic raw file… the “nonraw” branch will fix that though, as we can process the 3 components first, and then merge them as non-raw images.
Anyway, the vibrations could still be an issue even if we demosaic individual components first. To preserve sharpness, collimation of the component images is critical
My answer was not be taken serious!