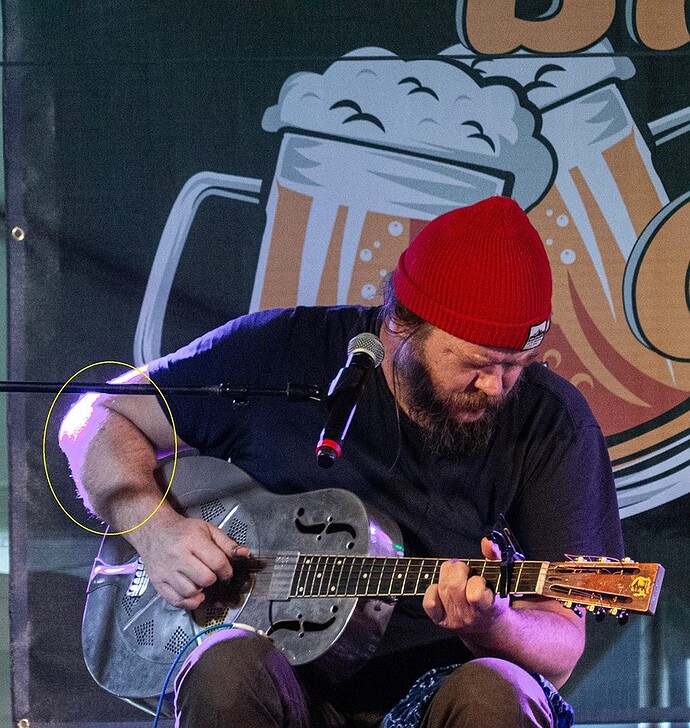
Is there a way to repair the circled area without spending half an hour cloning it? I’ve tried everything I can and it’s just not working, I’m guessing there is just no quick and easy way?
do you only have the jpeg or is there a raw involved?
I have the RAW file, I’ve gone back to that as well and just can’t figure it out.
Make a play raw out of it.
Not sure what that means, sorry.
We have a “play raw” subcategory under "processing. If you are willing to add a Creative Commons, By-Attribution, Share-Alike license (or similar) to your raw file, other user will try to develop the image in raw editors. Then you could see what others can do with your picture.
I’ll just do this, feel free to manipulate it however you want. I just do photography as a hobby, so I don’t license these or anything, so I won’t be losing anything by sharing these freely.
Here a quick (and dirty) try in darktable.
P1050121.RW2.xmp (9.1 KB)
You can load the .xmp sidecar file in darktable and check, what I have done. The region on the right arm is overexposed and might not be fully recovered.
Assigning a license signals to the users of our forum that they’re free to manipulate the image and share the result. There are several flavors of the CC license that cover non-commercial use.
You also aren’t loosing anything, but gaining the expertise of the community.
Hello, in GIMP: menu Colors - Color Balance - tick Highlights and drag the sliders to get rid of that color cast. The area that you encircled in your first post is, as already said, slightly overexposed.
PS. I get better results using ART and the CTL script Tetrahedral color warping (HSL), modifying the red (hue and saturation) and magenta (lightness) channels. But you asked for a solution in GIMP.

My fun RT and GIMP LCh
Sorry I didn’t give an answer to the question how … in GIMP
Removal - retouching, local discoloration (from old photos) using LCh mode.
Copy the layer and set its Mode to Color LCh, now I click on Change active color and use the Color Pick tool to take a sample of the color matching the ripple (Color Cast) at the location (from the location without ripple). If necessary, we use “Handwritten selection of areas”. Now brush and paint the areas covered with the stain
It was a quick and inaccurate (chin) attempt
Just WOW! This is great! ![]()
I feel I could do more with a raw file and playing in a program such as darktable. But maybe the hue saturation option in GIMP could help. Adjustments could be more localised.
Not the solution you are looking for but a tight crop helps with the problem area on this image.

To keep the file size smaller I have cropped the image to the left arm. What I have done is used Darktable to desaturate the magenta cast on the arm. I could have used GIMP for the same purpose and achieved a similar result. I have then opened the result created by DT and created a new layer that is transparent and the blend mode is set to soft light. I have used the color picker option to set the foreground paint color to the color of the singer’s facial skin. I have then painted in the color for the desaturated arm and toned the effect down using the layer’s opacity slider. This in my view repairs the color while retaining the original detail. Much much quicker than cloning and I feel a reasonable and natural looking result.
The xcf file is attached to show you what I did. Sorry about the file size.
GIMP attempt.xcf (30.0 MB)
Hey all, sorry I haven’t responded…looking over all the posts and they’ve definitely given me a lot to look in to. I mainly use Lightroom, I’ve used Darktable before but haven’t done a real deep dive in to all the functions. I am definitely going to now, looks like there’s a lot of functionality I might find useful. Appreciate the help!
I’m not having any luck with this, not sure what I’m doing wrong. Creating a new layer, using color picker, then the paintbrush tool is having no effect.
Hello,
Here are two good tutorials by Boris for this type of problem
Greetings from Brussels,
Christian
-
Use the colour picker tool to sample a spot on the players face for his skin tone. Set foreground colour should by default be ticked in the tool’s options dialogue and the paint colour will change to the selection. Alternatively set the foreground colour to 88 red, 52 green, and 45 blue. The rest of the sliders will set themselves.
-
Create a new transparent layer and then **set the layer blend mode to soft light.**The blend mode is the critical step here.
-
Paint with the skin colour over the arm. The eraser brush can clean up any slips of the paintbrush. You also need to paint onto the transparent layer which is sitting above the image layer.
-
If the color is excessive, try adjusting the opacity slider I set the opacity of the transparency layer to 49% after the painting to get a realistic balance.


