Best/easiest way to fix blown highlights and dark shadows?

I have somehow managed to amass a photo/video clip collection of over 220GB. I recently started doing some reorganizing and cleanup, and then I switched my go-to daily driver to a linux box.

It appears that the number one thing I need to do (after basic culling of bad pics) is to fix things at both ends of the exposure spectrum. Sky and windows are blown out, other parts of the same photos have details hidden in the shadows.

I’ve been experimenting with shadow/highlight sliders in various software with results that aren’t quite satisfying. LightZone, Darktable, Digikam. Just installed PhotoFlow as well. But before I figure out the UI of yet another software, I thought I would just ask here.

From what I can tell, I probably need to utilize Luminosity Masks to fix some of the more egregious photos. But I would prefer to use a tool where this is somewhat automated (buttons/sliders) and bonus points if it can be applied to a group of photos based on various exif or other parameters.

So what’s the best pixls.us go-to tool for this sort of thing?

From using the various raw editors, I’d say your best bet is probably RawTherapee’s partial profile feature. With this feature, you can match certain exif data and apply some tools presets to it automatically. Though you’ll need to set up each profile to suit your tastes.

I find RT’s highlight reconstruction to be pretty good.

But a word of caution: unless you have a lot of photos of the same thing in similar light, I don’t think you’ll be super pleased with automated results. You’ll still need to tweak the settings to get something great. I’d love to be proven wrong though :smile:

I forgot to mention - the vast majority of my photos are jpg - I’ve used RAW before, but since I tend to do a lot of wildlife photos, birds in particular, I missed a lot of shots while waiting for my camera to save the RAW image and re-open the viewfinder. So I’m generally 100% jpg now.

Will RAWTherapee still work for jpg’s?

RawTherapee will work on JPGs, yes.

I did that for a while, but I found that editing, such as shadow and highlight manipulation, was not kind to 8-bit JPEGs. In your case, I’d suggest you work on your camera settings to get the best exposure, one that minimizes or eliminates the need to deal with shadow and highlight manipulation after-the-fact.

As I think on this, your slow raw save might be at least partially attributable to your SD card speed. Might check that, retry raw with a faster card.

All FWIW…

Hey Glenn,

I have thousands of existing photos to work through - shot on all kinds of different cameras. So job #1 is to just deal with what’s there. Going forward, yes, obviously I need to shoot better. That’s the next phase :slight_smile:

The slow RAW issue (possibly a buffer problem) was with my Pana Lumix FZ50 - my new camera is an FZ80. New cards too. So - we’ll see, but early attempts with 4K photos was still pretty slow. Hell, I may end up doing everything in 4K video and extract photo frames later. LOL

It occurs to me that I should perhaps include a sample photo. So this one has massively blown highlights, and I wonder if it can even be fixed at all? No biggie if not, but might be a good photo for me to use to learn how to use RT or any other app that will help with this issue…

I tried highlight reconstruction but probably did it wrong, and I have no idea how to do the partial profile thing. I feel a lot of reading in my future…

This was taken with a Nikon Coolpix P310

I don’t really think you need to fix the blown highlights here… it is just going to make it look unnatural. Your subjects are well lit and this looks like the proper exposure, more or less.

1 Like

well that’s an interesting fix :slight_smile: but probably right in this case. Still reading through tutorials to better understand my options, though…

I agree with @ggbutcher, if you only have jpegs you have very little latitude for shadows/highlights correction. you might apply a mild tone curve, but anything fancier won’t give good results I’m afraid… of course, I’ll be very happy to be proven wrong :slight_smile:

Here’s the histogram of the jpeg:
c00affbc63349a7d57e6c1acc4e5af961341674d_1_690x517-histogram
Note the pile-up of data at the right hand-side; that’s the window. You and I know there’s a whole world out there, but the only data a highlight re-constructor has to work with is white.

I do these sort of shots a lot, family interior snapshots. I usually try to shoot a couple exposed for the outside, then try to pull up the shadows in post. There, stand more of a chance having data. My old D50 didn’t have a lot of dynamic range, so this didn’t work as often as with my current camera, a D7000. This was one of the main reasons I switched up…

I guess I should probably have used a not-totally-blown-out photo for this example…

1 Like

I don’t share or print most of my photos because they take so much work, which is unfortunate. I am not good at backing up either, so most of them are gone. I have learned to take smarter photos and print them right away, making sure that I expose my subjects well and that I modify or frame the scene as best as I can.

Take, for instance, the image that you shared. I would have drawn the blinds, or frame it from another direction. But you can’t go back in time…

Personally, I think there is no easy (i.e., fast, bulk) solution to images of scenes with high dynamic range. However, once you create a strategic workflow and use it often, you will eventually get the hang of it.

This is what I came up with: I used a custom G’MIC sequence of commands but you could do it using GIMP. It is more of a discussion really than a method.

1. I look at my subjects. There are 4 people in the room. As the others have said, they are well exposed.

Original image

image

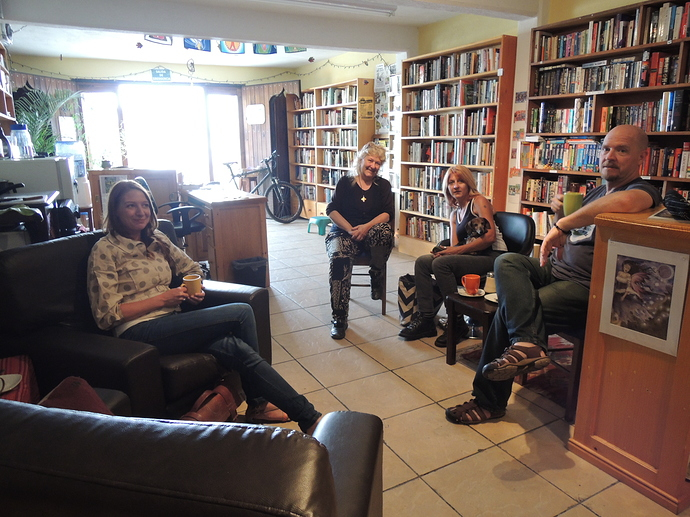
Some statistics won’t hurt, though you need to know what they mean. Observe the following chart, where 0 is black, 1 is white and the values are the averages:

face colour grey (norm)
L 0.392 0.496
0.445 0.507
0.409 0.413
R 0.349 0.373

I want to brighten their faces just a bit more.

Another observation is that the blown out area is large and domineering. I really need to control that area. I need to darken it or at least keep it the same as I brighten the rest of the image.

2. There are as many strategies as there are people in this forum, including hands on local manipulation using GIMP or Krita or a raw processor with local region capabilities.

I am not very good at that unfortunately. Hence, I ended up with taking advantage of curves and doing a version of luminosity masking (not my method but this tutorial is helpful: [Youtube] - Selecting using Luminosity Masks), which takes away the challenge of manual masking and painting. Perhaps, a combination of the two is best for optimal results.

There is also tone mapping (see tutorial: How to realistically brighten shadows in GIMP - Mantiuk and Retinex in G'MIC).

Basically, I took the original image. Call it A. Duplicated it thrice B, C and D. A is the reference layer that I won’t touch. B is the layer that I will darken. C is the layer I will brighten to the target values I would like the faces to be in. And D is the layer I will create a luminosity or whatever mask to blend B and C together to make E. Then I edit E to taste. For the result below, I simply increased the contrast.

Resultant image – the foreground should now be brighter with more contrast and the blown area should be about the same. (The background was darker before the contrast curve.) I did this in reference to the subjects’ faces.

result

Not the best work but hopefully you can see what is possible.