No, it does not. I’ve explained this a couple of times.
Hello,
I think there is a lot of confusion surrounding these two sliders. Personally, I think their names should be less technical.
On my MIDI controller, I renamed them luminance and mid-gray, and I also reversed the luminance slider (lighten to the right).
In any case, the results obtained with agx are impressive, which is the main thing.
Thank you for this wonderful module.
Christian
1 Like
The x (input) changes where contrast is the highest. As a side-effect, if y (output) is not adjusted accordingly, it also changes brightness, as it’s not that same if you map mid-grey - 1 EV, mid-grey, or mid-grey + 1 EV to 18% output.
Y (output) does not change where contrast is the highest, it’s really just a control of output luminance.
If you get inverted toe or shoulder (and a corresponding warning), the contrast will no longer be highest at the selected pivot point, as the curve will no longer be an S-curve.
2 Likes
I’ve just tested it and, honestly, I do not see a difference (not just similarity, to my eyes the results are identical):
- Exposure module turned off, pivot input shift adjusted to -19%
- Exposure set to +1.9EV, pivot input shift set to 0.
Coincidentally, -10EV*-0.19=1.9EV (-10EV being my black relative exposure).
Yes, there are secondary effects. I can think of two:
- Any scene-refered modules between exposure and AgX will operate at different exposures (this is the main advantage of adjusting exposure early).
- White/black relative exposure levels in AgX will shift - important if they introduce clipping of highlights and shadows.
I am not trying to justify removing input pivot shift slider. Quite the opposite, I’d like to keep it (see my earlier message) despite it being pretty much equivalent to exposure control. Sigmoid module chose to “optimize it out” and as a result it is significantly less convenient to use.
Perhaps AgX could recommend adjusting the exposure when pivot_x is outside e.g. +/-1 EV range?
The next question will be, of course: should we keep the previous ‘use mid-grey based pivot y calculation’ to move both x and y, or use the one from the ‘alternative’ branch, that attempts to keep the current luminance when moving both x and y? I have my opinion, but would welcome yours.
I might have gotten lost in some of the recent back and forth and have missed a key point but, I was using AGX without all these little tweaks and quite happy with the response of the sliders… I could see the extra control when you added the extra picker but I’m not sure how often I will use it.
As long as what you end up with can keep it more or less simple (to explain and use) in the first full release round for the module I think whatever that is will be the best option. There is time after to fine tune it when a wide user base chimes in…
The workflow in your quote is easy to apply and understand and that’s what I have been following…I like using the picker to set the contrast fulcrum and then going on from there to edit… I could tweak the output if necessary but I feel like most often I would do that manually and use my eyes as the guide for where to take it.
I think you have left that in play if you use the second picker as that acts like the old single one and now you have a dedicated input picker if I understand them…Maybe there are now one or more tweaks and I will go back and try to get up to speed so I could comment.
1 Like
A beautifully tone mapped sunset with AgX. Captured with DR400 on a Fuji X-T50. AgX excels at rendering the sun (highlights burned in the center,) as well as the smooth gradients fading all the way to pitch black. A little touch of saturation boost to match the colorful feeling at capture time.

17 Likes
And the first of your difference wouldn’t be a difference if you duplicate the exposure slider and place it just before AGX in the workflow.
I like the new behaviour with two sliders and the ability of tweaking the curve (including exposure) directly in AgX. Perhaps, there should be a note for new users to adjust the exposure first too much and make large exposure adjustments in the Exposure module.
Another option is to leave the exposure to the Exposure module and implement a single slider like “skew” in the Sigmoid module. I never liked this solution - it might have been technically simple but it was difficult to use. Curve control is partially delegated to Exposure control, changing exposure (to adjust the pivot) affects edits in other modules, parametric masks etc.
It’s in the docs.
I have my doubts software targeting photographers should rely on docs for adjusting exposure. Some guidance in the GUI itself would be helpful.
adjust for the mid-tones first : By default, the module preserves middle gray. Before using agx, you should first use the exposure module to adjust the mid-tones to your liking.
The docs tell users not to adjust the exposure in AgX and the GUI provides a knob for adjusting it. Guess which one the users will find first.
Set overall exposure for the mid-tones using the exposure module. Alternatively, use contrast and toe / shoulder power to fill the output tonal range.
This is confusing. Adjusting exposure and contrast are not alternatives.
pivot input shift: shifts the input value of the pivot point, relative to mid-gray. Since contrast is highest around the pivot, this slider allows you to choose at which part of the input tonal range you want to have the most contrast. As an example: a setting of 10% would move the pivot 10% of the way between mid-gray and the selected relative white exposure (the right edge of the graph), while -10% would move it 10% the way towards black (the left edge). Depending on the relative black/white exposure settings, the two will usually not mean the same amount of displacement. By default, the value is soft-limited to +/- 50%, but other values can be entered manually, see sliders.
The first two sentences are OK, I would redact them and add some context. The rest - I’d just delete it, these are internal details.
How about:
“pivot input shift: selects input brightness at which pivot, the highest contrast part of the curve, will be positioned. When set to zero defaults to 18% mid-gray point. Use the color picker to select the part of the image you wish to have the most contrasts.
Note: while pivot input shift can be used for adjusting final exposure large changes should be avoided. It is preferable to perform exposure adjustment in the exposure module, placed at the beginning of the processing pipeline, as many other modules depend on correctly set mid-gray point.”
1 Like
That one is misplaced, thanks for pointing out.
This section will be rewritten according to the new pivot logic.
1 Like
If you shift everything, yes, they are identical:
- you increase exposure by e.g. 3 EV (so you shift the the whole tonal range to the right)
- and you move the white and black relative exposure by the same amount (to 9.5 EV and -7 EV, respectively)
- and you don’t modify the pivot
- then the value that was originally at 0.18/2^3 now has the value 0.18, and therefore falls on the pivot, and is mapped to 0.18 output.
With those parameters, the curve looks like this:
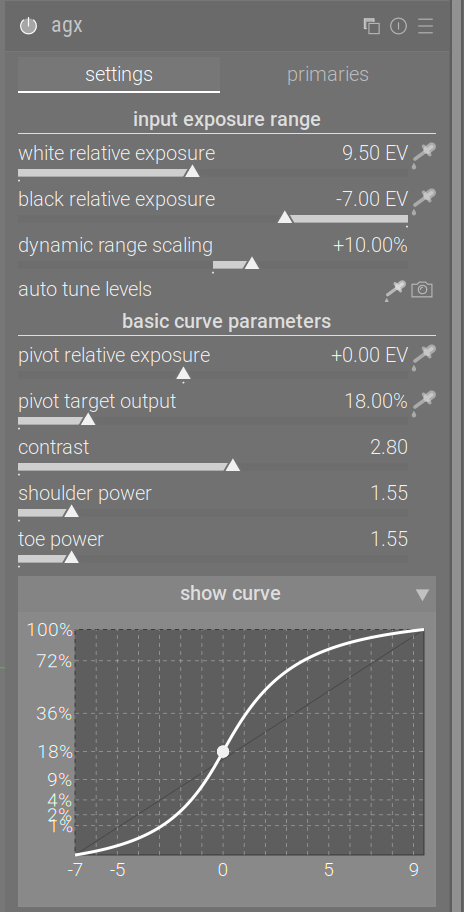
If you leave exposure at 0, leave black and white exposure where they originally were (at -10 EV and +6.5 EV, respectively), and move the pivot to -3 EV, then the value at 0.18/2^3 is now the pivot, and is mapped to 0.18 output. Its distance from the black and white point is the same as that of the original pivot from the shifted black and white points, the curve is identical, only the numbers on the x axis changed:
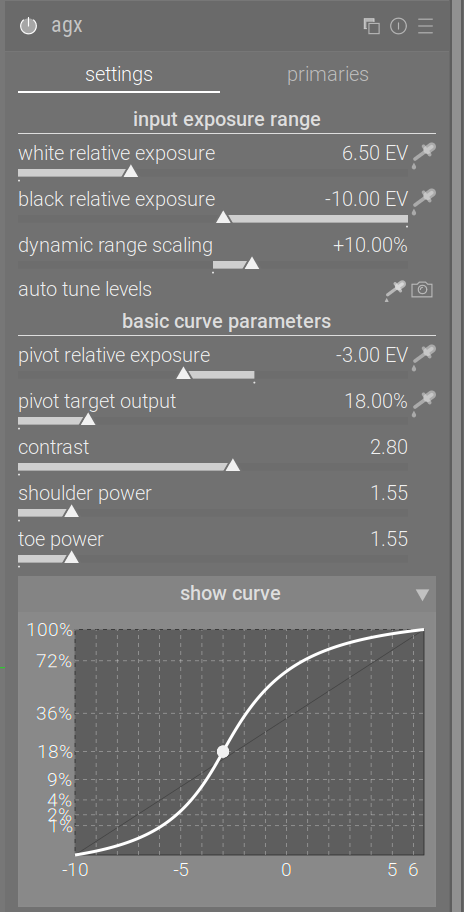
Comparison of the two snapshots:
However, if you shift the pivot by 3 EV, it’s not the same as increasing exposure by 3 EV, and not changing the black and white points, because the curves look different (changing the exposure only, but not changing the relative exposures does not change the shape of the curve):
Comparison with the snapshot:
I don’t have more to say on this matter.
5 Likes
Got it. I forgot white/black relative exposure settings start shaping the curve even when still quite far from the pivot (not just when they start clipping highlights/shadows, as I assumed). In my defence, with my test image and default white/black relative exposure values this difference was imperceptible.
So, yes, shifting the pivot is not the same as adjusting the exposure. My bad.
1 Like
Just wanted to say I finally… finally after years of trying darktable on and off and on and off and on and off, I created a preset I’m very happy with, which works with my flash and non flash photos. Thanks to AGX. <3
8 Likes
You’ve made me very curious now. Would love to see what’s in your preset.
Kind regards, Jetze
1 Like
Just tried AgX today. Amazing module, thanks @kofa for porting it and improving it! Here are my initial observations:
- Very easy to use
- Gives better results on average than Sigmoid/Filmic, or at least I find it gives a better starting point
- The only case where sigmoid is easier to use (so far) is VERY harsh transitions of highlights, like sunsets, where AgX does give a bit of banding that might take some work to get rid of, whereas sigmoid really has a smooth highlight falloff in all cases
Very cool module, and VERY excited to use it more!
1 Like
Thanks.
Both sigmoid and AgX rely on per-channel curves (you can switch sigmoid into RGB ratio mode, though, which AgX doesn’t support).
In sigmoid, by default, you run with preserve hue = 100%. In AgX, by default, you run with preserve hue = 0% (in Blender, AgX is used with preserve hue = 60%). So that’s one option you may try; it controls how much the ‘Notorious 6’ shift is avoided.
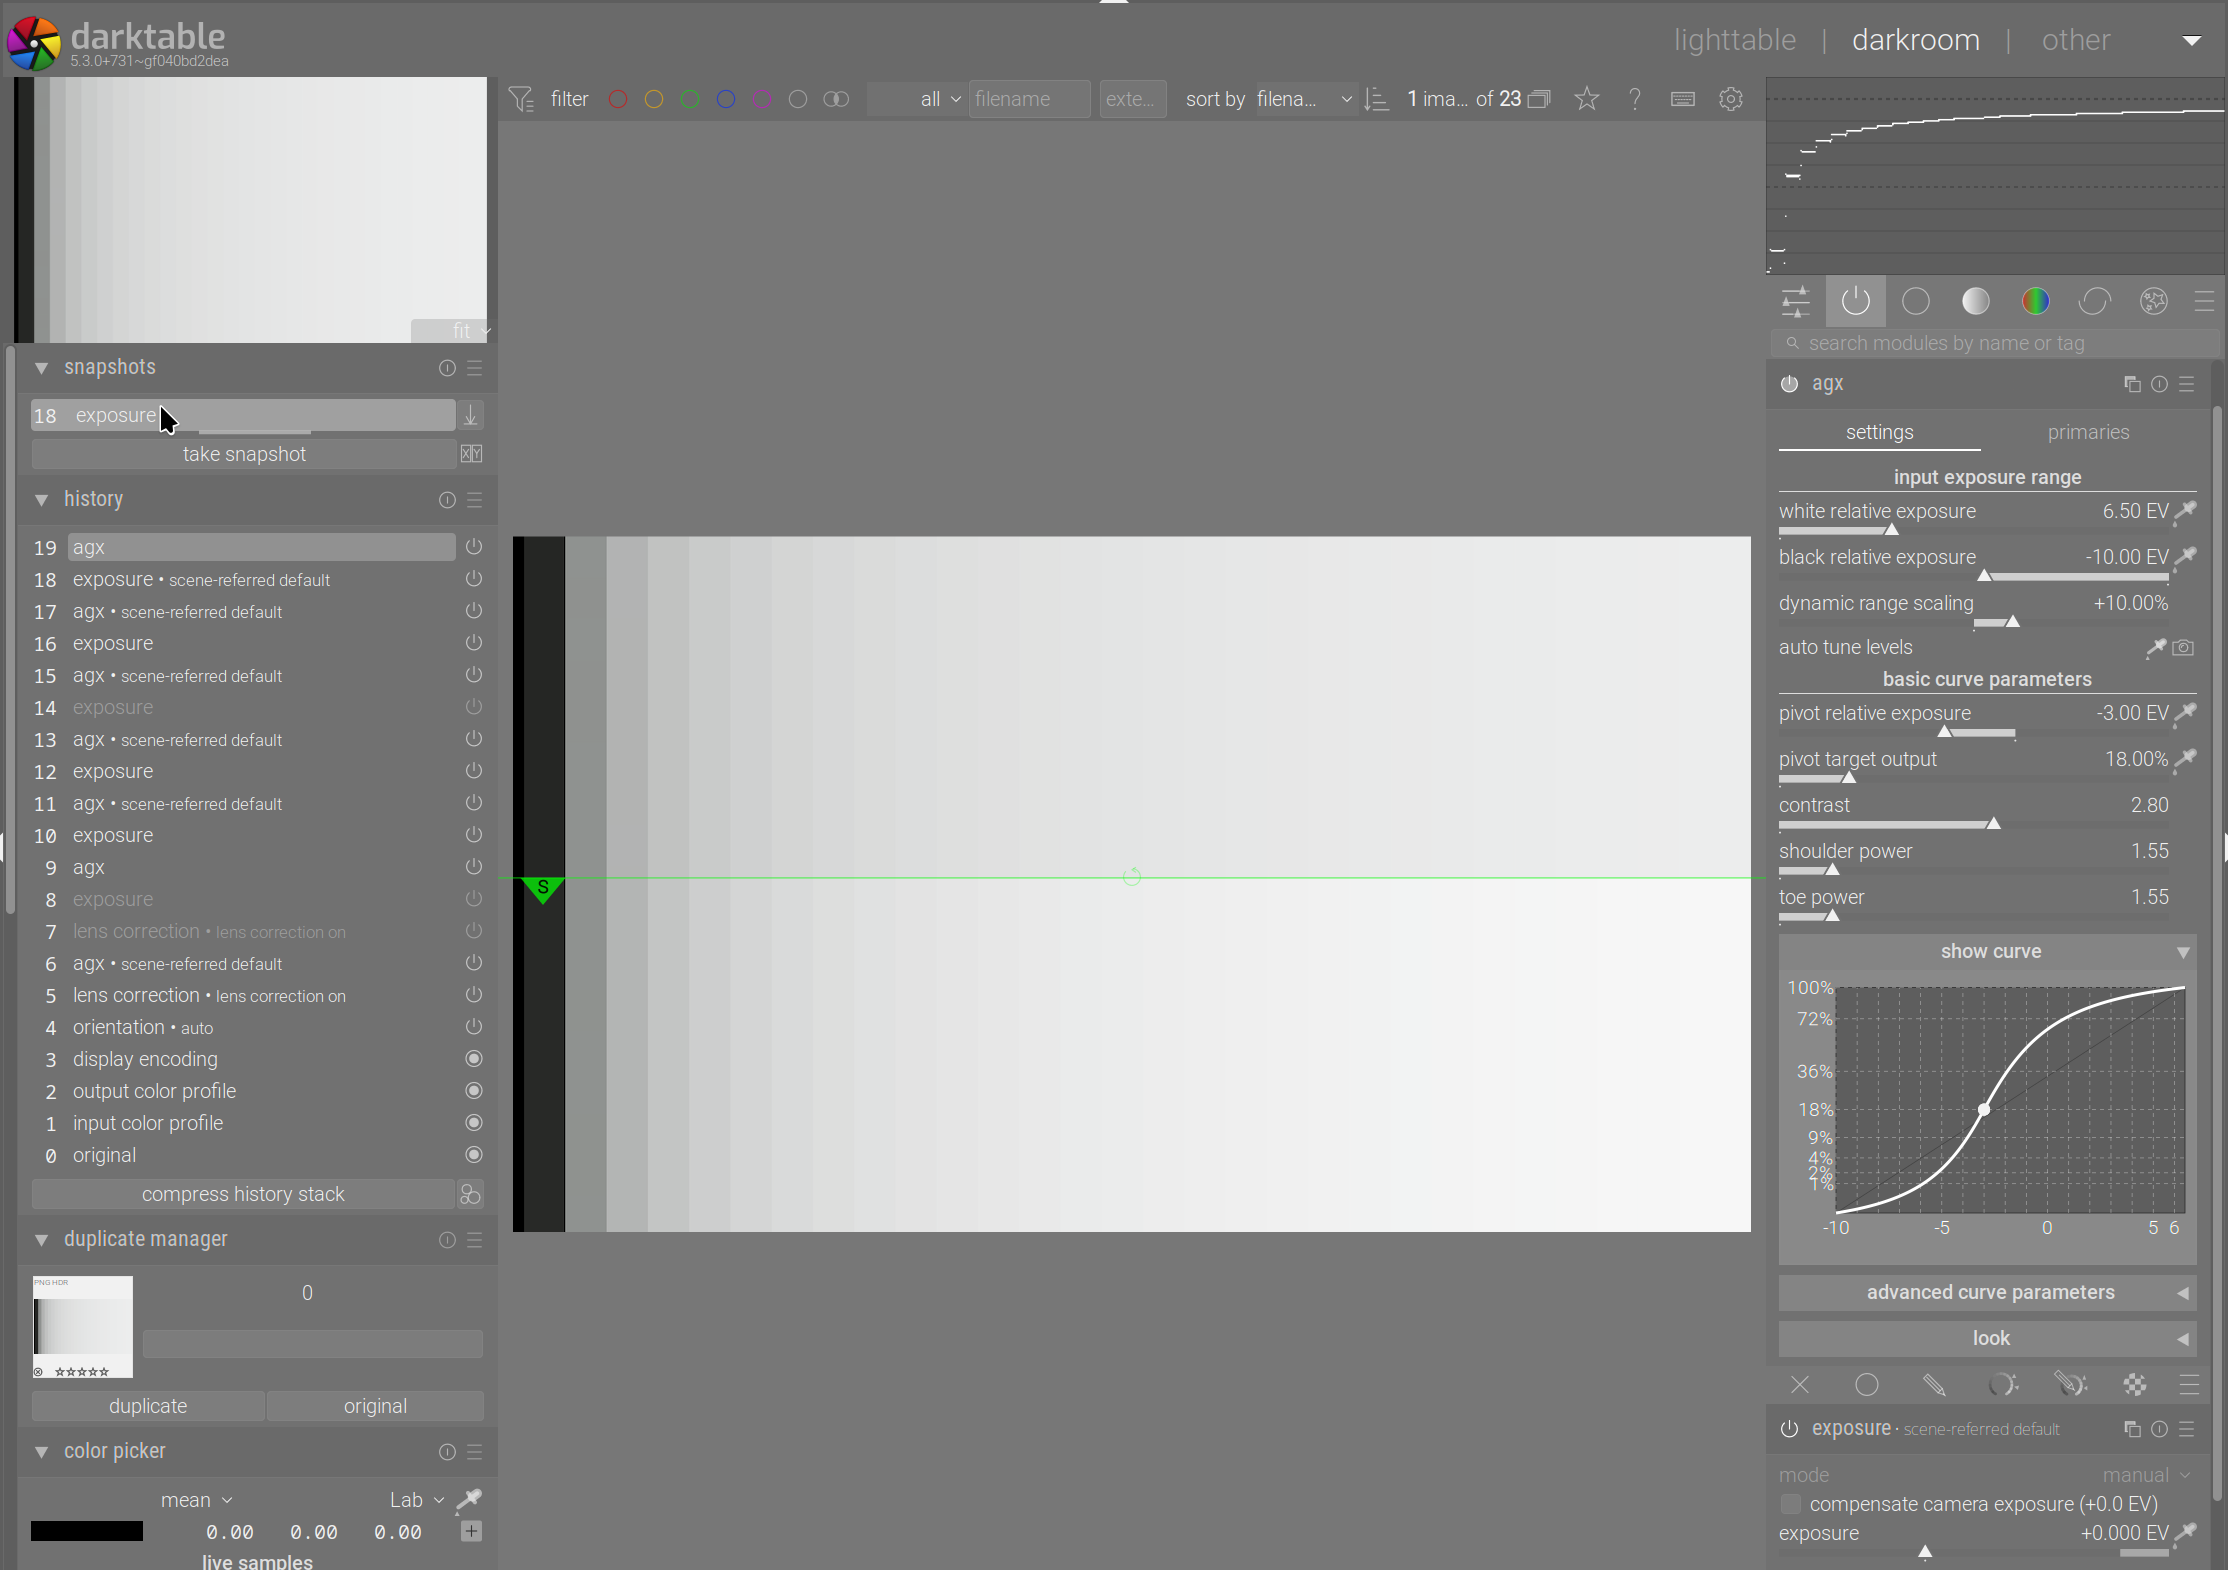
Further, sigmoid does not modify primaries, by default. For AgX, that is the core feature. If you want to turn that off, you could try the unmodified base primaries preset:
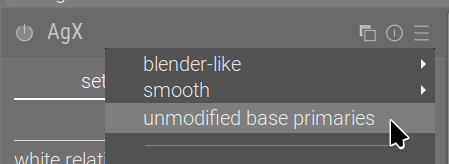
or go to the primaries page, use reset primaries to load the unmodified settings:
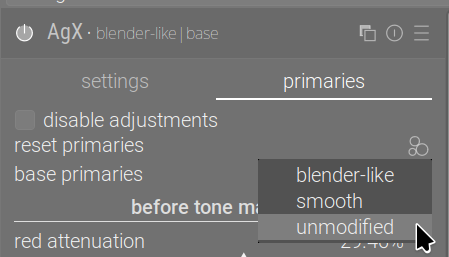
If, in sigmoid, you use the smooth preset, it:
- rotates the primaries and attenuates colours
- then, after the curve, it reverses the rotation (there is no control over that, sigmoid always reverses all rotations fully), but does not restore purity, by default.
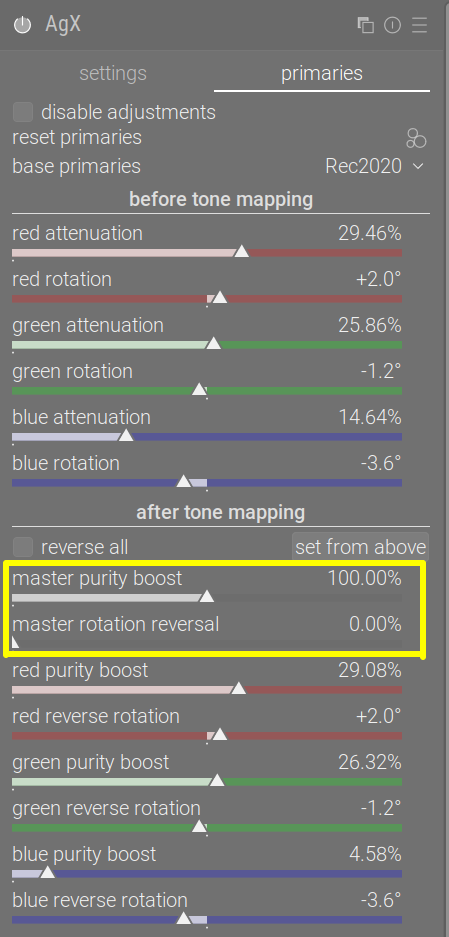
Contrary to that, in AgX, by default:
- we rotate primaries and attenuate colours
- after the curve, we do not reverse rotation, but do restore purity
You could either give the smooth preset a try:
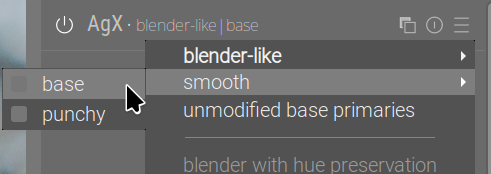
It uses the same rotation and attenuation settings as sigmoid | smooth, the master purity boost is set to 0%, so it does not restore purity, and the master rotation reversal & r/g/b reverse rotation sliders are set up for complete rotation reversal:
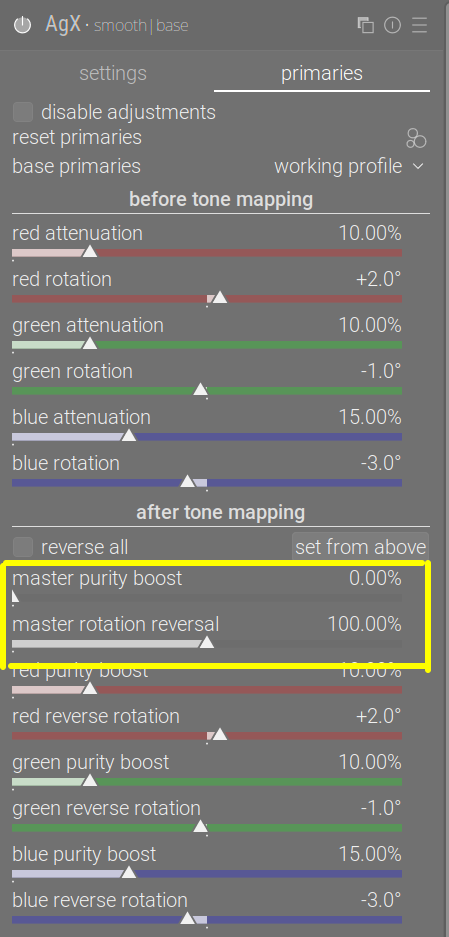
Or you could use the default settings, and tweak the reversal sliders (note that the defaults for the master sliders are the opposite of smooth, and that the purity is not completely restored even at 100%, because the per-channel values after the curve are not the same as those before):
10 Likes
How are you guys adding saturation when using AgX? With filmic I used “color balance RGB”. With AgX I am mostly using its saturation slider. Did anyone find a specific advantage to using one over the other?