@Popanz
With 0.51, you extended the linear portion too much; the linear section ended at a negative Y value. The code was not prepared to handle that, it tried to create a toe, but it always assumed that the starting y of the toe was positive. Starting from a negative value resulted in a ‘toe’ that became negative (and almost straight).
First, I try and match your output in DT. I start by inputting the same values you have in agx, then adjust exposure sliders to match as best I can:


Main difference I see is that yours is sharper than mine. I’m not sure how you achieved that without any sharpening tools, unless your screenshot is sharpened. Anyway, that doesn’t relate to agx module, so we can ignore it.
Now here is my attempt to match it without using slope and offset, and only moving power by 0.05:


Since I do not usually touch the ‘black level correction slider’ in my own workflow, I left it at 0, and re-adjusted exposure accordingly.
1 Like
The screenshot isn’t sharpened. I guess that would be visible on the rest of the picture (fonts etc). But as you’ve written, that is not important. There are modules for sharpening.
Your attempt without using slope and offset is very good and comes indeed very close. But you still needed the “power” slider, which you suggested to remove from the module.
Anyway it’s nice to see, that there are different ways to achieve a similar result. So we can choose, which way we find the more pleasant one.
Don’t you think so?
Isn’t darktable all about options. There are different ways to sharpen, different ways to raise contrast, as well as different tone mapping methods.
1 Like
I think possibly some of the discussion got off the rails when people took comments to mean that the Look or Sigmoid sections should be outright deleted before the POC has even gone through its paces. I’m not specifically referring to your comments or anyone else… just a general observation.
Speaking only for myself, I’ve run dozens of images comparing results against Filmic and Sigmoid as well as options within AgX and I found things I liked and didn’t like at the same time in all of them. But I think this tone mapper is showing great potential.
My testing is helping me decide which controls are important and which I can ignore, and possibly a consensus might help determine if some sliders are removed. For example, I haven’t seen a need for the toe and shoulder start points that are similar to latitude in Filmic, but others might feel otherwise.
That seems to imply that a user ought to choose one approach or another, where several users are finding that the combination of Look and Sigmoid has potential to neatly refine images under a single module without assuming the module “does it all”. I think that users will decide what workflow gives them the best results for their images, and other people will work differently.
2 Likes
Original:

High key version ( power, saturation, gamma, toe power):

toe start (pay attention to the man and the stairs):

Sunset:

Shoulder start (look at the perceived light intensity of the sun and the contrast in the bright areas of the clouds):

8 Likes
Thanks Boris, those are excellent examples and certainly shows there’s value in using the toe/shoulder start points. I have to admit that I’d be lost in the Sigmoid controls if I hadn’t experimented with them on a grey sweep image.
2 Likes
You don’t actually need either function very often, but when you do, they can help you to “squeeze the last drop out of the lemon”, so to speak.
4 Likes
From lemons to oranges
This setting gave me good contrast and a very white dish.

Greetings,
Christian
3 Likes
And these settings allowed me to recover details in the highlights and obtain a very white icing sugar.

4 Likes
Congrats @kofa. 470 post strong and ongoing. Keep up the good experimentation and implementation!
4 Likes
Boris, one can trust you to find a use for any number of controls. ![]() (I mean that as a compliment.)
(I mean that as a compliment.)
3 Likes
You’ve created something amazing!
And I’m not the only one.
For example here, it’s amazing how you can tease out the finest details with the right settings, as @Soupy noted in one of his posts above.
The true strength of the white relative exposure in one of the scenes we struggled with forever:

8 Likes


Had to deal with this image today and it was a perfect candidate for AgX. Bottom is sigmoid. It’s incredibly difficult to retain any detail whilst also keeping the strong sunlight look going on but AgX makes it much easier.
6 Likes
Please, I’m glad people find the code useful but what I have done and will do is just the mechanical stuff: exposing the controls of the curve someone else created, applying matrices someone has designed. The only ideas that were my own are adding it to darktable, flipping the toe and shoulder if needed (but I took the maths from someone else to do it) and exposing the internal gamma (I think).
I hope to bring another build tomorrow. Today I’ve cleaned the code up a bit and fixed that issue with the curve running into the negatives. I hope to add proper handling of the target black and white tomorrow (right now the curve can be in spectacular ways of the fallback toe or shoulder are activated). If time allows, I’d also like to add the pivot controls.
11 Likes
It certainly answers my question, and more. Given all this and the fact that the math is correct, do you plan to keep the behavior the same or is there some sort of mitigation that could keep whites and blacks from getting out of hand?
Otherwise, would some sort of range limitation or warning in the manual be necessary so people can understand the potential problems of pushing the relative exposure ranges too hard?
What you did was see all these pieces laying around and have the creativity to say “what if?”
4 Likes
Thanks @s7habo. It’s clear that you have found uses for every slider and can get great results from them
In my tests so far on a black to white linear gradient, I have noticed that Toe Power and Toe Start have a similar effect when you are just moving the sliders to the right. They both compress shadows to varying degrees, so I don’t see a big reason to use both in this way (unless you want to “stack” them for a stronger effect).
Where I see a bigger difference in their behaviour is when you have moved Toe Power to the left to raise shadows. Then Toe Start (which only moves to the right) can be used to set the point where the shadow lift starts from mid-grey.
Does this match your findings? Or have you found significant differences between them, and it’s obvious when you might choose one over the other / when to use both?
What kind of ‘getting out of hand’ do you mean? The plots I posted show that even at rather extreme settings, x=1 can be mapped to y=1, and I believe the same is true for x=0 and y=0. Do you have settings that break this? What behaviour do you observe that you perceive as erroneous?
Your previous message reads:
I’ve seen that White exposure set at less than 3.73 essentially disables shoulder power, and going less that 2.82 causes the white exposure to spike. And at very low settings around 0.16, both the Shoulder and Toe power will suddenly jump erratically.
Here is the Desmos plot. At relative white exposure = 3.7, following the dashed line of the linear contrast, you can see that even without a shoulder, we can hardly reach white. There is only space for a very mild shoulder:

At something like 2.7, the original sigmoid curve could no longer reach white:

Reducing the white EV even more, one would normally expect that more and more areas get clipped to white; however, as the point of intersection (x=1, y) is moving downwards, more and more areas would be clipped to grey. E.g., at relative white exposure = 2 EV, y could only reach a maximum of about 0.78:

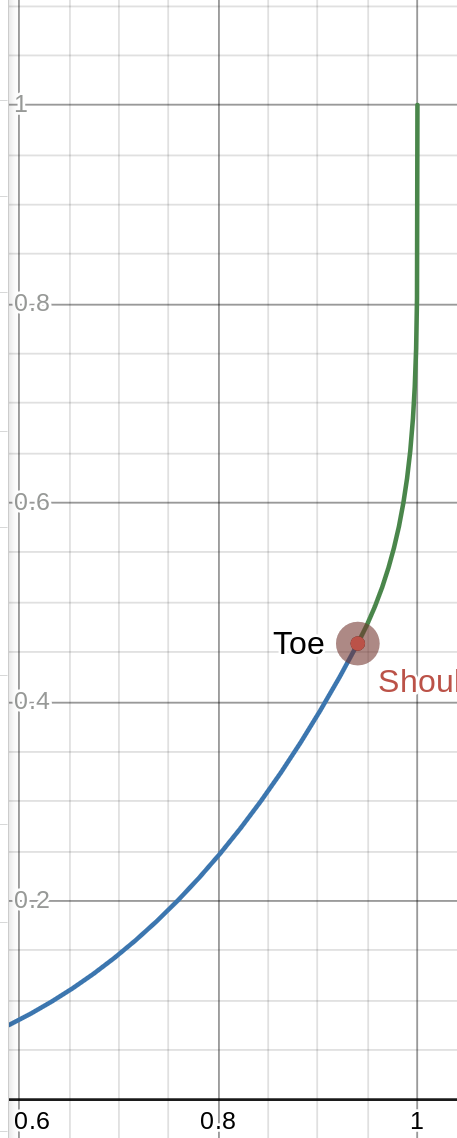
So, the point where the original curve could no longer reach y = 1, I switch curves, and start curving the ‘shoulder’ upwards:

When pushed to the extremes, it could still mean that effectively very few/no pixels reach white, for example:
If I start limiting the sliders, then others will complain that they have a completely valid use case for extreme settings (and, knowing @s7habo , he would, in deed ![]() ).
).
If you see behaviour that does not match what I described, please let me know and provide settings as a screenshot. It’s absolutely possible that I have bugs; I’ve started cleaning up the code, and if I miss some update, behaviour may become inconsistent. I have not seen such a thing lately, but I edit source code nowadays, not photos, so my experience is limited.
2 Likes
Yes, I have observed that too. And also that they are both dependent on the “slope of linear portion”.
No, in the example above the toe start was helpful to amplify the effect of toe power.
I see shouder/toe start more as a “booster” that should be used rarely and above all in moderation. In this respect, it is fitting that they are located separately in the last section below.
But I’d rather wait and see how the whole module develops before drawing any conclusions.
1 Like
limiting settings just makes sense if you get invalid values. Soft limits are a different thing, but to define those it needs finalizing the math first.
1 Like