Okay thanks  , but this was exactly what i did, at least on some of many many trials in the meanwhile.
But if that’s really the case, then my mistake must lie somewhere else—the only question is where.
If you want share a test shot and we can compare results…also with the lut profiles there can be a number of options to select that can impact the icc that gets generated… did you also turn off CC and set WB to as shot??
I’m just checking all possible things …
Also the one I shared ie the file with the chart and the flower…DT CC gets you to less than 1.2… I forget where it started with just the default… you could try your process on that one too and just see if the results a decent or still bad…
If I get the time I will make an icc and see what the delta e is or if you share a test shot we can try it on one of yours…
If you are savy with commands I found that I did a profile here quite some time back for a sony user and the profile did a nice job…this is a routine to use argyllcms to match the jpg…
If on windows you can run this in wsl…
I’d also be happy to try it for you if you provide a test shot…
How was your exposure…its also suggested to turn off Highlight reconstruction and only use distortion not vignette correction for the lens…
Other than that…not sure…it should look like the reference image created by ART or RT as well…
What if you use -am and create a matrix version from your chart…same otherwise…you could compare them…if the delta e is still big its part of the process likely and if its less then maybe its the lut version that introduces your larger deviations…just a thought…
I see that you are using some sort of custom cie file…does that come with the spydercheckers now??
That matrix, or any replacement you choose has to be in the processing pipeline if you want your rendition to look presentable. It represents what I’ll colloquially call the “camera color space”, it describes the color space of that particular camera for transforms to other color spaces, ultimately the color space of the rendition medium. Just setting it to Rec2020 or some other arbitrary color space bolloxes the whole transformation chain.
Okay, here’s a test of that specific replacement. I opened a raw with some color in rawproc, my hack raw processor. First screenshot is the rendition to display using the appropriate ‘standard matrix’ for my Nikon D7000:
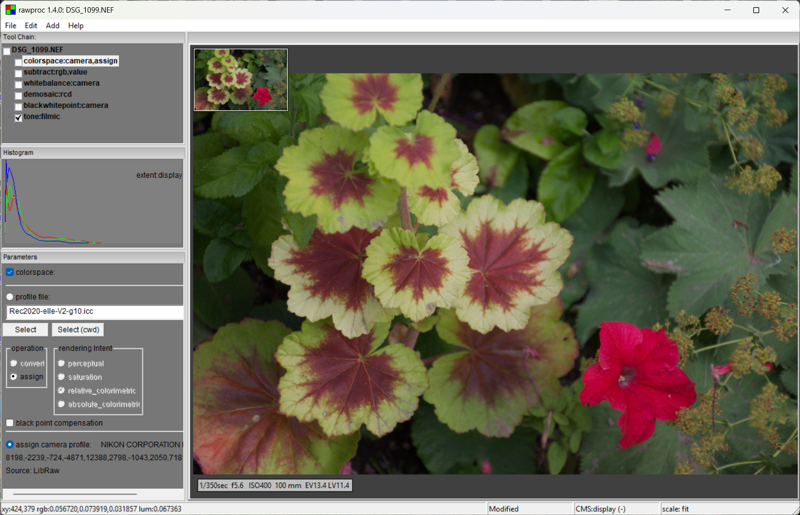
If you look at the toolchain pane in the top-left of the program window, you’ll see a ‘colorspace:assign’ operator, that’s where my program associates the camera profile with the image. In the parameter pane at the bottom-left, note that the option “assign camera profile” at the bottom is selected, those 9 numbers are the camera matrix for my Nikon D7000. Note that the “profile file” option at the top is not selected, but has a Rec2020 profile file in the box. Let’s select that option, and regard the difference:
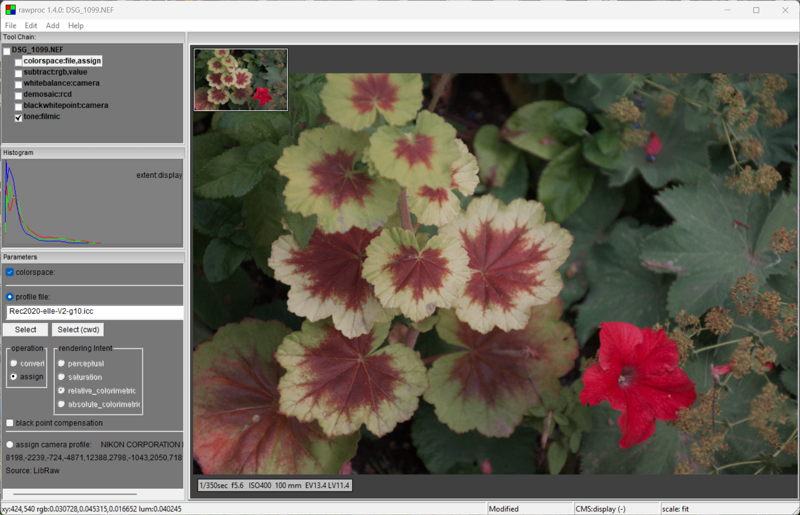
The matrix for a camera, either embedded in the sofware or supplied in a separate profile file, is purpose-built for the specific spectral response of that camera. Unless you want to just do goofy stuff, you need that as a starting point.
1 Like
First of all, thank you so so much for the time you’ve already invested and continue to invest.
Attached are all the files I’ve generated.
The input, output, and working profiles are all linear Rec.2020, even though that’s not what appears in the XMP file right now (since I reset it), but I had it selected when I generated the TIF file.
The file mkicc.txt is the script I used to generate the ICC (the .txt extension is only there because I couldn’t upload it otherwise).
Unfortunately, the photo was a bit underexposed. So I adjusted the exposure so that the white patch has an L value of 95.6%.
ColChart_test2.icc (472.3 KB)
ColChart_test2.tif (145.6 MB)
diag_chart.tif (72.7 MB)
DSC00278.ARW.xmp (17.5 KB)
DSC00278.ARW (121.9 MB)
mkicc.txt (766 Bytes)
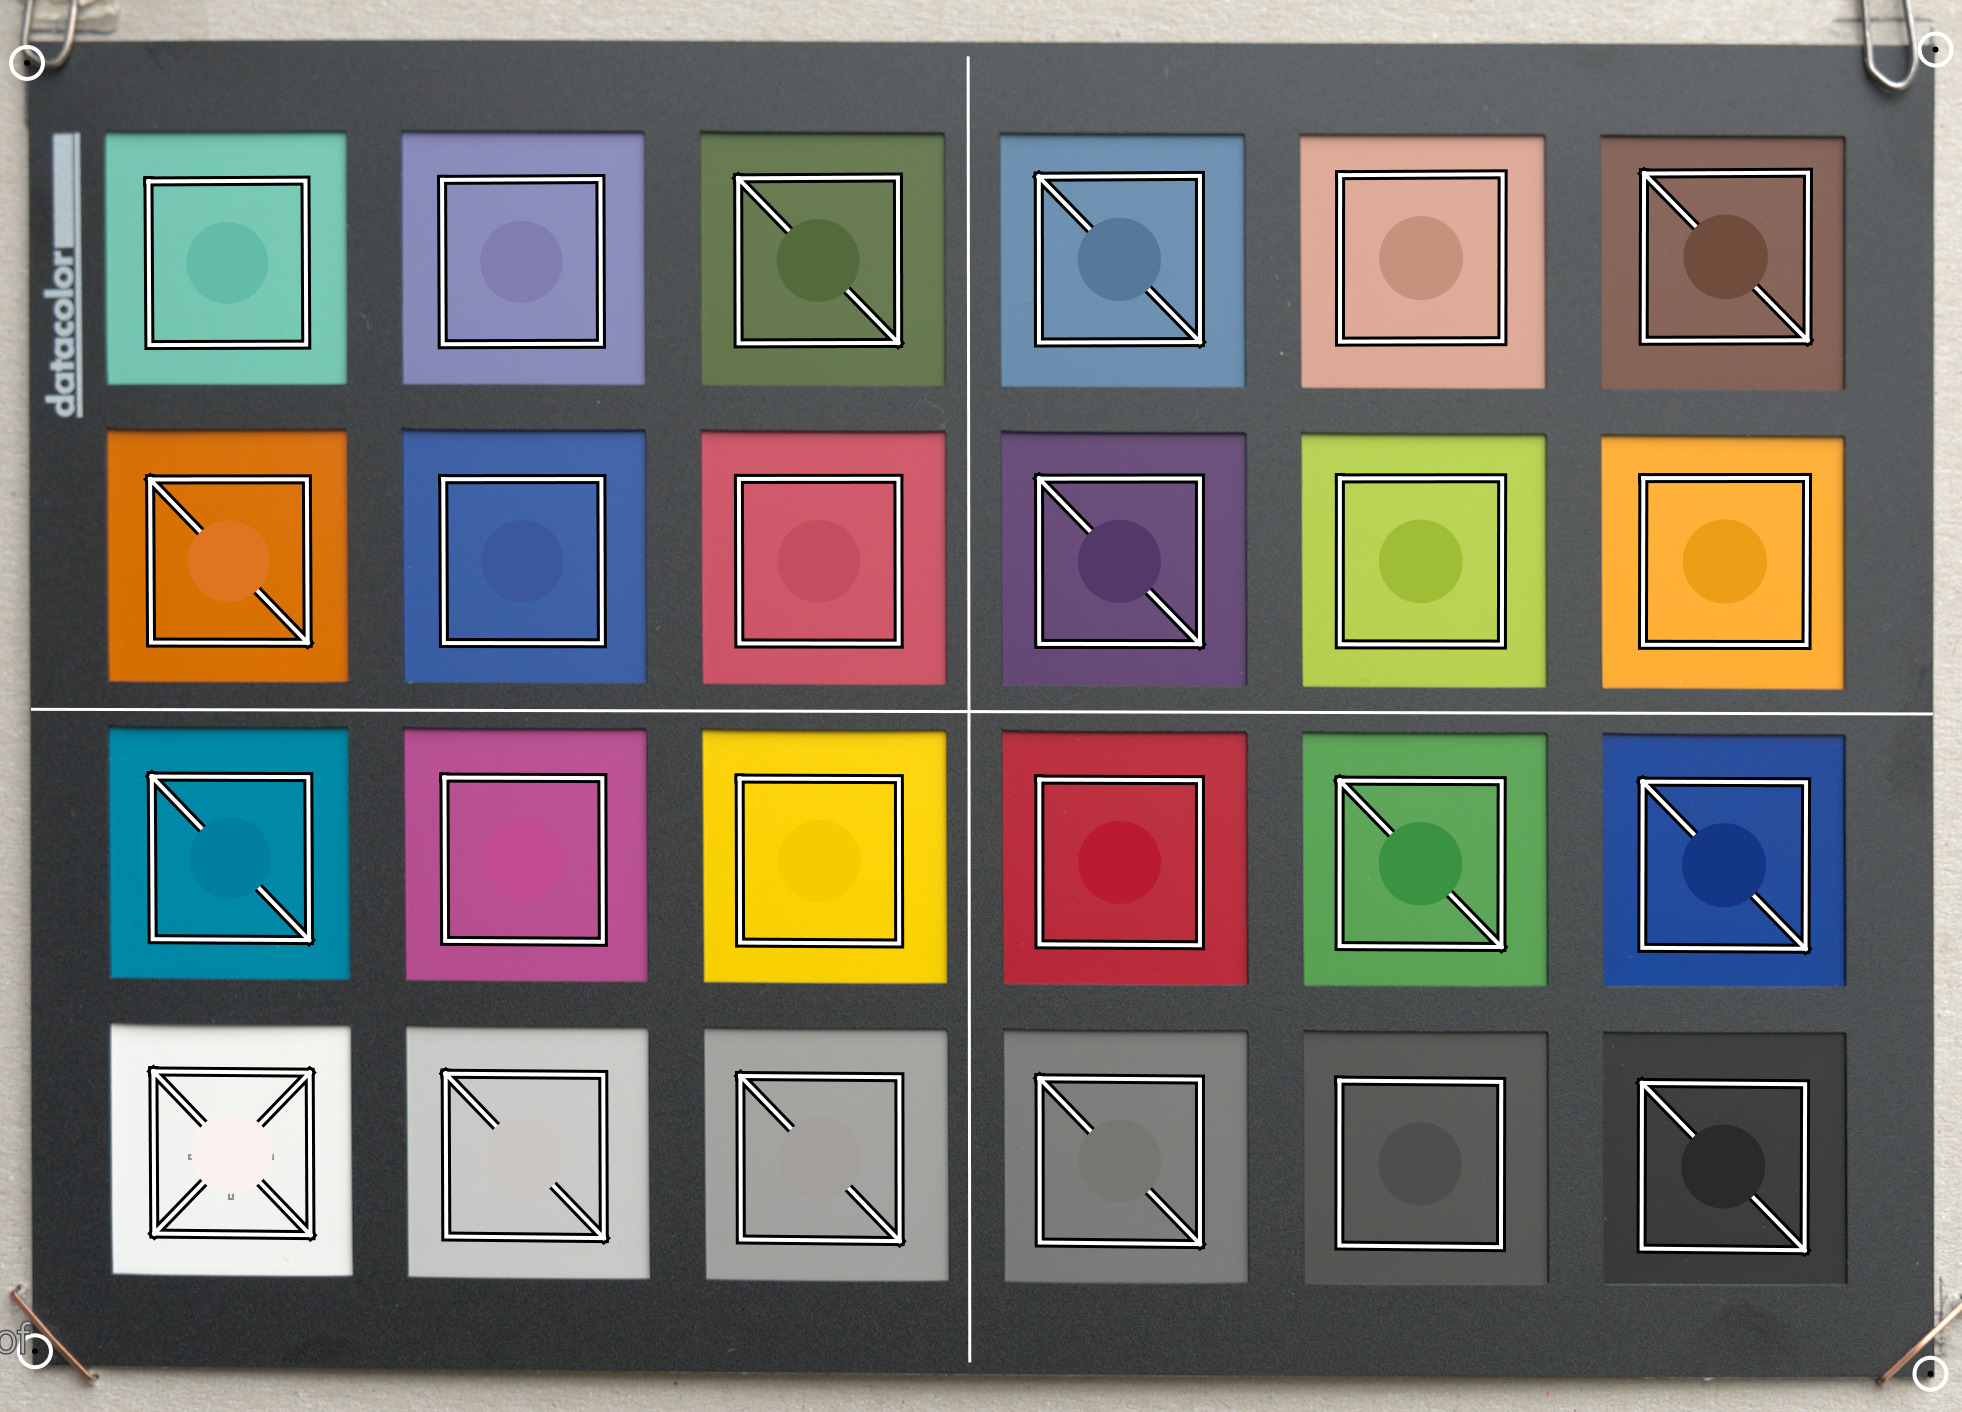
This is with standard-matrix:
So it looks with the generated "ColChart_test2.icc
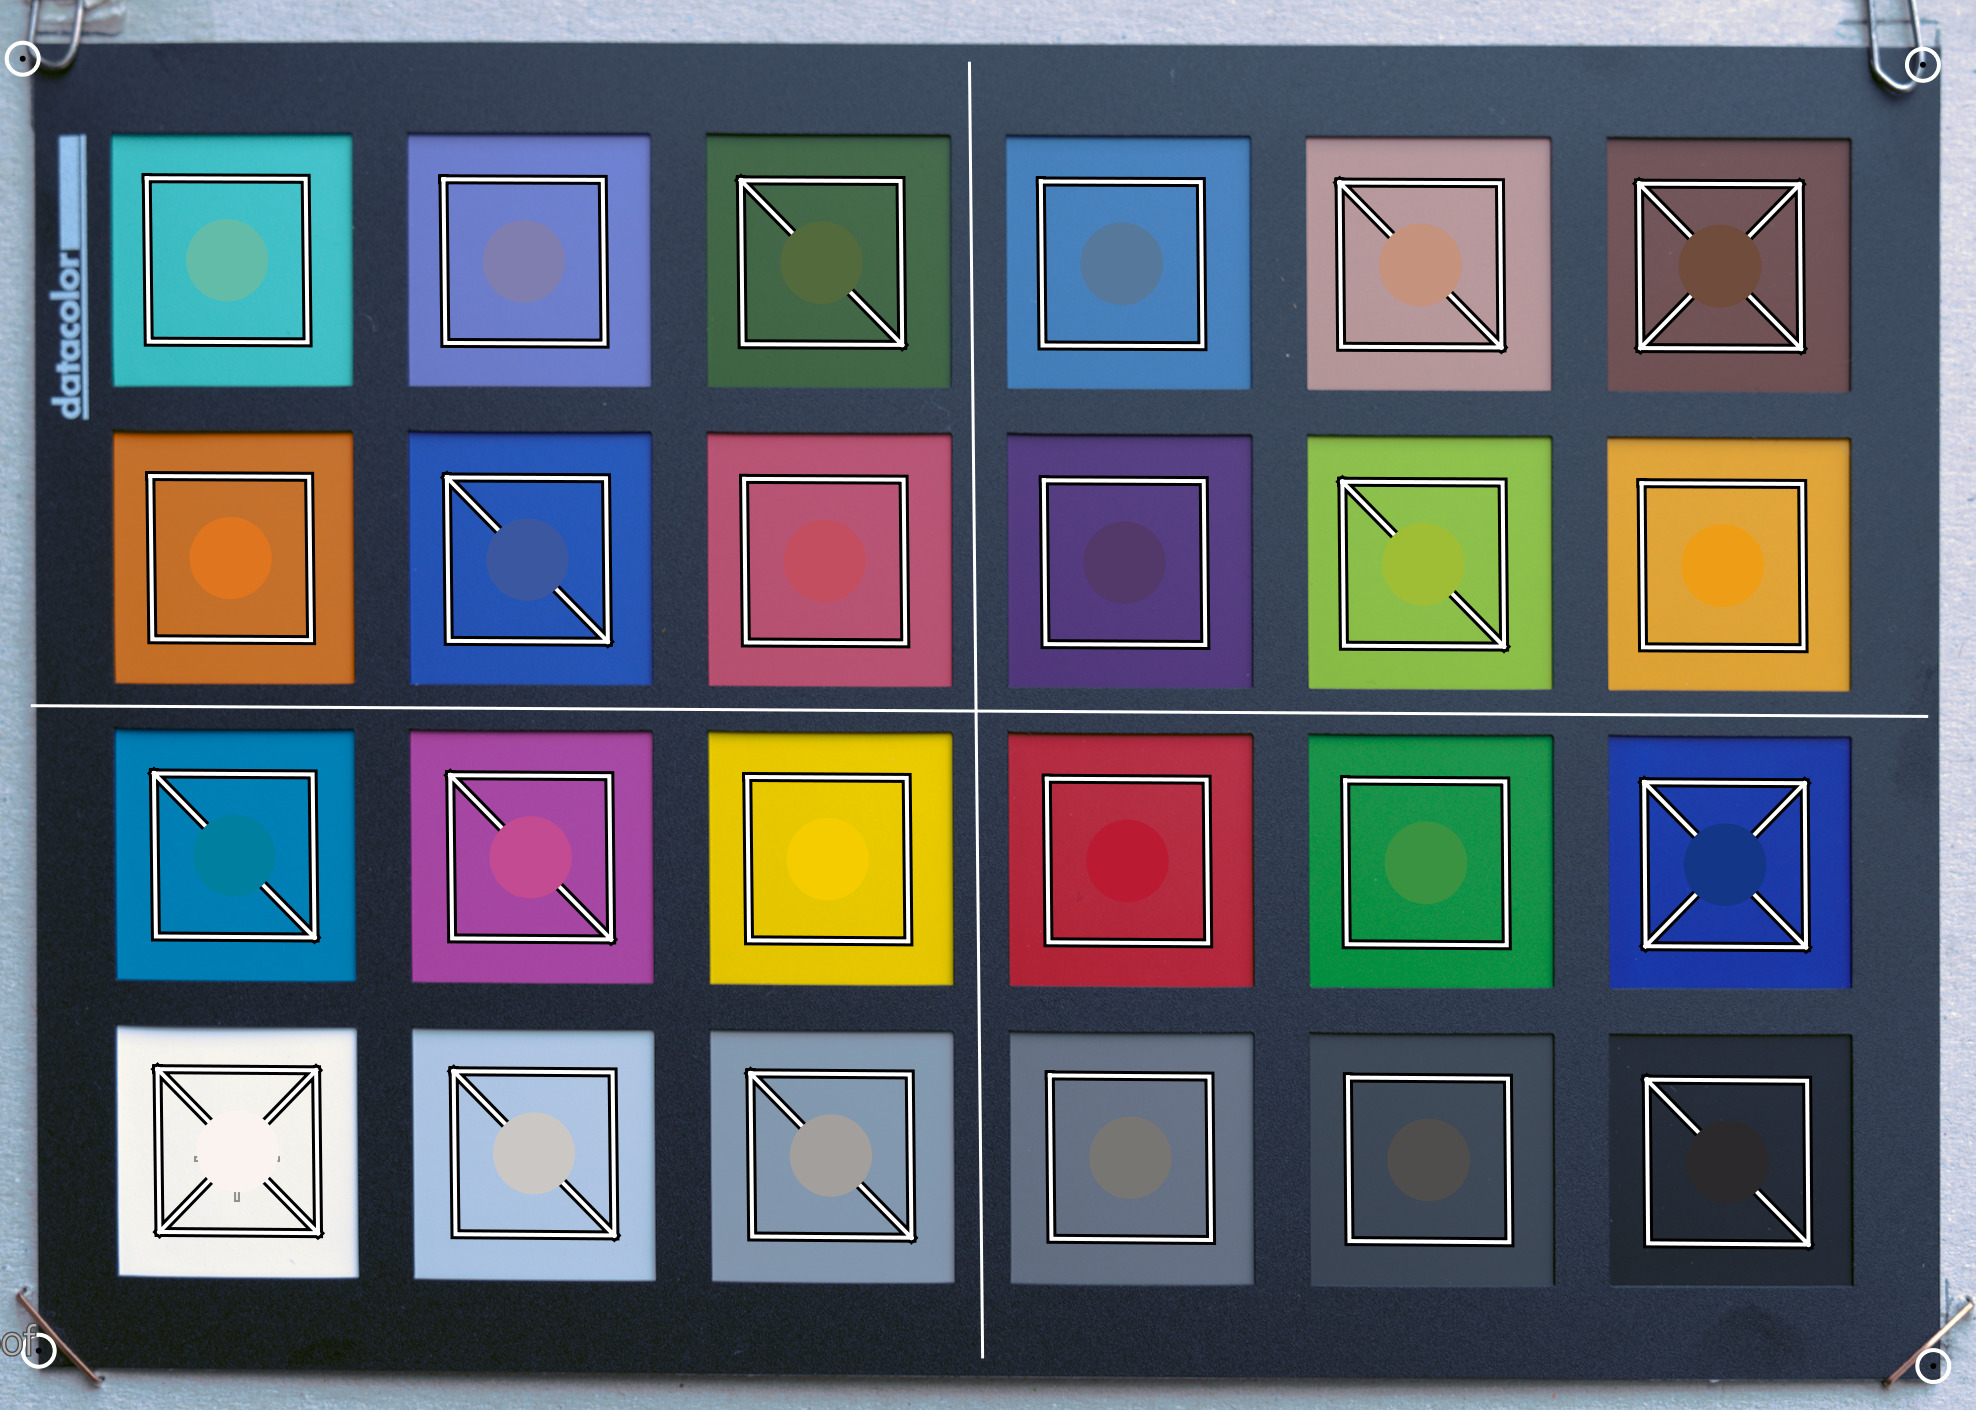
In both cases, I find the color accuracy lacking.
1 Like
Sorry overseen. You mena “SpyderChecker24_Lk.cie”. No it is only a local copy of the spyderchecker file in argyll (/usr/share/color/argyll/ref).
Interesting… your colorchecker target shot might need white balance attention, look at its borders compared with the standard-matrix. A bit-blue…
1 Like
Glen in DT there are several profiles…in the end to create the linear gamma tiff file to use with argyllcms…you set all the profiles to linear rec2020 or I guess if you wanted linear prophoto…this effectively creates the unmodifed pass through of the camera data ready for calibration in argyllcms…
Oh, to make the target shot rendition… my bad.
Ah nice…when I googled it it said it was a custom cie from the manufacturer specific to a certain set of cards…in any case I was just curious as to why the LK version…
As for a good site you can check here… its older but still a good reference…
I think Glen is right there is a wb issue going on as clearly the neutrals are “blue”
Yeah, I kind of get that—but it doesn’t really help me. The DT Manual explains how to embed an ICC profile, but unfortunately not how to create one.
There are a lot of different posts online about how to do this: Argyll, DCamprof (which isn’t very accessible to me), darktable-chart… All of these methods require a photo (usually a TIF) of a color chart and the corresponding color values for the individual patches (in XYZ or Lab).
What I’d really like is more specific support, such as from @priort or @reffort1
I started my profile work with argyllcms, gravitated to dcamprof, which has a lot more ability to tune and do more esoteric things like make profiles from spectral sensitivity data, which is a lot-less fiddley than target shots. If you eventually want to try dcamprof, I can help, otherwise I’ll bow out as I’m not familiar with darktable-chart.
Yes for sure. But what does it mean? In the first picture with the standar-matrix this blue shift is not there. Also not in the created tif or the tif file created by scanin (diag_chart.tif).
I’m at work now but later I can try to mess around a little with the files that you kindly provided…
If you follow the advice here for your tiff file creation…its just an older reference so linear rec2020 could be substituted and if you go to the other link of Elle’s where she walks through making the Pentax profile …that should be about as good as you can do with an icc and using Argyll…you could create lut and matrix versions and compare them as well…
Darktable chart is another beast…its an older way to make a style that has a color lut module and a tone curve module pair iteratively calculated to either match the provided jpg or colorchart patches… so its not an icc based solution…and it uses display referred modules…
pcode — Darktable Camera Color Profiling.pdf (134.8 KB)
1 Like
I have no idea what the procedure is for making a profile with darktable. That question appeared to be the main point you were asking about, but it seemed to have been overlooked in the responses. So, I reiterated it, hoping to make it more apparent.
does ART also use the scene referred workflow?
Similarly, I’m not sure what “scene-referred” actually refers to in darktable. My guess is that, in the past, darktable processed everything in a display color space (sRGB or some other gamma- or tone-curved space). But at some point, that was changed so that it uses a linear working space until all the processing is done, and then the picture is converted to a gamma-curved color space for display (somebody please correct me if that’s the wrong impression).
ART uses a similar flow – a linear working space that is converted to a display color space at the end. Not all of the tools operate linearly, though, or even in the working space. Some things are better done in a nonlinear, sometimes non-RGB, space (the DT tools probably do this, too, but I have no first-hand knowledge).
Do you think ART is better than DT especially with respect to a proper mathematical approach?
I started out using darktable 6 or 7 years ago, switched to RawTherapee, then to ART. I found that I could get better results with less work using ART; other folks probably have the opposite experience. For making profiles, ART and RawTherapee have a button that exports a reference TIFF file using a process configured for making camera profiles (you still have to prepare the image, as usual). There are many ways to crunch the numbers; I’m not sure there is a single approach that’s always better.
1 Like
@ Thomas_Link, I’ve downloaded your raw file and will take a look at it. I’m not familiar with the SpyderChecker target, so I’ll need to play around with that for a while.
Here are a few suggestions about the setup:
-
The surround should be as dark as possible to reduce flare effects and minimize extraneous colors leaking into the frame. I use an old dark cloth from my large format days, and spread it out to cover as much area as possible. Also, remove all the shiny objects for the same reason (specular reflections are very bright, like having several tiny suns in the frame). A lens hood can also be beneficial.
-
Reposition the target or camera a little to reduce the glare in the upper right corner. If the color patches have a bit of a glare on them, they will photograph lighter and less colorful than they should.
-
The photo looks as though it may have been taken in the shade. That’s OK if you are making a profile to be used for pictures taken in the shade, but making a daylight profile (direct sun + blue sky) should be more generally applicable.
-
I’ll also suggest stopping the lens down a little bit more, to the f/5.6 - f/8 range, to minimize any aberrations.
1 Like
I think the test shot has a 1 ev exposure compensation…
Someone that makes profiles and uses Art and or RT can likely confirm this but I think the reference image option works fine if you shot a series and you can get the exposure in the right range otherwise you get a very dark image and the white patch will be nowhere near 92 or the 96 it is supposed to be for the spyder card.
If on the other hand you set the image in ART to no profile. Adjust the exposure as needed for the white patch, (when you dont have a bang on exposure or series you can pick from to get the right white value), then you choose the pass through export output profile and save the tiff…
When I do this and and compare this to the DT output with all linear profiles and the same exposure correction and wb then the values of the tiff file from some picker sampling are I think are quite close…
So I “think” you can use the reference image if you have a shot with the right exposure but if not you need to tweak exposure and make your tif with the no input profile and passthrough output options noted above in ART…
That seems right to me but maybe not so if anyone wants to elaborate and or correct that please do …
Edit,
From this reference it would seem that if you are close enough you can rely on the -U option in argyllcms to extrapolate white or if you are careful you can use exposure and save in a similar fashion to what I proposed above …
Apparently the “Sweet Spot” for your capture is strictly Expose-To-The-Right (ETTR) with the white patch sitting just below clipping, or up to ~1.5 stops below that. If so then I found a suggestion that “Save Reference Image” is by far your safest and most accurate option. Shots much lower than 1.5 to 2 stops apparently start to push the dark patches too low and you risk profiling noise…
@Thomas_Link : Have you calibrated and profiled your monitor already? I think that’s the more important step if you want reliable color rendering:
- there’s a lot of variation between monitors, so if your monitor isn’t set up correctly, you don’t know what you are looking at
- as there is a lot of variation between monitors, what you see is not what most others will see. If your monitor is calibrated and profiled, you’ll at least make sure that what you sent out has the colours you expect.
As you notice, profiling the camera is a lot of work. And getting a proper profile does not in itself guarantee correct colours, you also need to control or measure the illuminant for the images on which you use that profile (normally, such profiles are valid for one illuminant only…)
1 Like
This is an interest point and one that I am not sure I fully understand but with ICC profiles you can craft profiles in a way that you let the ICC do the wb correction from the chart and this is apparently often done for reproduction work where the conditons are known and you want to work in that lighting…
However there are options to wb your shot and use that as the input data for the profile…Then the profile is constructed to use properly wb data… making it a bit more flexible …but I wonder if that is still that same as what you are saying…
Regardless there are so many nuance to these profiles for sure and at my age once I go away from them for a while I forget almost everything …
1 Like