Contrast Management RGB : A new scene-referred approach (POC)

Hello,

Here is the latest version. I have focused on refining the mask generation and improving the multi-scale decomposition logic. The “Pyramidal Edge Protection” is now dynamic across all five scales to ensure better edge-aware filtering.

I have also renamed several sliders for a more intuitive workflow. My main priority was to address previous feedback and implement a more robust halo-suppression strategy. I’m looking forward to your feedback on this version, which I hope is more polished!

Here is an example with excessive contrast

And here is an example of a 100% portrait (which is not my speciality).

Here is a new appimage
https://drive.google.com/drive/folders/1FmpmIxhGIf3pC7mwPuITMbsnXXuCrlAg?usp=sharing

And the code is available on GitHub

Greetings from de Luberon,
Christian

12 Likes

@Christian-B ,Thank you for all the great work. In testing your latest release the CSF slider is grayed out. Is that by design?

1 Like

Thanks for the update…could you comment on the edge protection, ie how the “pyramidal” interacts with the individual one’s or at least the practical way that you would use and adjust them??

Thx

https://www.dropbox.com/scl/fi/n9vb93j95cu2pfbh3rpnt/darktable-f4fd936823-win64-NSIS-deprecated.exe?rlkey=s6k1mb6hrhjx21funh3pc89og&st=x69yavk6&dl=0

6 Likes

That slider becomes enabled when you adjust the “global contrast” slider. Seems to be working in my build.

2 Likes

Well, I can’t say I fully know what I’m doing yet with this module, but I can get some impressive results just with playing around with the different pyramidal sliders:

9 Likes

Thank you.

2 Likes

Hello,

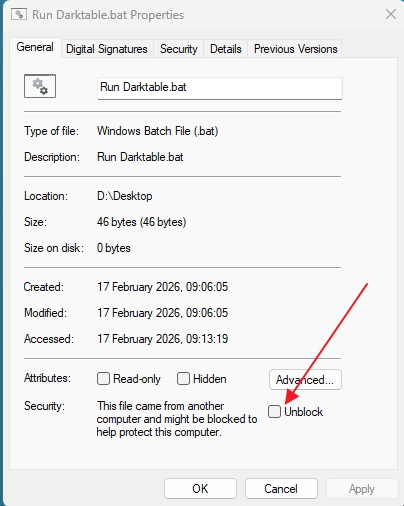
With pleasure, and thank you again for your help in compiling the Windows versions.

I believe I have introduced a true ‘pyramidal decomposition’ for frequency scales. Unlike the previous multi-scale approach, this pyramid strictly separates frequencies. This architectural change allows for the implementation of dynamic ‘Pyramidal Edge Protection,’ which, in theory, drastically reduces halos compared to previous versions.

Here are the pillars of this approach:

  1. Quadratic logic of the Edge Protection slider

I introduced a squared logic (base\_eps = feathering^2). Since the parameter is already the inverse of the slider value (1/p), squaring it makes the adjustment much more responsive and precise in the critical area. Where a linear slider would double the effect, this approach quadruples it, offering unprecedented finesse of control over contour sensitivity.

  1. The ‘Pyramid of Intensities’

The Epsilon (the detection threshold) adapts to each level:

  • Extended Scale: Larger Epsilon (* 1.5). The filter is more ‘permeable’ to smooth large volumes naturally.

  • Micro Scale: Smaller Epsilon (* 0.5). The filter becomes precise and refuses to smooth over sharp contours to preserve micro-details without halos.

  1. The ‘Protection Pyramid’ (Edge Sensitivity)

Fixed multipliers (from 1.80 for Micro to 0.80 for Extended) weight the Epsilon. This allows for much stricter control over large shapes (where halos are most visible) while remaining more flexible on fine textures so as not to amplify digital noise.

  1. The ‘Contrast Scale’ slider (Intelligent Blending)

This slider does not lower frequencies uniformly. It is a proportional scale factor: when increased, the ‘Extended’ layer rises faster than the “Micro” layer (crisp details). This preserves the natural balance of the photo and accentuates the modelling without giving an artificial ‘HDR’ appearance.

By combining these pyramids, you get an automatic balance: more power for
modelling and more precision on the contours to avoid halos. The user no longer has to struggle with the settings; the system ‘pre-calibrates’ the protection according to the scale.

  1. Practical side: My workflow

In general, I prefer to start with the overall contrast and then shape it with the CSF slider, which becomes active automatically.

Next, I like to make an initial adjustment (if necessary) with the ‘colorimetric contrast’ slider, which affects the brightness between red and blue to create separation without changing the white balance.

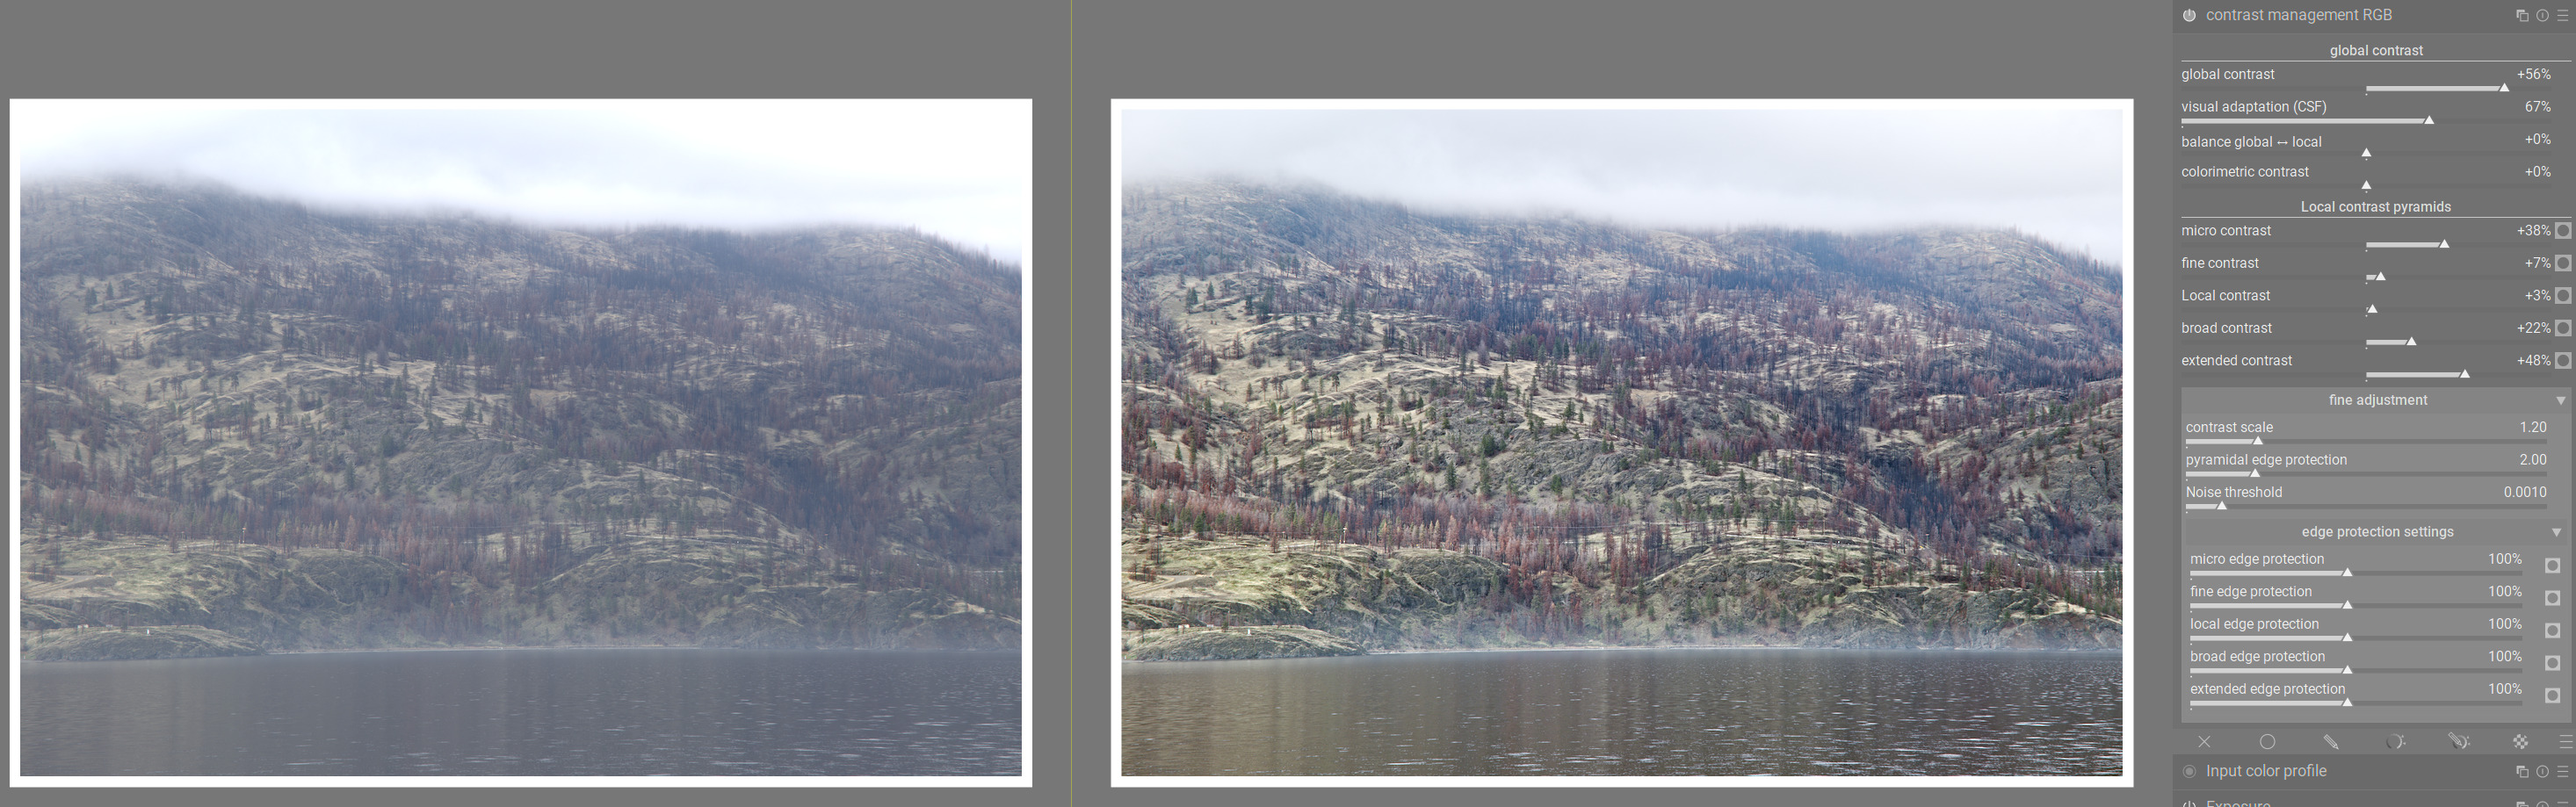
Next comes the pyramidal local contrast adjustment. Each slider affects a specific area of the image:

  • Extended & Broad: These are your modelling tools. They affect large areas of light and shadow. For example, to give relief to a face, depth to a landscape or soften the background.

  • Local: This is the ‘structure’ and reference contrast relative to the others. It reinforces the presence of the main objects.

  • Fine & Micro: These are the texture sliders. They bring out the detail of fabrics, skin pores or the sharpness of a lens. A negative value can be very useful for portraits (to reduce skin imperfections).

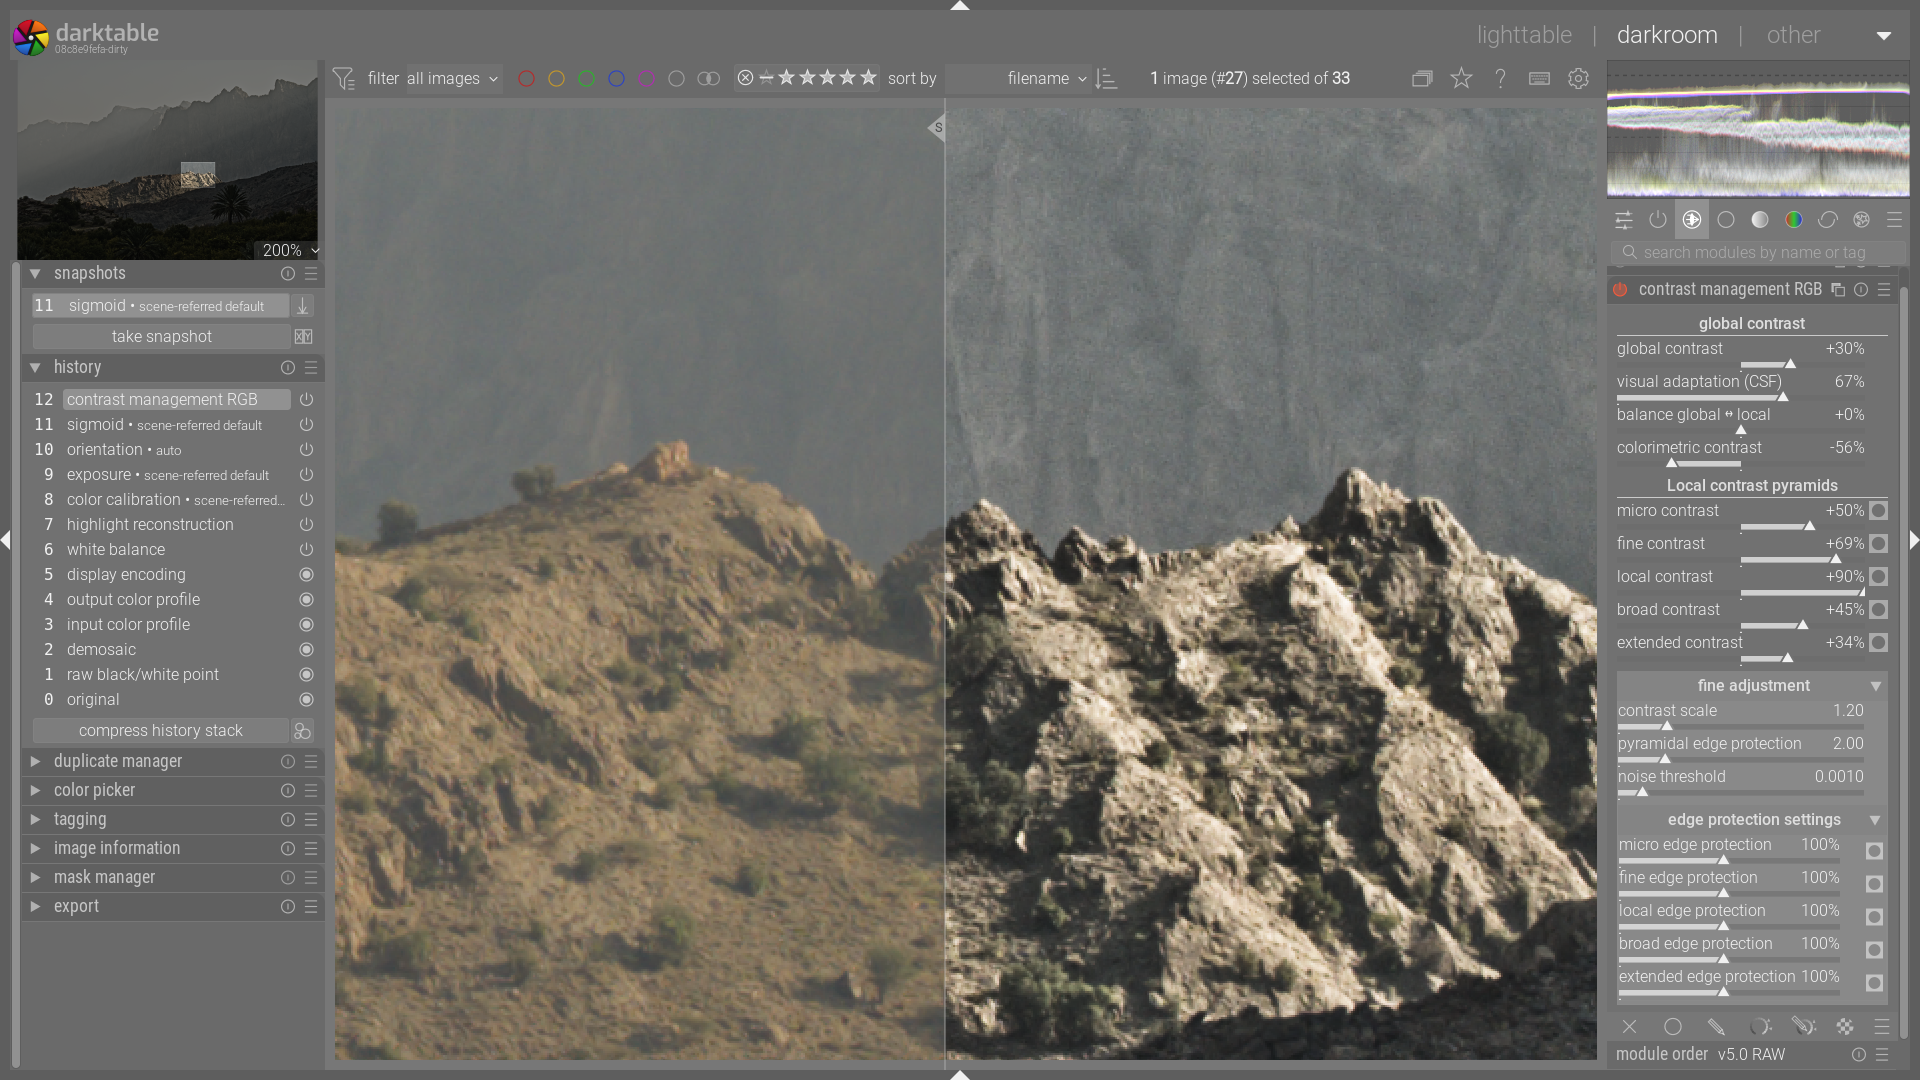
Fine adjustment of scales (Visualisation)

The module includes visualisation buttons for each layer (the mask icon next to each slider) to check that your ‘Edge Protection’ is set correctly.

You can either adjust the main ‘Pyramidal Edge Protection’ slider until you obtain a ‘clean’ mask at the edges (to ensure there are no halos when applying contrast), or use the dedicated sliders to fine-tune the scales individually.

Depending on the mood of the photograph, you can also use the Contrast Scale (Blending) slider, which will dynamically shift all scales. A higher value will have less effect on very fine structures, which can be useful for a very noisy photo.

And for the final touch, we can balance the global or pyramidal part with the “global<>local balance” slider.

Greetings from Luberon,
Christian
PS. Translated from French (AI) Here is the French PDF.
20260216 Pixls forum.pdf (44.5 KB)

13 Likes

Hello @priort

First off, thanks a lot for your builds!

I would like to test this feature myself on Windows 10.
Unfortunately, it looks like your dropbox build is not totally “portable”.
In short, it does not install unless you have an Adminstrator account (which I don’t).
I also suspected so because it is an .exe. Not the usual Zip you often get with portable applications where you unzip the files and later you click on the .exe or on a .bat file
In additions, it is also named as "deprecated.exe " which is a bit worryng… :slight_smile:

Is it indeed not portable as it looks like?

1 Like

This one is not portable…you would need to install it … This is a build. When you build you can do a direct install or build a package with the installer. This is the later… It’s probably as safe or safer. To provide a portable version I have to install it on my PC and then zip it and add the batch file to run it… Installing a parallel version is fine…You just turn pick a new install directory and turn off xmp writing…

The depreciated part just refers my build environment setup nothing to worry about

1 Like

Thanks a lot again Christian, @Wilecoyote and @priort (hope I do not forget anybody…),

Just updated to the lastest version…

I find this module a lot of fun to work with. And my results are good.
I still have to learn the finesses, so thanks a lot for your explanation above.
Invites me to experiment and see the - often subtle - differences.

Cannot wait to have it in a production version of dt …

Kind regards, Jetze

2 Likes

Hello @priort

This one is not portable…

Thanks a lot anyway :slight_smile:

Just for you… :slight_smile:

https://www.dropbox.com/scl/fi/lxr2oivn9fbyw6upfo7po/DTLCCM.zip?rlkey=9fhe8nhipxkui8h3hah2fjiwa&st=f28gdma5&dl=0

3 Likes

Thanks for the detailed explanation…I’ll work my way through it and try to apply it as you explain it…If anything of note comes up I will come back with questions…

This seems really thorough with a great potential to adjust and control the contrast in the image… I actually like how in many cases reducing contrast with this model acutually really opens up the image revealing details that are crushed and then you can do more regional and targeted tweaking…

2 Likes

I installed this version, and thank you for putting it together. The modules in darkroom have an extra, to me, icon that I would like to remove, but I cannot find a setting to do that:

image
Specifically, the right icon on the left side. Could you advise me on how to turn it off?

1 Like

I use 7-Zip to unzip the ‘deprecated’ Windows installation files, and then use a batch file to run the resulting copy of darktable as a portable app. In addition to @priort versions, the nightly Windows builds also include ‘deprecated’ installation files.

With 7-Zip installed, right click the Windows ‘darktable-xxxxx-win64-NSIS-deprecated.exe’ file and select 7-Zip’s ‘Extract to’ option, which will unzip the exe file into the specified folder.

Copy this batch file into that folder, and run it, to open darktable. Note that the batch file will create the required \config folder, the first time it is run.

My version of the batch file includes the word start, which automatically closes the command window once darktable has started.

start .\bin\darktable --configdir “.\config”

1 Like

Hi @Underexposed,

That is because you are using one of the -icons themes. Change the theme to something else, e.g., darktable-elegant-gray and the icons will go away.

3 Likes

This is not specific to this module but determined by the chosen theme. Take a look at the preferences.

3 Likes

To stop the batch file nagging, right click it and check the box indicated.

Nice to follow the developments of this module.

Would just like to drop a link for possible inspiration.

2 Likes

Hello,
I am delighted to see that you have tried this module, and I hope it meets your expectations.
After conducting numerous tests on my own photos, the results I obtained have motivated me to submit a PR soon. Before finalizing the project, I would like to make sure that the default settings are optimal for as many of you as possible.
I would greatly appreciate your feedback: do you think the different scales (Micro to Extended) and the different settings are well calibrated by default?
Thank you again for your help and feedback.
Greetings from Luberon,
Christian

4 Likes