Reveal the middle grey slider? Which version of DT? I’m on 3.4.0.
edit
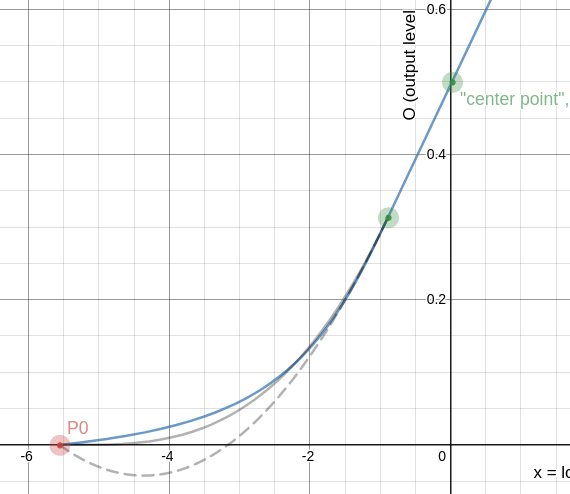
oh, found the it! So … what does it do? When I change the setting, the straight line in the graph keeps linking “0 EV” and “18%”, but both the highlight and shadow range sliders are being increased if I brighten the image, and both are reduced if I darken it. I think I understand why the marker stays at “0EV” (because the slider only changes what input level is interpreted as 0EV), but why would this change the dynamic range? I.e.: if I darken the picture, the shadow range should increase by the amount by which I increased the middle grey level, and the highlight range should decrease by the same amount (because I’m declaring parts of the picture shadow, which used to be considered highlight). >the current implementation means that after I have adjusted the middle grey slider, I will always have to re-adjust shadow and highlight ranges, iteratively.
And of course I still have no direct control over anything but black (relative to middle grey), white (also relative) and 18% output. So if I want the subject to be brighter or darker than 18%, I still cannot directly prescribe that, but have to run iterations around iterations to get it where I want it.
end edit
That graph actually does help, though I’ve found myself often enough wishing I could:
1: fix the top and bottom end of the range relative to input levels
2: grab that middle grey and move it to a different point (“this is the input level I’m interested in, and this is the output value I want to map it to”)
3: keep the top and bottom ends of the curve from overshooting, thus mapping a part of my shadows to zero, and highlights to 1, although they’re in the range. I know I can change that by adjusting the width and contrast parameters, but that requires iterative adjustments again.
Again I need to state of course that I have not seen the maths behind filmic written down (and am not used to reading Darktable source code, so It’d be a big task to look it up), but I’m reasonably confident with analysis, vector maths, and I think by now I have a decent idea of what the transformations in filmic actually look like – so I’ll be happy for @anon41087856 (or someone else who knows better than me) to explain to me that this is mathematically either impossible or hard to implement. I think however, that there are solutions to these issues which don’t break the current functionality or workflows but should make it easier for people currently struggling with filmic to get results quicker and more robustly:
1: is a question of providing an input to define top and bottom end in terms of input values as an alternative to “middle grey ±x”. I think it’d make things more comfortable because it removes some of the ways in which different user inputs are coupled to each other (change one thing, now the other one is out of whack…).
2: Is the more important one to me because being able to set middle grey directly would reduce the need to go back and forth between exposure and filmic.
3: Is probably a bigger task and may not be easily done, as it’s not just a question of the user interface. This would require adjusting the definition of the highlight and shadow “roll-off” curves but could help to make the whole process more robust (i.e. reduce the range of user inputs leading to “broken” results). This is a point where some of the maths would need an update, but there must be a mapping function which does not overshoot for any inputs. Actually I know there is because I’ve been working on curve definitions for smooth geometries in a different context, and it’s possible. htan() functions could work, some splines, or an additional curve parameter injected into the current function which only becomes active if overshoot needs to be prevented.
 (Edit: found this emoticon last week, I just love it… )