Denoise Comparison - Darktable, ON1 and Topaz

Following on from my question concerning external denoising application workflow with Darktable, I put together a play raw to compare how noise reduction compares against ON1 NoNoise, Topaz DeNoise AI and the Profiled Denoise in Darktable.

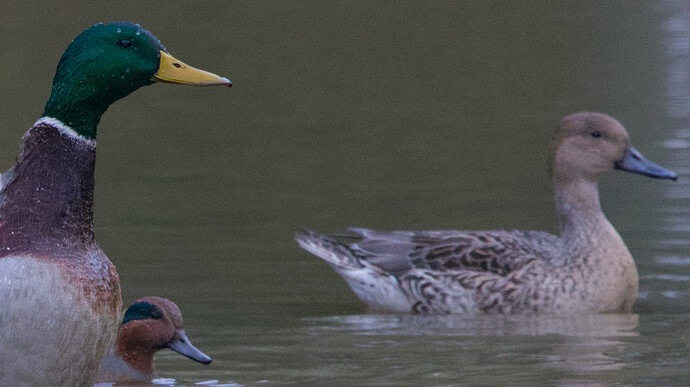
The image is an ISO 4000 photo taken from a Canon 7D MKII:

0P9A0410.CR2 (26.4 MB)

This work is licensed under CC BY-SA 4.0

The photo was minimally processed for exposure, tone and color correction and sharpening, using similar but not identical settings for each.

Photo 1 - Darktable Profiled Denoise


0P9A0410.CR2.xmp (15.7 KB)

This is the JPEG export of the image using the Darktable Profiled Denoise module. I applied noise reduction across the entire image, and also masked for the background.

Photo 2 - Topaz DeNoise AI


0P9A0410-DeNoiseAI-low-light.dng.xmp (8.7 KB)

This image was processed through Topaz DeNoise AI, using the low-light setting and then exported as a DNG file and processed through Darktable.

Photo 3 - ON1 NoNoise


0P9A0410_ON1_DeNoise AI only.dng.xmp (9.6 KB)

This last image was processed through ON1 Photo Raw. It has no edits other than NoNoise AI. I set the profile to Linear Raw, made no tone or exposure adjustments and turned off lens correction.

Of the three, I was least impressed by Topaz. I found noise artifacts in the background after uploading the DNG into Darktable and the duck’s head has a rough “nervous” appearance.

The Darktable version was VERY good. The Profiled Denoise did an excellent job removing chroma noise and brought the luminescence noise under control, but there is some minor residual noise on the duck’s wing. I had to apply a separate mask to remove the salt-and-pepper noise from the background, which resulted in some posterization of the ducks in the background. I’m sure you all can do better… :wink:

I think the ON1 version was the best of the group, but the difference isn’t very significant. The image is cleaner, there’s little noise on the wing but there are some blotches in the water that should be cleaned up. Here’s a screenshot of the ON1 photo with the DT version on top. You can better see the residual noise on the wing and the posterization effects on the ducks in the background

I just want to say that I’m in no way critical of Darktable’s noise reduction, in fact I think it’s excellent. But if you need additional help in removing noise, then hopefully this can help give you some idea of what the dedicated noise reduction programs can do for you.

Looking forward to seeing how others will approach this!

Note: the DNG files are too large to upload, but I can make them available by Dropbox for anyone who is interested.

12 Likes

Interesting, I’ve been very impressed and completely satisfied with darktable’s profiled denoise module in my own work, but in this example it’s doing far too much for my liking - the ducks in the background are looking very waxy indeed.

Perhaps this is in part why I’m very partial to leaning on the contrast equaliser pretty hard and adding grain with G’MIC as a final finishing step.

EDIT: Here’s my quick result:


0P9A0410.CR2.xmp (7.8 KB)

EDIT2: You might ask what’s the point of adding grain to an image you just removed the noise from, but I think the texture is very important for resolving detail and adding sharpness without screaming hot edges, and also for avoiding that waxy, painted look I mentioned. Plus the denoising is mostly targeted at reducing colour noise, the grain is monochrome.

EDIT3: Having said that though, I must admit I’ve overcooked the sharpening I typically do in G’MIC after down-scaling. It’s quite noticeably poor on the sharp duck’s bill… Try again:

3 Likes

With high-iso noise I’d like to use a “diffuse or sharpen”/denoise combo for denoise without cancelling all the noise

1:1

0P9A0410.CR2.xmp (11.1 KB)

3 Likes

First off, nice that you are providing a picture and its a beautiful shot too!

Here is my edit…


0P9A0410.CR2.xmp (36.6 KB)

Some thoughts of mine:

  • with that export resolution, noise hardly matters
  • I did choose a warmer white balance (used the white on the feathers)
  • there where some nasty black pixels in the noise, which the hotpixels module didn’t fix for me.

    I reduced them quite a bit by choosing another demosaicing algo: vng4. I Suspect you could tweak it a bit more with the parameters of the denoise (profiled), no local means
  • otherwise I did mask the duck of course and applied selective editing to pop the duck and smooth out the background.
  • for denoising i like to you serveral modules: denoise (profiled) kills chroma noise efficiently and with a second instance and non local means you can reduce the luma noise. Also astrophoto denoise is worth a try, I use it often in wildlife photos. Lastly I use the contrast equalizer, if I need to completly smooth out the background
  • sharpening of course only the duck, how much is very subjective, with diffuse and sharpen (several of the presets work good) and maybe a bit of local contrast.

I realize, this is pretty generic stuff - just typing out some thoughts, anyhow hope it helps someone out there.

Here is additionally a 1:1 crop…

6 Likes

By the way, we did have quite a similar thread some time ago, here, for your interest…

1 Like

Your result is astonishing noise free and still looks really natural. Great work.

Anyway I love crisp pictures and have the feeling, that often too noiseless pictures have a unnatural look. Therefore I tend to leave some noise in:

100% crop:


0P9A0410.CR2.xmp (21.6 KB)

1 Like

There are about 3 videos on a YT channel by the module author… rawfiner is the screen name. The first is for version 2.6 of DT but is still relevant as he walks through noise and all the ways you can remove it in dt. It’s a great video and then the following two are updates. I think they are a must watch if you want to get the most out of the tools in DT. In the first video the modules were called bilateral = surface blur now… this is a great module. Astrodenoise was non local means back then … he covers raw denoise and the contrast eq…He is also the author or the chromatic abberation module… again really worth watch how to manipulate that module

EDIT:

https://www.youtube.com/@rawfiner/videos

5 Likes

I’ve uploaded dngs here before without issue? (The big linear kind). But there was a request somewhere to take it easy on storage i believe:).

Anyway , want dxo in the mix?

I think the occasional raw/DNG is not the issue. If 50 people post 5-10 MB processed JPGs (full-res, exported at 95%+) for a single 20 MB RAW on a PlayRaw thread, then they consume lots of storage – with the sidecars available, anyone can reproduce their results for pixel-peeping.

4 Likes

I tried to upload one of the DNGs that I created and the site responded that one of the files was too large. I’ll post a Dropbox link for anyone who wants to look at them

There is a 100mb cap on uploads I believe.

This is correct. HD resolution jpeg at 85 quality + sidecar should be mighty fine for playraws.

1 Like

This is from Lightrooms denoise if anyone’s interested. That creates a DNG like the others but in true Adobe style if you open it in any other program you just get the normal raw.

1 Like

And DT edit.

1 Like

Relative and Perceptual renders… I see I did a crappy job on the wing highlights

2 Likes

Pray do tell more, and share a sample if possible.

Not much more to tell, it’s only in LR that you see the changes. The DNG from DXO, Topaz etc… you can edit with other raw editors.

Here’s the file. Noise Reduction Testing – Google Drive

Also in this folder I’ve included the results from DXO PureRaw with one of my photos if anyone’s interested. I had the trial a while back. There’s the DNG, the original raw and a DT edit of the DNG which is probably a bit too sharp but it shows what it can do.

Thanks for the sample, this is indeed getting interesting! This is now a brand new Adobe DNG 1.7 spec file that has an additional subimage embedded inside (rather than saving it as the primary image after enhancement like the other tools seem to do):

[SubIFD1]       SubfileType                     : Enhanced image data
[SubIFD1]       ImageWidth                      : 5496
[SubIFD1]       ImageHeight                     : 3670
[SubIFD1]       BitsPerSample                   : 16 16 16
[SubIFD1]       Compression                     : JPEG XL
[SubIFD1]       PhotometricInterpretation       : Linear Raw

Note also the very new JPEG XL compression used, which is not supported widely either, so I guess it’ll be some time until this gets implemented by 3rd parties…

Can you please also upload a sample to https://raw.pixls.us/ directly (incl. a note it is the DNG 1.7 w/ JPEG XL compression)?

2 Likes

Interesting. I just cancelled my Adobe free trial - and glad for it - so I can’t test that myself. I know that LR/ACR will create a new DNG upon activating their Enhance NR, but can you then export that file to another DNG version that could be read by other applications?

Any rate, I wasn’t particularly impressed with Adobe Enhance. Its nice to have the NR inside the program, but the results are very aggressive with no other controls than strength and the results seemed very waxy to me.

1 Like

Thanks to everyone for chiming in. I’m picking up some great tips from everyone.

Thanks, I think that comes pretty close to my DT attempt without completely distorting the ducks in the background.

That’s pretty clever how you combined the drawn and gradient mask on the duck. I think you have the BG noise controlled pretty well, personally I like to use the D&S surface blur to take care of those black pixels - which I think are more distracting than unrefined luma noise - but my attempt rendered the ducks in the background very poorly.

WRT noise and the resolution - yes, I suppose you’re right about that. However, I reduced the size to comply with the general request to not post large, full scale JPEGs.

I tend to agree, but it seems that with the advent of AI denoise there seems to be an expectation that photos are supposed to be totally noise free. One of the reasons why I started looking more carefully at NR was because of feedback I received from some judged shows.

But I think I mentioned before that I can sometimes tell when someone has taken through a photo through an AI NR program. The images begin to look oversmoothed and plastic. Back in the '90s we called images “Photoshoped”… I wonder if a new term “Topazed” would apply today. :wink:

2 Likes

I can if that’s okay with Dave as it’s his photo?

2 Likes