I recently used the black slider to ‘crush’ some blacks in black and white images where I was going for a harder tone. Although in this case I happened to starting from jpegs and not raws. Here is the series (sorry I can’t remember which ones required use of the black slider).
https://www.dpreview.com/forums/thread/4398963
'ere y’go:

Of note is that this setting of the blackpoint is different from black subtraction, which is a simple subtraction of a certain number from all pixel values. This is done early in raw processing, depending on the metadata for the particular camera. For instance, I have a Nikon D7000 which doesn’t have a black subtraction, and a Z6, which does, 1008, from the metadata.
Hello Glenn Butcher,
thank you for your mathematical formula, but unfortunately it overwhelms my understanding.
May I ask again, what exactly does the slider “Black” do? I have seen that it is excellent for making a photo that is too dark lighter and friendlier if you move “Black” to minus. All tonal values remain (for a long time), very similar to the “Brightness” slider. Only if you move “Black” to the positive range, the dark grey areas will quickly turn black, which sometimes looks good.
So my question: Is the function of the “Black” slider in the minus range about the same as the “Lightness”? Or is “Black” just meant to make darker areas even darker, to summarize them as black?
kind regards
micha
No worries, I probably jumped to the math for expediency, I’ve been posting “on-the-run” lately.
The curve screenshot I posted is probably the best place to get an intuitive feel for what setting a blackpoint does. To keep from re-inventing the wheel, I’m going to refer you to a really good curve tutorial @patdavid has on his website:
https://patdavid.net/2012/06/getting-around-in-gimp-color-curves.html
About a fifth of the way down, you’ll find the essential words describing how a curve works:
" The best way to visualize it is to remember that the bottom range from black to white represents the current value of the pixels, and the left range is the value to be mapped to."
Now, depending on the particular software, there may be other niceties going on in a blackpoint set with a slider or somesuch. But the essential behavior of the curve in the screenshot is this:
- For all pixel RGB values below 34: set them to zero
- For all pixel RGB values above 34: look them up on the X (bottom) axis, look up to the curve line, then look across to the Y (left) axis for that number, and replace the pixel value with that Y number.
So two “math” things are going on in the setting of a black point: 1) crushing all the shadows below 34, and 2) scaling the rest of the values to sit between a black of 34 (now 0) and the upper point, per the X → Y lookup defined by the “curve” (yes, it’s a straight line, but we’re kinda weird about tha in imaging…  )
)
Visually, the two things these two operations do is to 1) turn deep shadows to black, and 2) increase the contrast of the rest of the image (that’s what a steep slope in a curve does, shallow slopes decrease contrast).
A lot of image operations you do with sliders can be considered in terms of a particular curve. It’s really worth understanding the essential X → Y transform behavior of a curve to understand just about any image operation on tone. Study @patdavid’s article closely; it’s what I did to understand this…
Hope this helps…
Hallo Glenn Butcher,
thank you very much,
yes @patdavid’s article I have already studied quite well. And I don’t have much trouble with the curves. But the control: “Black” is such a thing that I would like to understand. Yes, I did my own tests and saw what he did. Here unfortunately only in German:
https://discuss.pixls.us/t/rt-dokumentieren/12983/3
Do you still need “Black” or “Lightness” at all if you work with curves? Are curves always better? Better for me because I see what I’m doing and even think I understand it. With the controllers I only see the result, but I don’t know what they do.
micha
Let me put it another way. If you want to use the Highlight compression slider, you need to do Exposure compensation. If you want to use the Shadow compression slider, you need to adjust Black. Curves don’t have builtin compression in the way that the Exposure module does.
I don’t. In the upcoming next version of my software, I’ve deleted all the slider-based controls for highlight, shadow, contrast, and brightness because I rather do them with curves.
Well, I think so because I’ve come to relish that shallow slope from 0,0 to, say, 12,1 rather than just trouncing all those values to 0. Note that each step in a 0-255 curve relates to 256 steps in a 16-bit integer image array, so the change from 0 to 1 on the curve is working 256 tone values in the image (your curve needs to do the appropriate scaling, I know mine does because I wrote the code). One of the essential parts of the filmic curve discussed elsewhere is such a “toe” at the lower left; ostensibly, that toe provides a “crispness” to the black values, which to me is the retention of some tonality in the shadows, not just a draconian crush to black.
Me too.
Hello afre,
I can really imagine something under these thoughts now. I can understand your answer well now: The exposure modules have something special that the curves don’t have. When does it make sense for you to use them?
It is also interesting that Glenn prefers to do without the Exposure modules and the builtin compression completely and prefers to work only with the curves.
Is it just a question of personal taste and working style whether you prefer to work with the modules or with the curves? I find it exciting how different the ways can be to get to one’s own picture.
Thank you very much for your efforts for my understanding.
micha
Hello, have a look at this (aready old) page which describes why curves are your single point of success… 2. Tone curve: your single point of success | paulsphotopalace
Hello Glenn,
it is very interesting, how different the ways are and probably lead to an equal result.
I’m getting more and more happy with RT and I’m about to give my workflow a lien so I don’t always have to try and try like a blind chicken with trial and error.
My current curve is the Lab L f=(L) and Parametric.
Glenn, can you please send me some screenshots so I can see which curves you’re working with? That would be wonderful.
Many thanks in advance
micha
Hallo afre,
I really learned something from your contribution. For that I thank you very much. If Ingo also explains Black and Shadow compression to me, everything would be wonderful.
micha
But he obviously spends too much time for other stuff atm ![]()
Mmmm… I’ve posted a few as control point lists in recent PlayRaws, but that’s kinda hard to read and it doesn’t show the intervening curve, which for the same points can differ significantly in various softwares.
It may take up to a week, but I’ll round up a few examples. I have a new camera with great dynamic range AND a highlight-preservation matrix metering mode, both of which have significantly affected my use of curves. I’ll make sure I include the one from the image in post #18 above.
Hello Glenn,
I don’t mean the exact settings of your curves, but I ask myself:
Here is a sceenshot of mine:
- I leave it unchanged.

- to work with

Which of the many curves does RT offer do you use?
micha
None of them… I make mine from scratch. ![]()
Okay, so you’re aware, I use my own software. It has a curve tool, starts like your #2 above, but no settings other than RGB|R|G|B, to either apply the curve to a single channel or the whole RGB. My software lets me start with the raw data directly from the file, then add tools in a chain, in any order I desire. So, after I add all the tools to make the image presentable (black subtract, camera colorspace, whitebalance, demosaic), I can add as many curve tools as I desire (or realistically, memory will accomodate). I usually just do one, if for nothing else than to increase contrast.
When I add a curve tool, I look at the image in terms of tonality, dark-to-bright, and decide what needs lifting or depressing. Sometimes, I also have to add points to control the curve, as my spline algorithm is quite “smoothy” compared to others. This used to be trial-and-error, but now I am better about assessing the image from the start and picking the points to make it go in the directions I want. It’s a bit like dodging and burning, from the olden days of film, darkrooms, and projection enlargers; I use curve control points like cards-with-holes and paddles between the enlarger head and the paper…
Hallo Glenn,
uff, that sounds very interesting, but this way cannot and does not really want to go, that would overtax me very much. With all your help I will find my way into and with RT.
Many thanks for the info, now I know how little I know.
But RT still allows me to develop much better images than the camera can do internally. And I found pleasure in it.
Thanks to all
micha
Hallo Karlheinz,
yes, I knew this arrticle, and yet I studied it again today. Thank you very much for the hint.
I think the curves are very vivid and obey a very logical system - I even think I understand them quite well. In Gimp I almost exclusively use curves for brightness, contrast and colours.
RT offers the exposure sliders in addition to the curves and some also have builtin compression. I would like to understand these sliders better, because I suspect that they can do a very good job.
Many thanks for the hint.
micha
PS.: Schöne Grüße in den Schwarzwald
Had a little time between after work and wife coming home, so I collected a few screenshots of my previous curve endeavors. I have three examples, two images each, one with the curve, the other with the curve disabled so you can see the starting point.
First, the image from earlier in the thread. In this one, I chose to crush the lower-toned background to accent the flower, a lazy-man’s “layers”:

Note how the second control point lays the first part of the curve almost flat. Compare that to this screenshot with the curve disabled (note the checkbox at the upper left of the curve pane; enable/disable):

Now, a bit less aggressive application of a similar curve. This scene had patchy sunlight, so I wanted to emphasize that:

Less of the leftmost part is flattened, which are the shadows in the trees. What I wanted darker was the foreground, which was shaded by the overhead clouds. Here’s the image without the curve:

The above images could also be affected with a blackpoint setting roughly corresponding to the second curve control point. The difference would be that all the points to the left would just be zero; with the curve, there is still some definition in those pixels.
Not exactly to your question, but a recent change in my curve use. My new camera has a “highlight-weighted matrix” metering mode, which biases the matrix-calculated exposure to put the highlights back in the image range. I have it programmed into one of the function buttons so I can toggle back and forth; sometimes, the exposure doesn’t change because the scene is already “flat”. This is not the case in the example below, where the post-twilight dawn sky is clearly much brighter than the foreground, which is still in the mountain’s shadow. With these images, it is necessary to pull the shadows up, and the curve illustrated does that:
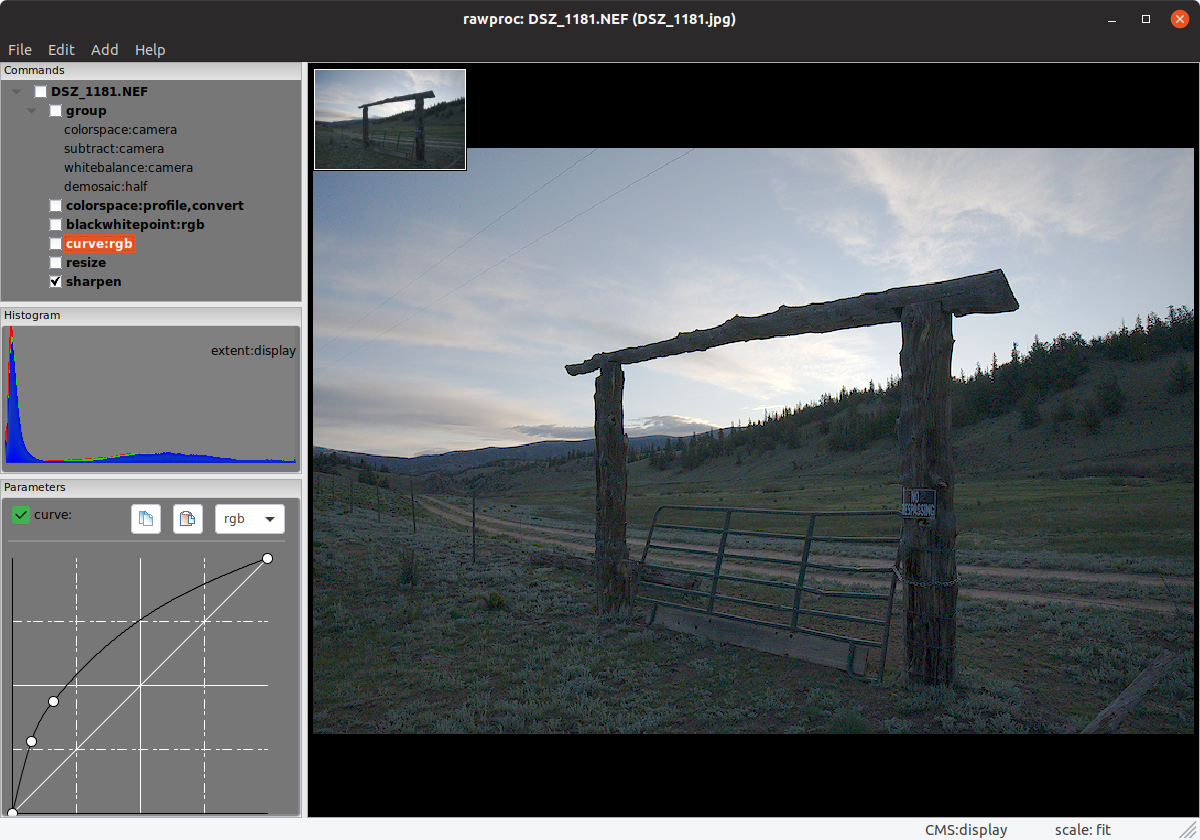
The second control point does the “lift”, the third one pulls the curve off the ceiling in the higher regions. In any such curve, you want the upper right part to gradually intercept the 255,255 point, in order to not blow the highlights Here’s the image without benefit of this curve:
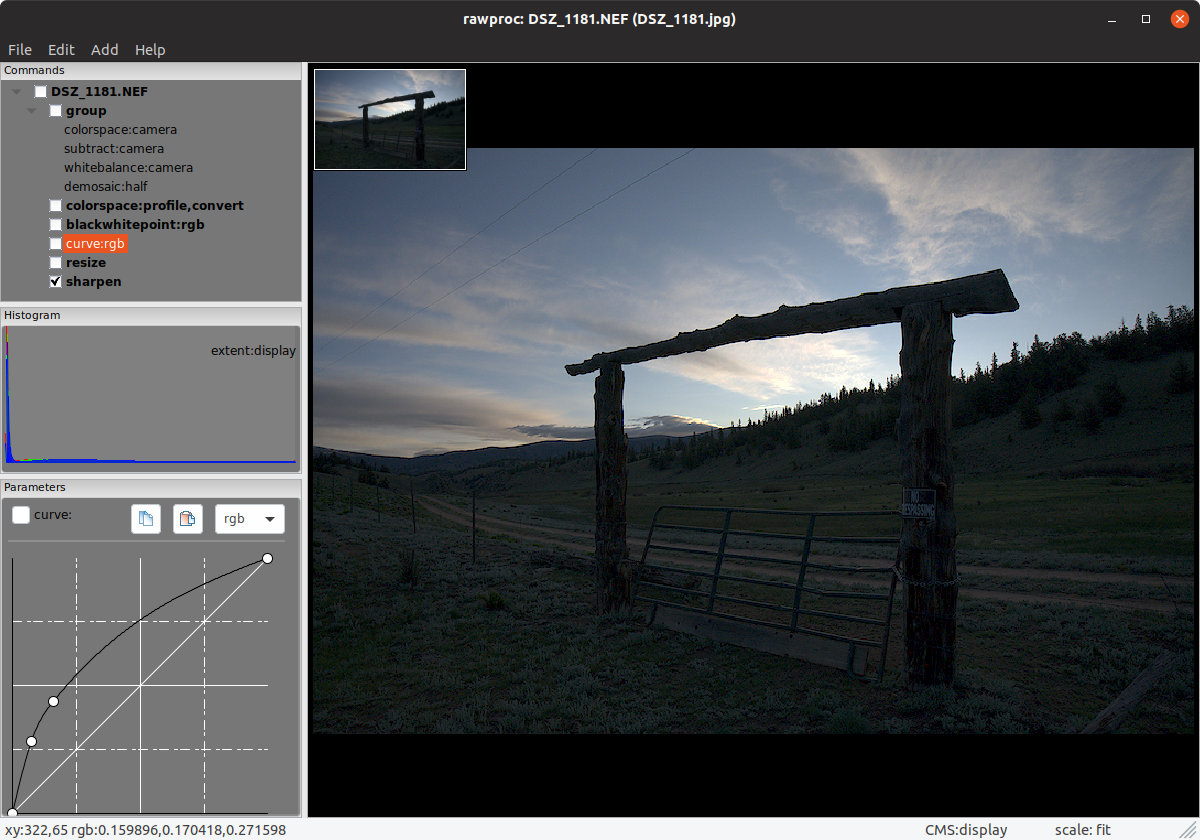
I’m still on the fence with this one (oh, a fence in the image, very punny!), and still trying to figure out how to best use this metering mode, but I’m pretty sure whatever I settle on will involve such a curve. For the readers familiar with ETTR, this metering mode uses the in-camera JPEG to determine clipping, so it doesn’t meet the ETTR sniff test. But the camera, Nikon Z6, has really good dynamic range so I’m just really counting on that “slop” to give me usable shadows, right now…
So @micha, I understand where you’re at with this, I was there just recently. But the ways of the curve are how all of these tonal manipulations are “laid flat”, so to speak; when I came to really understand the transfer function nature of the curve, I was able to “eyeball” so much more manipulation with it.
For what it’s worth… 
2 Likes