New user here. I found procedure suggested in May 7 post by @rom9 in ‘Any interest in a “film negative” feature in RT?’ (By the way, how do I correctly reference post in another thread?). I do not want to hijack the topic so I am starting a new one.
The procedure @rom9 suggested is simple and easy to automate (script), so it would suit my but prompts me to ask few questions:
Any suggestions on how to convert thus acquired raw data into some working color space (such as sRGB, or Pro Photo, or what not)? The existing camera profile is clearly useless…
I am not sure what is ImageMgic command -grayscale Rec709 used for here (un-interpolated raw tiffs are already grey scale).
The .dng file lacks tags for proper handling by main-stream raw processors. I can open it in RawTherapee but not in Adobe Camera Raw (my assumption here is that anything the Camera Raw can open is also compatible with majority of raw processors, and thus suitable as an archiving format). Which tags am I missing?
Would this procedure work for slides as well? My concern is that in highly saturated image areas, such as grass, the leakage from green LEDs into the red or blue sensor tiles may have higher numerical values then red or blue values from respective red and blue LEDs and the selection by lightness will fail (ditto for saturated red or blue areas). Actually, this problem may be present in negatives as well…
Click the “link” icon under the post, copy the url and simply paste it in the text you’re writing, the platform will handle it automagically (and you’ll see it in the preview).
I think you can do that with dcraw (see -i and -o options) if you want to use a command line tool. Keep in mind there’s also rawtherapee-cli
As for the input profile, in theory (but this is my guess) you should assign a profile whose primaries are close to the wavelengths to which the emulsion is sensitive to (approximately 650nm, 550nm and 460nm as can be found in some film datasheets).
You can try DCI-P3, AdobeRGB or Rec2020 which should be pretty close.
For the RT tool, i used this tutorial to create my own profile.
Nothing in particular, it was just a way to pass the Rec709Luminance parameter, to specify that the output should be linear gamma. I could have used the -colorspace option as well (see here)
Have no idea, unfortunately. To make that DNG work with RT i’ve spent a lot of time with exiftool adding tags by trial and error, diffing with a correct DNG
ACR being closed source also doesn’t help…
Haven’t tried. However, i wonder if this is really needed for slides, when using a DSLR (which has a bayer filter).
After all, the normal viewing condition for slides have always been: shine some (white) light through it and look at the image directly: with your eyes, with no other processing in between (like printing for negatives).
So, shouldn’t a good backlight and a well calibrated camera be sufficient to digitize it?
Of course taking separate R,G,B shots makes sense when using a monochrome sensor without a bayer filter (like high-end professional scanners do), which has its advantages.
Thank you for your reply. I am learning as I go, and this forum is a gold mine!
Just to mention, I am trying to digitize family images (before they fade) using Nikon D7200 and an enlarger lens on bellows. Nothing professional.
My workflow is shaping as follows:
Acquire R, G, and B (separation) images
Convert raw files to linear un-interpolated TIFFs using dcraw or Iris
Reassemble the raw tiff using Iris’s ‘split_cfa’ and ‘merge_cfa’ commands
Convert the resulting raw tiff into something recognizable by most raw processors
I am still searching for the simple method to process the last item. I am thinking about using the Adobe DNG Converter to convert one Nikon raw file into the linear, un-interpolated .dng file, cut off the header and paste it onto my ‘synthetic’ raw. I’ll use a HEX editor to see if this works, and if it does, I’ll look for some script-able method. I’ll share it if successful.
I think I should use the same method for slides. The dyes fade at unequal rates and it may be beneficial to have RGB data roughly proportional to transparency of respective CMY dyes.
Very interesting. My research has led me to agree that individual RGB captures are ideal, but I had no idea that it might be possible to recombine those into a raw file again. Out of curiosity, what do you think is the advantage of combining them to a raw file again? When you capture separate RGB images using narrow spectrum R/G/B light you’re basically using your camera as a densitometer rather than as a colorimetric device. As I understand it the next step is to convert the density values “seen” by your camera to the density values as they would have been “seen” by photographic paper + when illuminated by the light source+filtration the film was designed to be printed with. I wonder if it might not be easier to demosaic each R/G/B frame and just extract the single color channel from each. Then you could combine the three channels into a 16bit Tiff and use an icc profile based on the spectrum of your light sources and/or 1D/3DLuts to transform the data. Do you think that would be just as good as creating a dummy raw file?
Thanks for sharing your process. Where did you get the idea from to obtain illuminated shots with separate (nearly monochromatic?) light, and then recombine them? @NateWeatherly Also indicates this might be ideal. I’m curious as to what the added benefit is of simply using a good white light source and interpolating the raw files as usual.
Also, how good is your RGB led into producing monochromatic light? If you obtain an image under red light, do you throw away the ‘G’ and ‘B’ pixels of the raw?
Just to mention, I am trying to digitize family images (before they fade) using Nikon D7200 and an enlarger lens on bellows. Nothing professional.
Nothing professional? Well, your approach is certainly not the easiest route
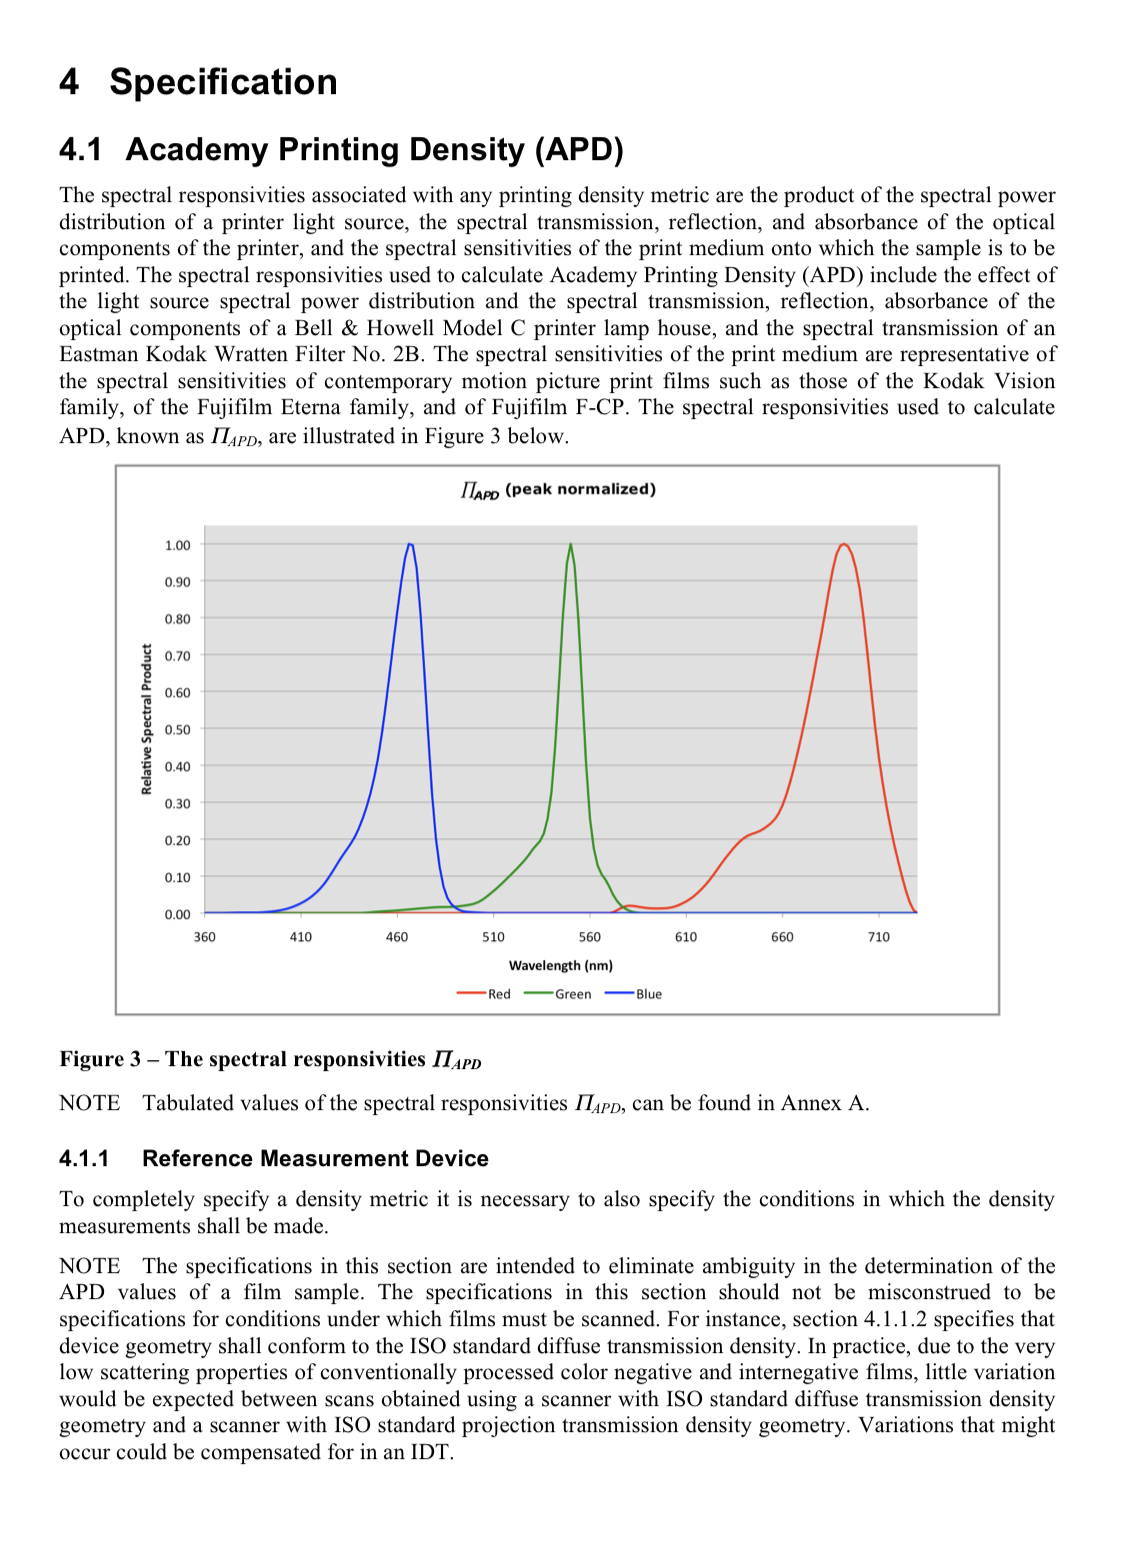
The basic problem is that film is designed to be “seen” by a combination of light source spectral emission, filter density, and paper spectral sensitivity. This specific spectral response looks something like this:
That’s based on Kodak motion picture print film, but print film has very similar responsivities to print paper. When a negative is seen by the system it was designed for and processed into the dye layers of the print medium it will automatically have technically correct color (which is often different from aesthetic intentions).
The goal in camera scanning is to conform our own light source + filtration + camera spectral response as closely as possible to the system that film is designed to be “seen” by. The Inherent problem with camera scanning though is that cameras are designed to “see” similarly to human eyes and their respond is markedly different than the film printing density response. Here you can see the spectral response of a Sony A7RII vs the approximate spectral sensitivities of a photographic print paper:
All three channels have a narrower response than the camera sensor, but the biggest difference is the spectral position of the red channel sensitivity. The peak sensitivity of the digital cameras red channel is centered in the area the paper’s lowest sensitivity, which is squarely in the middle of the wavelengths that comprise the infamous “orange mask”. To make matters worse, both the red AND green channels are highly sensitive to this range of yellow-oranges making it essentially impossible to use white balance to eliminate it. So what happens is that you end up building red channel density AND green channel density from wavelengths of light that are designed to be ignored, while very little valuable red channel density is measured due to the cameras decreasing sensitivity in the true red spectral region (650nm).
Because of this high level of red/green channel crossover in camera sensors the only way to get consistently high quality scans is to use using narrow band lighting (RGB LED and/or sharp cut filtration) to capture only the dye layer densities at the wavelengths where the sensor and film dyes each have maximum channel separation (i.e. Minimum crossover). This can be done with narrow band RGB light, or with specialized filtration over a high quality white light. It can sometimes be accomplished digitally, but not with any level of consistency. Every image would require a different level of correction. After all, how could you possibly distinguish between blues formed by the orange mask and those that were formed by a combination of the magenta and yellow dye layers? All you can do after capture is attenuate ALL blues. Some images will look ok, others won’t.
The best solution for total color separation is to take three narrow band exposures, extract the exposed color channel from each, and combine them into an RGB image. From there it’s a matter of digitally profiling to get an even closer match to the printing densities and emulating the color conversion from the paper’s spectral sensitivity to its developed dye densities. If we can do all of this the result will be consistent, nuanced, high quality scans that match the original color intent of the film. So far all the film scanning solutions I’ve seen have instead tried to use auto correction algorithms to normalize scans, with really inconsistent results.
Well, synthetic raw file assures that only the red tiles from red image, green tiles from green image, and blue tiles from blue image are used. Otherwise, you have to trust the interpolation software not to mess with those values.
Awesome
I see a few familiar nicknames here
I am happy @NateWeatherly brought some of the knowledge available in private FB groups discussing this on a daily basis.
While we are at it, elaborating on an ideal capture when it comes to colour “purity”, I have a question and it pertains to sensor design. Since most of them are Bayer arrays, RGGB, should we also not consider acquiring N times more shots on the spatially-deficient channels (red and blue), typically with sensor shifts? (N would be what… two or four?)
If you’re shooting tri-color RGB exposures for each image capturing pixel shifted images won’t really affect the overall color channel purity, but it would theoretically give better detail and color resolution at the pixel level scale. I.E., the overall image color would look the same but if you zoom in to 100% there might be more color variation and depth in the film grain.
That said, by the time you shoot R/G/B pixel-shifted exposures you’d probably be looking at 500MB+ per image haha, plus all the processing time. Also, depending on the resolution of your camera and what lens you’re using you’re going to hit the region of diminishing returns pretty quickly I’d think. With most lenses the best point of focus is going to vary between the extremely saturated LED colors, so to see the benefits of the extra color resolution you might even need to refocus between shots. But then you have to deal with alignment issues as the lens magnification changes slightly, etc. I could be wrong though and I’d love to see some comparisons. The full-color pixels of dedicated film scanners (or monochrome sensors) certainly have more micro detail and depth in small areas… maybe pixel shift would make a big difference?
There’s a DNG validation tool in the Adobe SDK you can use to check.
I wrote a small program (makeDNG) to rewrap my mosaiced TIFFs into (Cinema) DNG. You may be able to adapt it to your needs.
Separate captures to increase resolution (by skipping demosaicing) are problematic. Alignment has to be perfect, which it almost certainly won’t be if you change focus. I use a micrometer to set focus (DOF ~5 microns) on my film telecine and I can barely see focus move between dye layers. I have to stare hard at the per-channel histograms.
FWIW, for 1:1 slides and negatives, I don’t use pixel shift on my A7RIII.
White light is still the reference for the end result, but to maximize dynamic range and color accuracy you want to capture using something else so you can use UniWB and ETTR. Narrow band LED matched to the film stock is a good idea. I have independent LED control in my telecine and could do separate capture, but I’m not convinced it’s worth the complexity. At least that was my conclusion years ago, but for science and curiosity I may have to try again.
As for a good camera profile, I use a machine vision camera in my telecine, so I had to make a profile from scratch. I used dcamprof and the SSFs from the datasheet. I have big dreams to use the old monochromator I’ve had lying around for years to make something more accurate, but I’m already pretty happy with my results. There’s been some recent discussion on such things here.
My problem is that I’m mostly dealing with Super 8 Ektachrome 160G. The G is for garbage. It’s supposed to be both tungsten and daylight balanced…somehow. The blue channel is trash (huge grains) and the color temperature changes with exposure (typical of color reversal). The trouble is that the exposure (and therefore temperature) can change per frame. I don’t know whether to blame the lab or the in-camera metering more. The 8mm Kodachrome I have seems much more well-behaved. YMMV with slides or other film stock.
Pixel shift certainly helps, just not enough to want to use it regularly/by default. The file sizes are significantly larger and while compression would have helped, there were compatibility issues with RT and I don’t want to archive something only ACR could open. I’ll try to reproduce and make a proper bug report.
I have a 14-element Scanner Nikkor on rails with a PS-5. Similar to this. It’s rigid enough.
If you were to measure your A7RIII and share the SSF with me you would be my hero. And if that isn’t enough to convince you to do it, I’d pay you for the data . I’ve been searching for SSF data for my A7III forever and from everything I’ve seen the A7III and A7RIII have exactly the same CFA.
Also, great point about being able to use UniWB and ETTR with tunable RGB LEDs. It’s astounding how much better the image quality becomes when you do that.
Well, that’s the trick. It all depends how picky you want to be about matching up the ideal wavelengths. I haven’t found a ready made RGB LED panel/strip etc, with 460, 540, and 660nm LEDs (which are the optimal wavelengths for digitizing negative film. Most RGB LEDs on the market use 460, 540, and 625nm LEDS which can also give great results (and in fact, that’s what some scanners like the Fuji SP3000 use), but different film stocks might need a bit of digital profiling for optimal results. If you’re handy with electronics you can solder your own custom diodes and program a control board… I am not that handy and just bought an RGBAW video light called the Luxli Viola2 that has an iOS app that lets you program sequences of different colors, save color balance presets for different film stocks, etc. It may not be 100% ideal if you don’t plan to do separate RGB exposures because you can’t turn on all three R, G, and B channels without the “white” channel also coming on. This is great for photos and videos, but not great for single shot scanning. There are a lot of other RGB panels and strips that you could use to make your own setup, but I’m not familiar enough to recommend a specific brand or anything.
You guys made this into a science. I used a much simpler setup and processing - found an old soviet lens (Gelyios, aka Helios, 40a), adjustment ring and distancing rings, put the negatives into the frame of my old enlarger, backlit it with a simple ambiental LED (with a white grocery plastic bag as diffusor) and shot it from a tripod. Did that eight years ago, and the results are as good as I had the patience - the setup would move a bit, until I fastened the tripod with bungee cords to the table leg, and the cardboard box corner, which held the frame, with masking tape to the tabletop. And I had to shoot (my old canon 40d then) on 2s delay, which is how long it would take to stop vibrating from the pressure of my finger.
I processed it then in LR (4? 3? don’t remember), and I’m satisfied with the results, because I wasn’t looking for professional quality. The originals weren’t that good, it’s mostly family history. No numbers were hurt in the process (gamma and the rest).
Having failed to find a software that will do what I needed, I decided to have a look at the makeDNG program @ifb wrote. Now, my only previous c-programming experience was a program for Arduino controlling my LEDs. To make things worse, I only recently installed Mint 19.3 (dual boot) and am just trying to familiarize with it.
The modifications to makeDNG were easy (I made the thumbnail size fixed and corrected small incompatibility with my version of libtiff) and it works very well.
Next, from snippets of code cut from examples found on the web and pasted together, I cobbled a small raw image extractor. That one I promptly enlarged to read three separation tiffs and merge them into one raw image by interleaving red pixels from red separation tiff, green pixels from green tiff and blue from blue as per CFA layout from one of the input separation files.
It seemed logical that there is very little point in writing the raw image into a file only to immediately read it back into makeDNG, so I merged those two programs into one. I tested it with output of dcraw (un-interpolated uncompressed tiff), as well as, of Adobe Dng Converter (un-interpolated uncompressed dng) and it seems to work well (the separations were correctly assembled into a synthetic raw dng).
What is left to do is adding more of camera specific tags to a resulting dng file that could be useful to a raw processor in the future. This is where I need some advice.
Looking at the tags in dng file Adobe Dng Converter created from Nikon’s nef:
Some tags are obvious, but there are six 3x3 matrices (ColorMatrix1 & 2, CameraCalibration1 & 2, and ForwardMatrix1 &2) which may or may not be needed and likely have wrong coefficients. Then there is ProfileHueSatMap with close to 7000 floats and ProfileLookTable with another 14000 floats I do not know what to do with. Reading tiff and dng specifications is of no help.
Words of wisdom from people developing raw developers would be greatly appreciated.