Hi, I am new to using Natron. I was wondering if anyone could explain to me how to get started rotoscoping? I want to do kind of a Forest Gump style scene, you know, where you take some old footage and put something new like a person into it?
https://m.youtube.com/watch?v=BM7eLY9x5PM
Lots of good stuff on YouTube!
3 Likes
Cool Breeze
HELP! For the past several weeks, I have spent sooo much time trying to do in Natron what I know how to do in After Effects. Today, I’m at the end of my rope and the only solution I’m seeing is to just return back to after effects. That means returning back to mac or windows. I’m using ubuntu and trying to stick with it.
My current project is of the kid’s halloween picture moment where someone is in my shot and I am trying to remove. I have studied for weeks the available tutorials to attempt this. When i thought I finally understood and tried to write it out today, it looked like a complete disaster and waste of valuable time. i’m so frustrated because I want to finish my home movies for someone who can’t be there to enjoy the moments and doesn’t have much more time to watch these videos. I took screen shots of what I have in the hopes that someone will reply sometime soon and its the only way I can show what I have done.
I just can’t understand why when it writes out, I have a white background instead of the blurred background I want and I can’t get rid of it even if I remove the constant node. Alltogether, the mask even though it seems to stay pretty well on the subjects looks like such shit when rendered!!
(upload://sUkNtbj5tOxl9QuiV2FbwOslNNR.png)
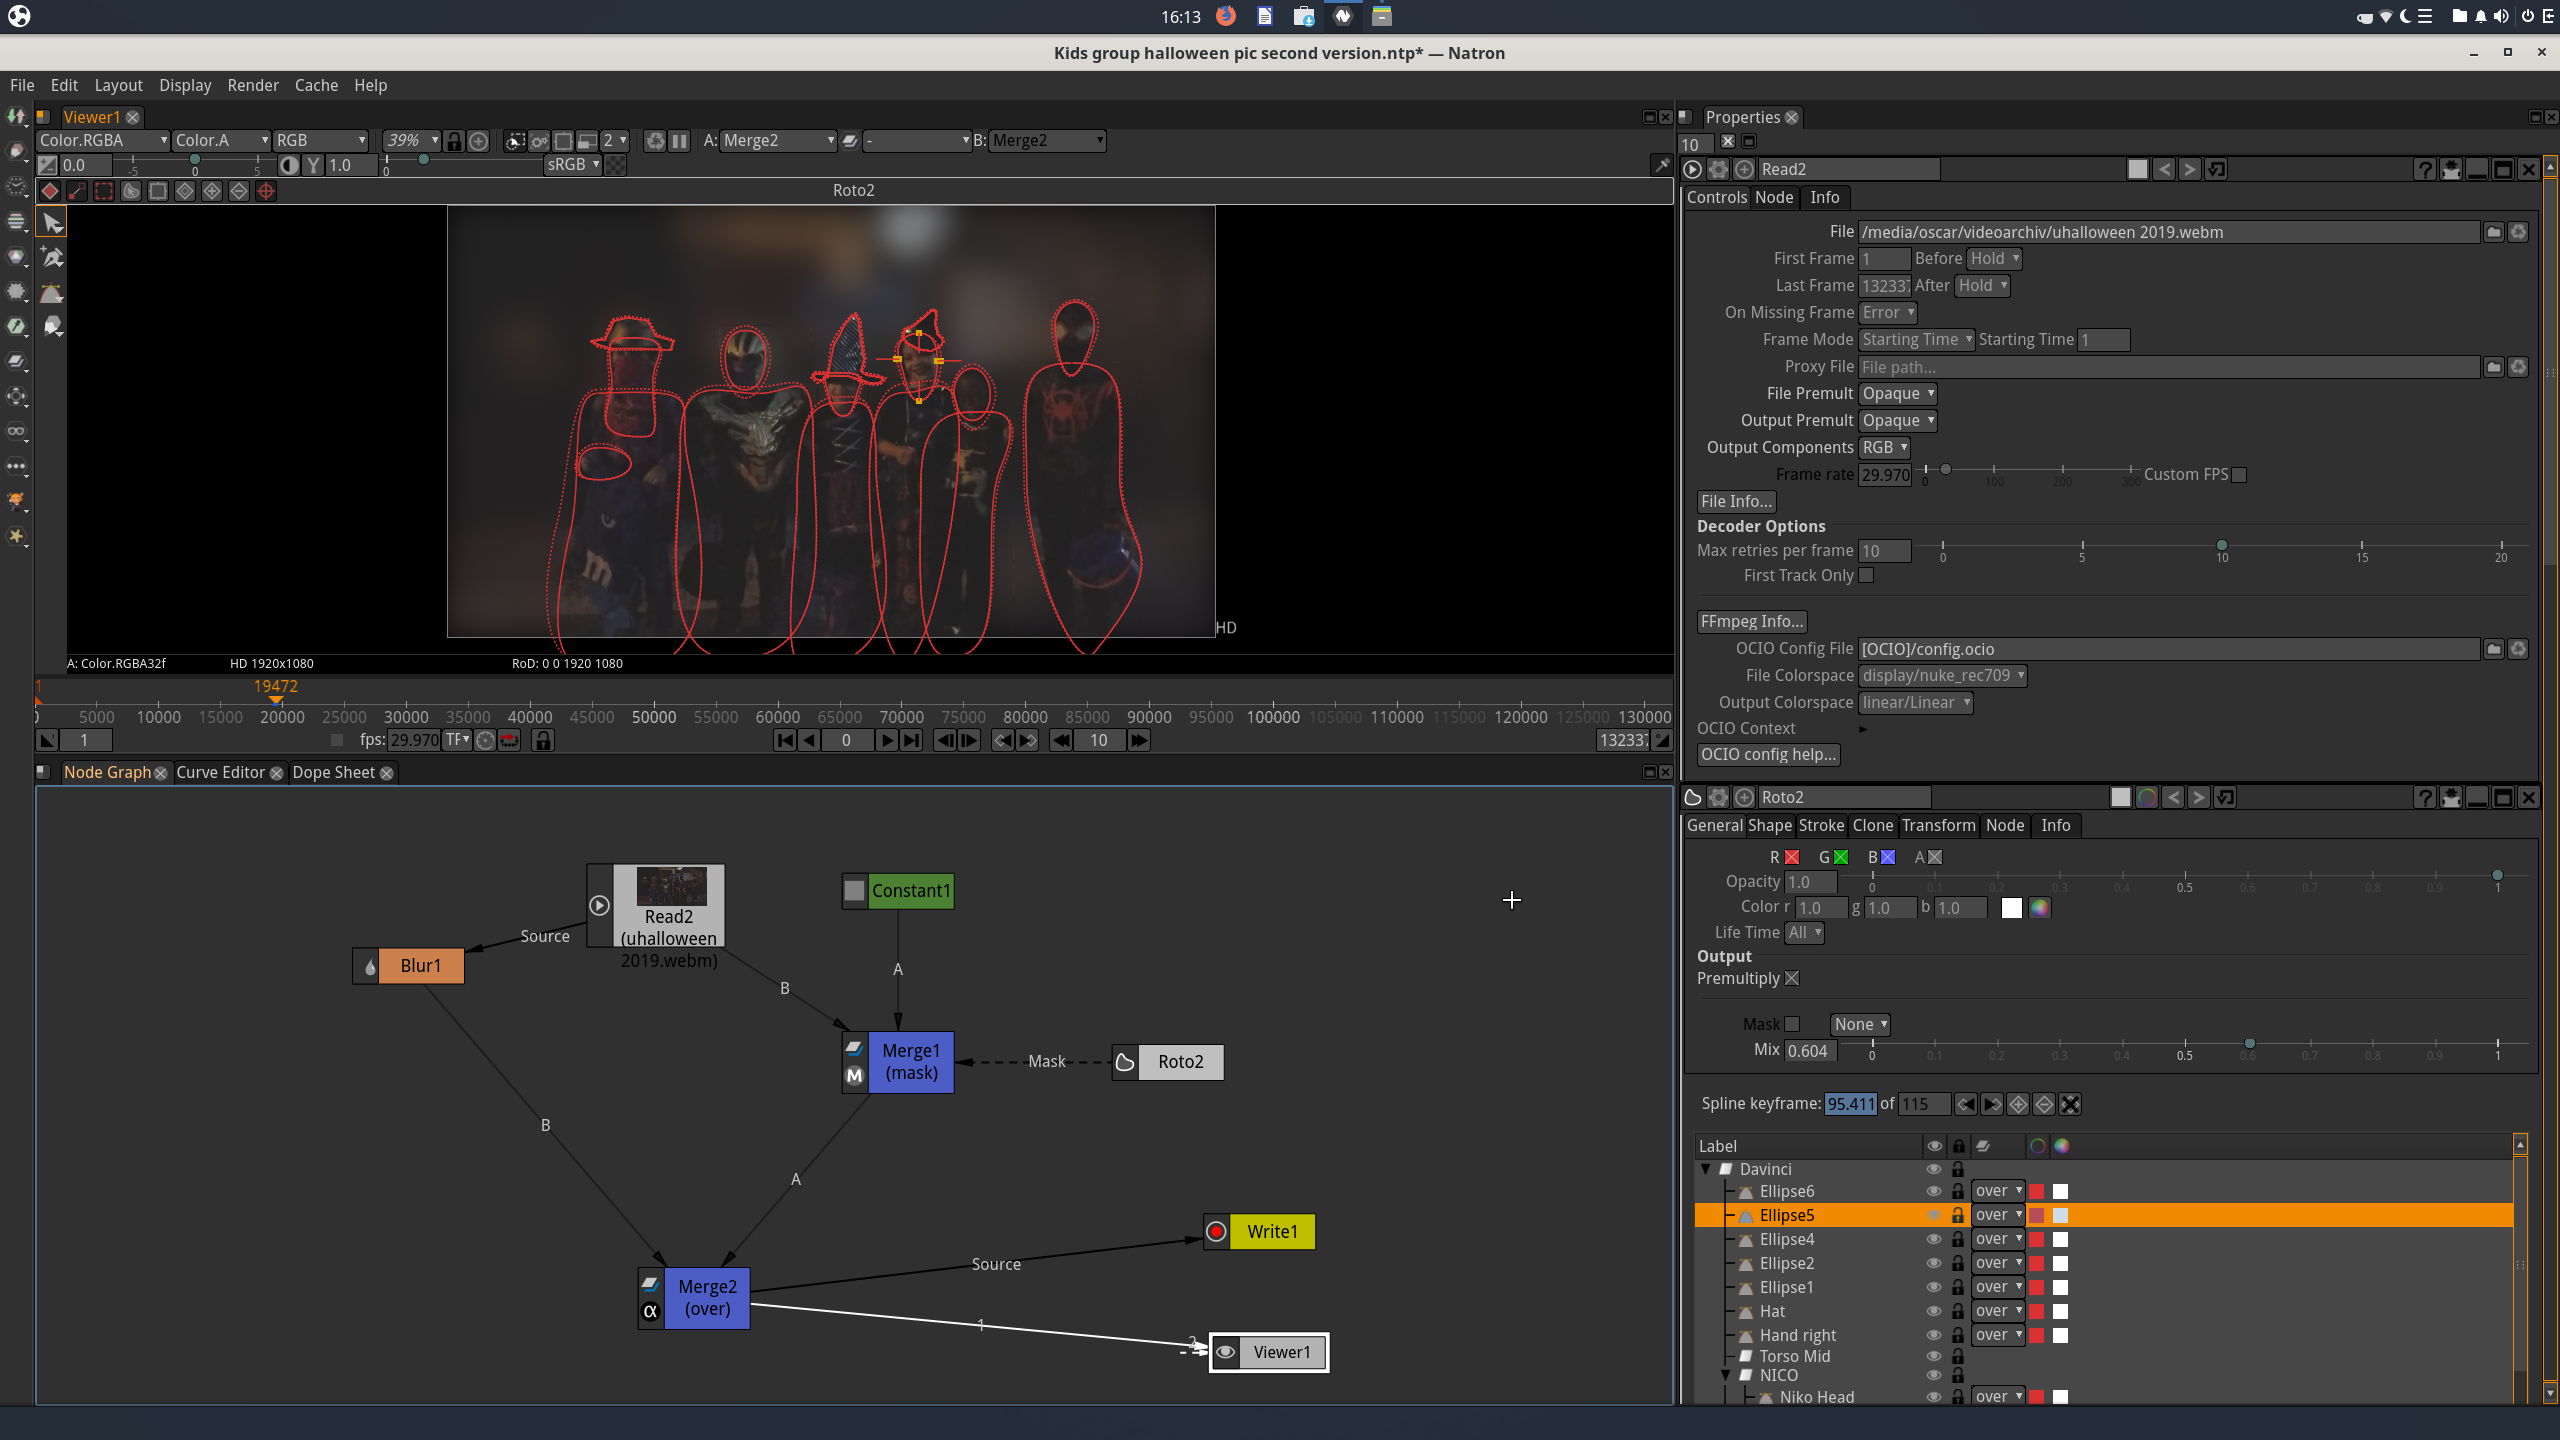

I am not too familiar with Natron (Fusion in DaVinci Resolve is great too, but alas not FOSS) but your output format seems to carry RGB and A which means the alpha channel is included in whatever you merge in the last merge. The Write node has alpha also checked. And *.png can carry an alpha channel if I remember correct…So could it be that your image viewer just shows white instead of transparency? In that case, just uncheck the Alpha channel in the write node.
Also that constant that you have connected…is that white by chance? What is the purpose of this anyway (honest question, in Fusion if you merge like this you can do an easy reformatting…idk if natron behaves like this too)?
The mask looks shit when rendered? From the screenshots it looks like you specified the masks (rotos) like this. which behaviour do you want?
I find node-based workflows infinitely easier to understand than Layer-based workflows, but I truly think that what works for you is the most important thing.
(Edit: It should also be possible to check within the viewer window the seperate channels. like this you can find and track down what the alpha looks like. After that last merge, you actually don’t need the alpha anymore, so there you could get rid of the alpha by unchecking that box in that last merge)
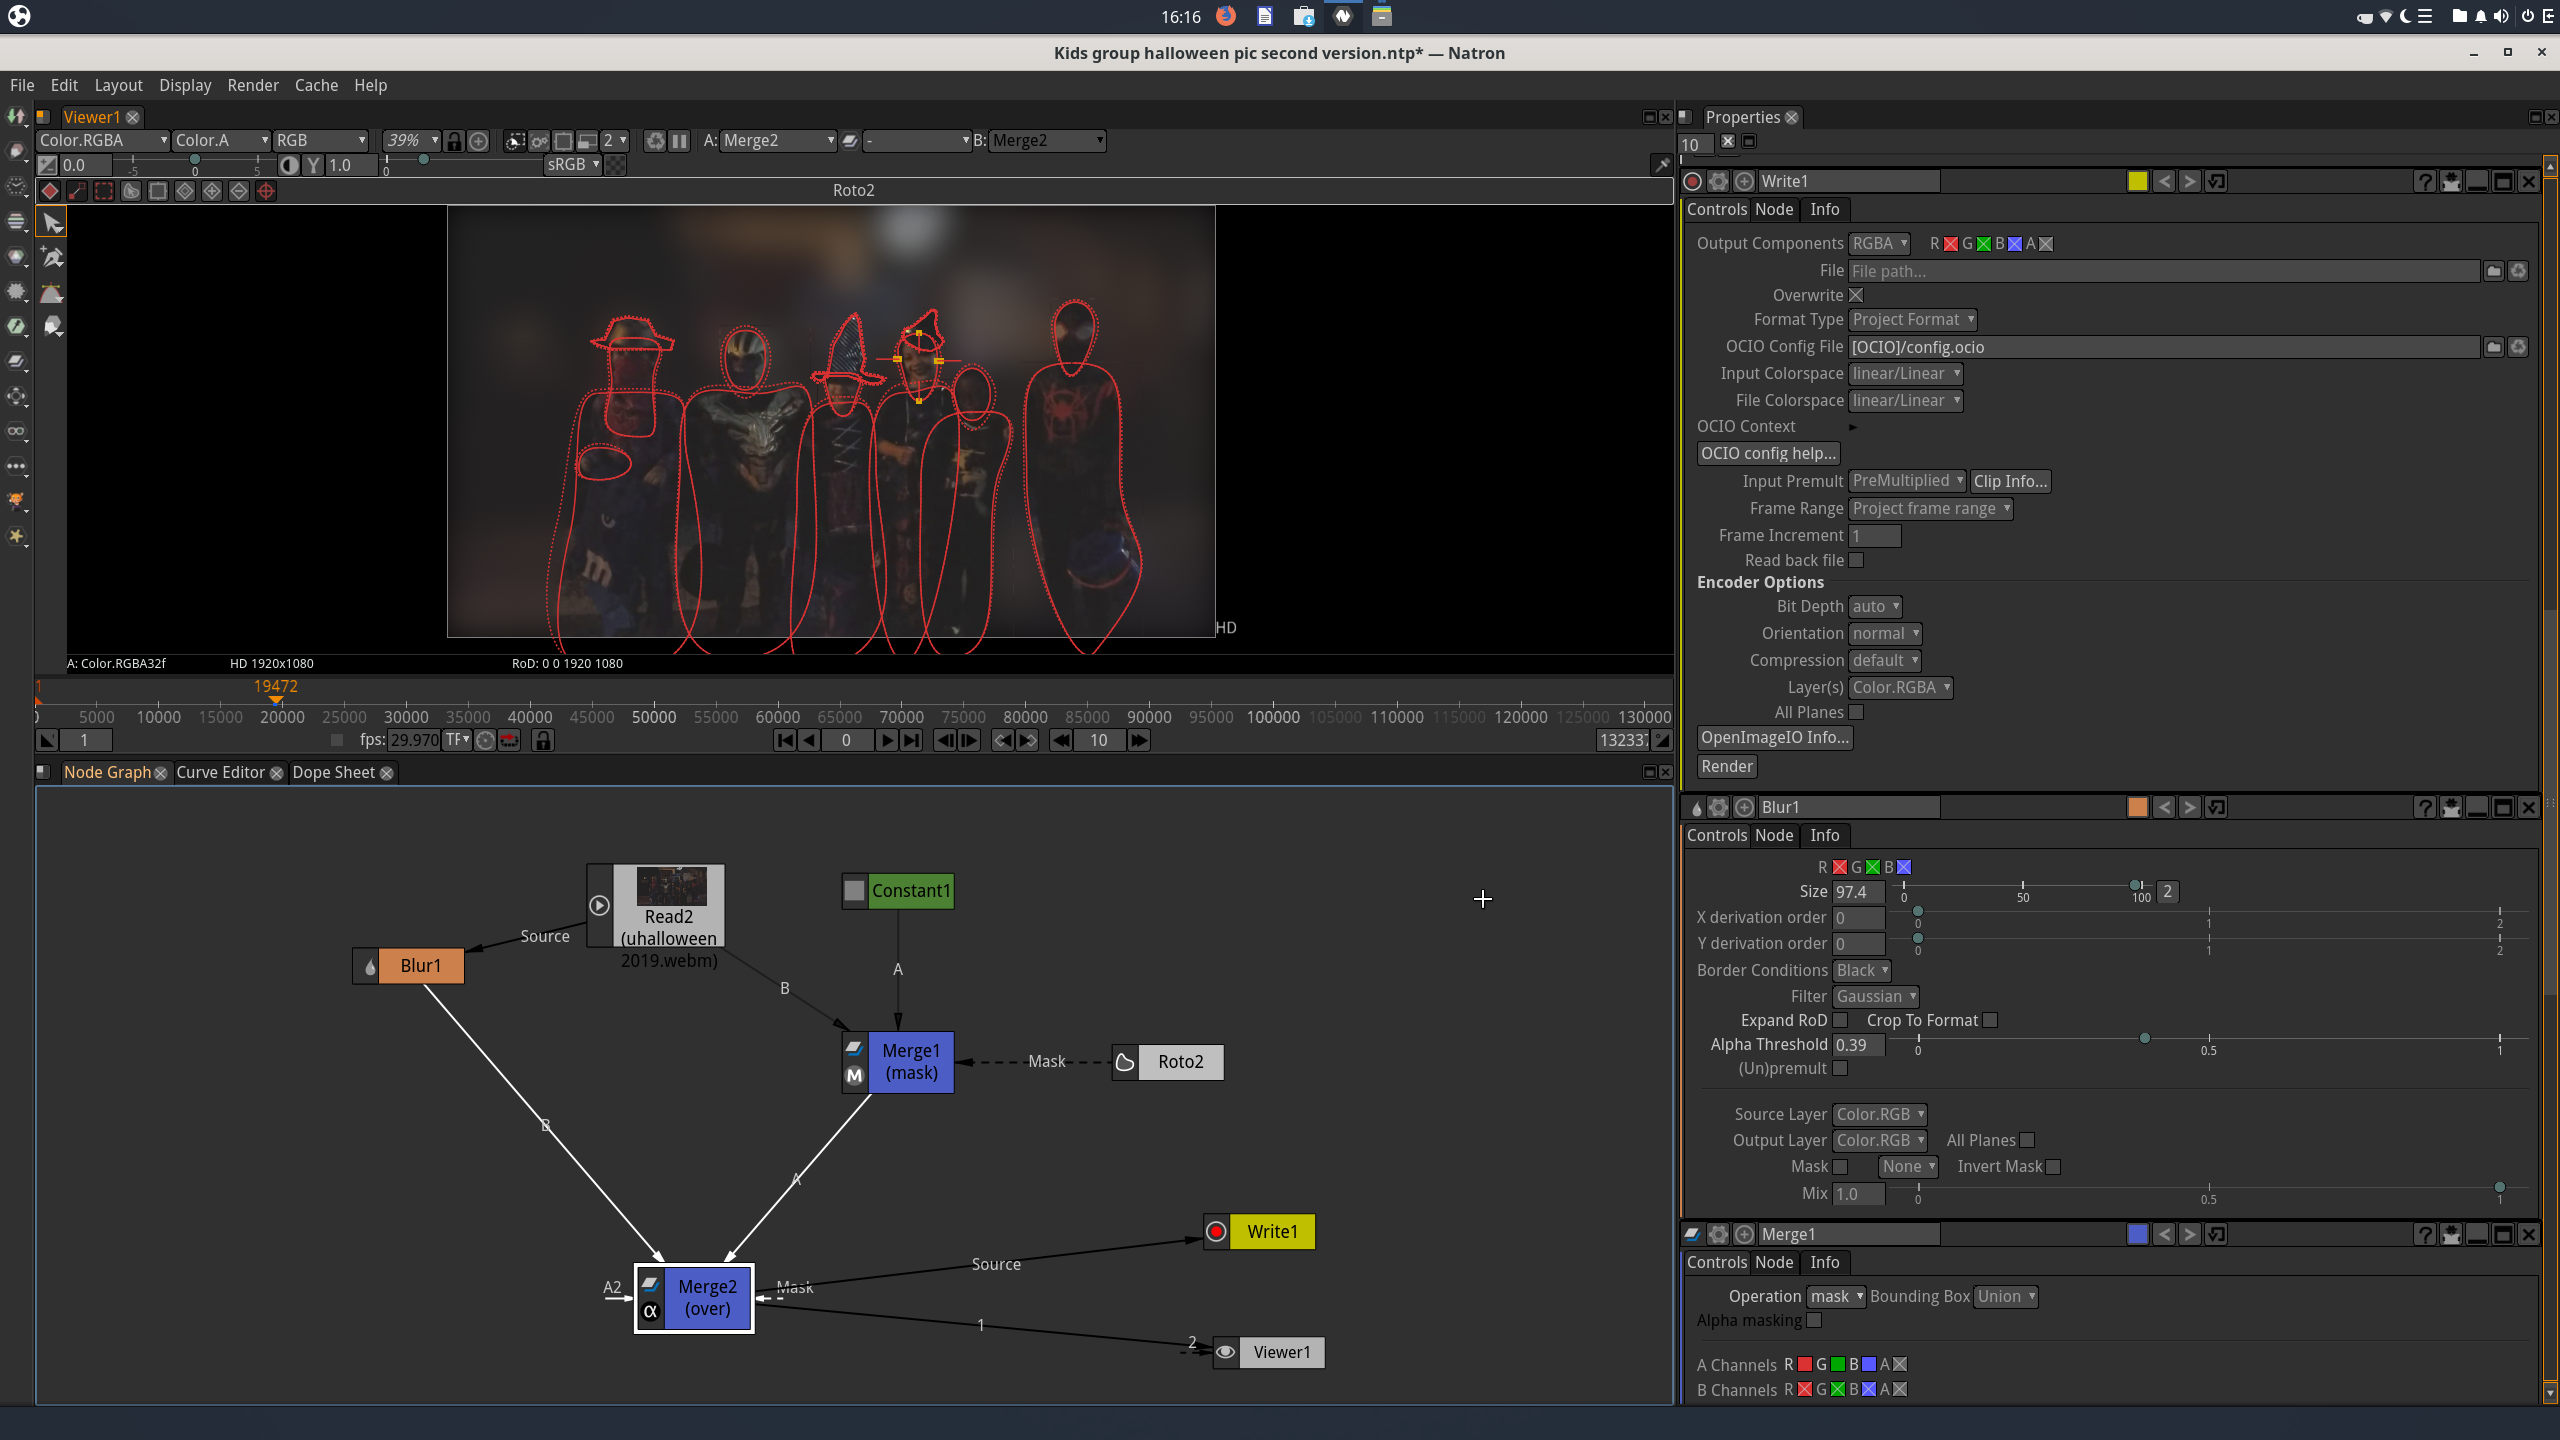
Thanks for the prompt reply… So I looked at the output as you mentioned and unchecked it. Then I rendered and the white background ( which is the screenshot I submitted upon playing the file after render) disappeared. But now I’m not sure exactly what I did, as I unchecked and rechecked other boxes. BUT when I rendered this time around the video file was very jerky and it rendered that way. Also, the mask job ultimately showed to be aweful. During the project it seemed to stick and track ok. But rendered is a different story. Then I wanted to stabilize the footage but I had no idea where to add the nodes and match move the mask to see if that was a better result…Still very stuck…But that bit of advice was helpful and I think there may be some hope here.
I would also suggest toggling the “checkerboard” button above the viewer. It helps seeing which areas are transparent.
The Merge node probably has the “A” channel unchecked for input B. This is because B is RGB, not RGBA, but you can force a solid alpha by checking this.
An good way to achieve your effect is:
- chain the Roto with the Read node (Bg input of Roto is the Read node), this will add an alpha channel
- in the Roto node, check “premultiply” so that all colors are multiplied by alpha (this is the standard in Natron and Nuke, but not in AE) - everything outside the roto shape should be black and transparent on output, check it with the viewer.
- your blur node is OK
- in the final merge node, make sure checkbox “A” is on for input B, so that you get a solid alpha=1 for the background.
- always check transparency with the checkerboard viewer tool
see also my reply above
Ok… Still struggling here and really hoping I get some useful replies… I fooled around alot today with this project and was able to render a better result…but not good enough…
So I decided to try tracking all the faces in the shot to see if I can track a roto mask to move smoothly and better more automated. I’m stuck and can’t seem to figure out how to attach a mask to move with the tracking data that took me a good 45 minutes atleast to produce. Can some please help???


Your Roto shape is not connected to an input, so basically it exists as a shape and is transformed (moved in this case) by the transform (good!) but it doesn’t know what to work on. Connect something (your video of interest in this case) to your Roto, or your Roto to some sequence. That green arrow between the tracker and the transform tries to say that only parameters for the transform are passed and not any image data. Green dots in the corner of those nodes means ‘keyframes exist’, if I remember correctly.
I personally would have started with tracking one feature and getting this working and would then have extended this to other features.
Are you aware that you can connect your viewer to any node at any time to see what a specific node is doing? This way you can look for what is not working and why or just view any intermediate stage of your composit.
I also suggest that you watch every tutorial that you can find on node-based compositing. Doesn’t matter if its for Natron, Nuke or Fusion. Introduction tutorials most probably. But sometimes watching advanced tutorials also helps to understand ‘the flow’ in node-based compositing.
To add to that check out this playlist of Natron tutorials by @Rita_Geraghty https://www.youtube.com/playlist?list=PLprXrT2oteICaZqvsrMQJHy4xIjkqqThH
Ok, thanks very humbly. Yeah, I’ve watched every tutorial out there on this…Coming here was my last resort. The best way to learn this is by making mistakes and having someone sort of supervise you. (Incidently, I didn’t answer one of your previous questions and couldn’t post anything until you wrote back…but as far as the constant node placed just ontop of my roto- Yeah I don’t know if that needs to be there. El Director did a tutorial for me on roto and paralx and I just copied what he did but I’m not sure if its really needed)
…As far as the above screenshot…If my roto node is already tied to the transform, doesn’t that mean that its already connected to the reader also? Or do I need to pipe it again into the reader thereby having two lines exiting the roto node? Still not clear…
…Also along the same lines, I wanted to remove someone out of my video shot and spent most of the day trying to achieve this effect and finally came up with something as close as possible. I would like to know if THIS set up is proper and any other bits of advice will be greatly appreciated as well …the project is my son on a horse being led by someone. I wanted that someone removed from the footage…Here it is- you can see the mask where the person was and I doubled the footage in order to move the background into the void but when I play it back, there are adjustments to be made as that the person appears in time…

As far as I remember, no. The transform-node carries just numbers (x,y,…) and it acts on something connected to it by using these numbers to ‘move’(well, transform) whatever is connected. The tracker node can generate these numbers. The green connection ‘just’ indicates where those numbers come from. The transform node in this case does not carry image data. You got to somehow connect ‘whatever’ to fill the roto shape that you have defined. Ask yourself what needs to go inside the roto shape. What do you want inside the roto shape?
well. to remove something perfectly without artefacts from a background, you can watch i.e. hollywood productions how they do it. If you want that quality…you have to put a lot of effort in, already during shooting, but not limited to this. Think greenscreen for example.
Why do I mention this? Because if you go for less-quality…whatever works for you is fine!!
Removing someone from a scene like you’ve shown (kid on the horse) is a VERY difficult task if you haven’t shot a ‘cleanplate’ (a scene without what needs to be removed). No matter if you use Aftereffects or Natron. It is SO MUCH WORK that I’d ask myself if it actually needs to be done at all.
Do you know that the roto shape is keyframeable? Every Frame where it doesn’t fit properly, you can adjust it to fit. It interpolates positions in between frames you haven’t touched. This is a very manual and work intensive technique, but you have full control over the shape.
EDIT: typos
Thank you for your reply. What you are seeing in that screenshot is the person already removed from the shot. If you look closely, there is a mask shape on the left of my son on the horse. This is where the unwanted person was. I filled in the void with the background of the same shot in the background keyframed to areas closer to the edge. At first I didn’t know how to keyframe the X position on the transform but I think I figured it out. (Please correct me if I’ wrong but on the transform Node I right clicked on the transform spaces and selected the first choice which is keyframe all) This roto I did manually without tracking …But I think I need to figure out to hold a cleanplate shot at some point to fill in areas where the subject of the shot is covered. In After Effects, one would export out a frame hold to use as a picture to then keyframe at a moment where that part of the video needs those missing areas. Thank you again I kept checking the post anxiously waiting for some input for the past few days!!
Yup I saw it.
Since I haven’t natron installed right now, I am not too sure, but Keyframed parameters in the right hand panel should have a blue underlay? someoneelse correct me if I am wrong!
I think in Natron you can do this with a read node that you set on the frame you want and then have it repeat on that frame…here as well: someoneelse please correct me if I am wrong.
cheers, and have lots of fun with node based compositing! sounds like you’re getting the gist of it now. ![]()
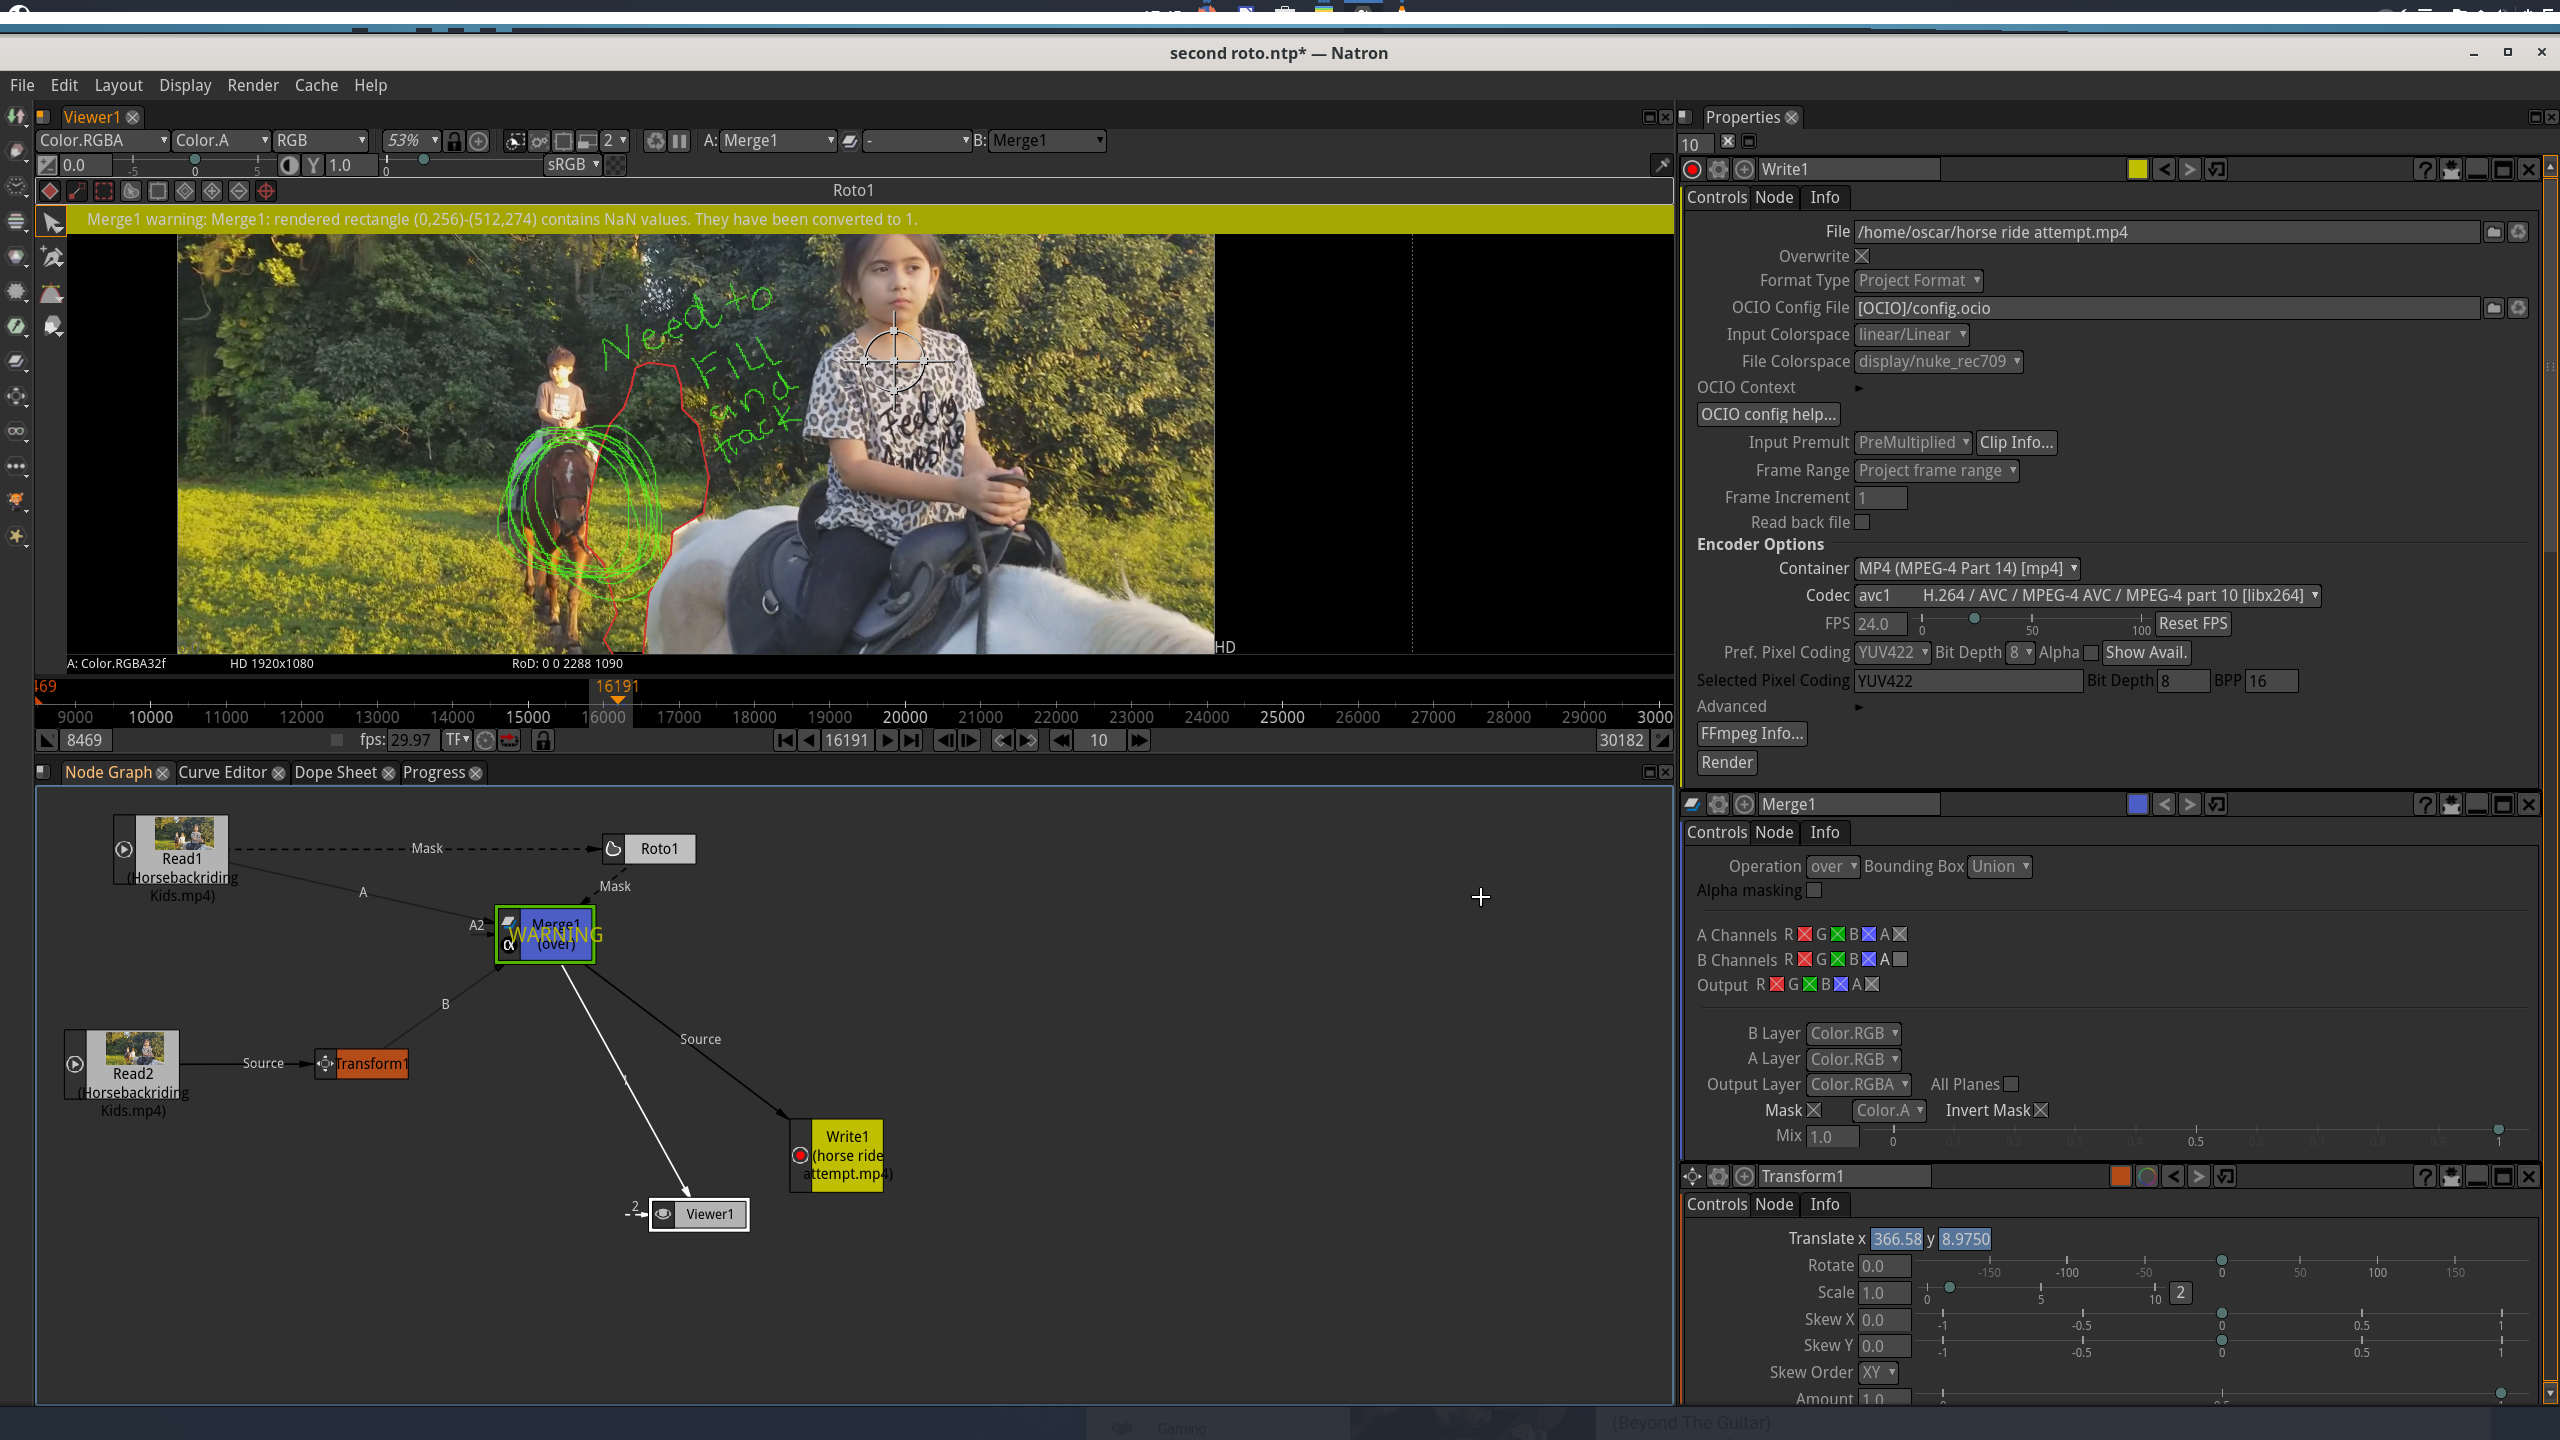
Ok having been encouraged a bit by your help in your replies…I’m still chipping away here. Here is my next attempt. I tried to remove that unwanted person one more time by masking him out and filling in the back by moving another duplicated read node (what is the hot button way to duplicate?) BUT despite watching a tutorial by the great El Director on freezing frames, I just couldn’t do it in order to copy over the missing parts of the desired subject that were cut out along with the unwanted person. Nuke’s tutorials are quite the same here in this respect and leaves me stuck. In after effects, one would just take a photo of another frame and keyframe it over the needed areas in time. How can I achieve this here?
ORIGINAL ;

As far as another read node and setting the frame time to repeat…I couldn’t seem to make it happen. When I played it to see if it would loop-it wanted to play the whole movie instead so I just deleted it and proceeded to post.
Unfortunately I can’t try it because I haven’t got it installed. My best guess is that in the read node you can specify the range to be played and what to do if the range is shorter than the composite…maybe there is a better way, idk. maybe a freezeframe node? check the natron manual.
You need a new background (which needs to be tracked), and a roto for the horse such that it sits in front of your replaced person. but the horse is covered sometimes by the person that needs to be replaced…so you would also have to invent some horse parts. And I suspect all of this is moving. You should make a tutorial out of this. A lot can be learned here when it comes to compositing. And more Natron tutorials are probably very welcome!
Yeah I agree Natron tutorials are needed. I think maybe you gave me an idea. Rotoscoping the horse again to be visible when part of it disappears. Sounds like a solution. But how do I roto it again in order to make it appear over the background. Where I get confused is how to order these nodes. In After Effects its easy to just stack which ever layer over the other. I wish they can just make one of these programs that way for those who are used to layers. Also, how do I address that warning error message? What is going on here?
LATER here is what I discovered…

Now I just need to figure out how to incorporate this in the rest of the arrangement above as shown. Do I need to duplicate these read nodes?
Do you know how to do this in Davinci? Can you point me over there if so?