dt 4.0 highlight reconstruction with guided laplacian

Guided laplacian is meant die very small areas , and you need (lots) of iterations for it to start working . It is NOT a simple ‘turn it on and done’ setting. For larger areas, you need to radius to be absurd high and iterations high , bringing even the fastest computers to their knees.

Use on of the other options , or wait for the new method in 4.2 (or get a test build with it compiled in ).

Filmic V5 desaturates highlights , causing there to be little to no color in very bright areas. So there hides the purple/pink look.

Filmic V6 with luminance Y chrominance-mode (or maybe ‘no’) has the same sort of effect (at least it often has for me ).

1 Like

Sharing the raw file would be great! From what i can see in the second image (that with the color cast) this will be some sort of challenge for any algorithm. You can only suppress the cast by current modules by some tricks but none of the modules is “really fit” to handle such cases really well.

This is not so much related to being in scene-refereed workflow or not, it’s just that supressing the cast must use different methods.

Would be nice to see how the new segmentation based hl recovery can handle this.

Exactly…I asked for the raw…hoping to see what it would do…

It looks like the OP did upload the raw or rather tried to - it’s stuck at ‘uploading’…

Sorry, I had thought the .CR3 had uploaded along with the two .jpg files. (It even says “Uploading: IMG_6799.CR3…” on a line between the two photos! Looks like it was rather slow uploading the file and I pressed GO before it had finished. It seems to have been successful here.
IMG_6799.CR3 (33.1 MB)

1 Like

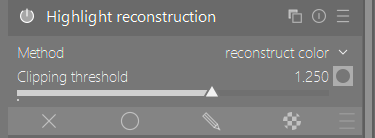
‘reconstruct color’ seems to work well enough. But it is just a large blown-out portion, so don’t know what to make more of it.


IMG_6799.CR3.xmp (25.4 KB)

The usual: Load file with filmic, color calibration, highlight reconstruction disabled. Use exiftool to check what it reports as white level, and make sure Darktable uses the same value (which it does for me).
Reset white-balance to ‘as shot’. I do this since ‘color calibration’ and the modern color-workflow often doesn’t work for my Sony.

Lower exposure, so low that you see ‘room’ in the histogram…
image

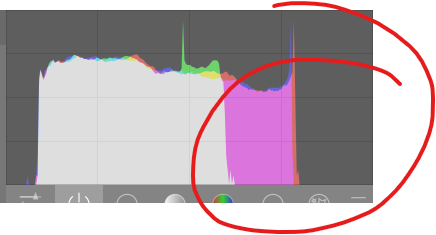
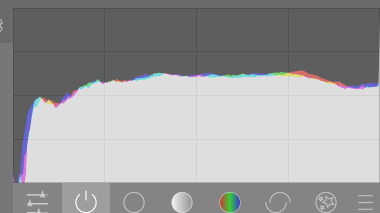
…so you know you’re looking at everything. Now go toy with ‘highlight reconstruction’ to see what you get. But as I said, ‘reconstruct color’ seems to work well for me. I even raised the clipped-threshold, to just below where the purple is gone.
image

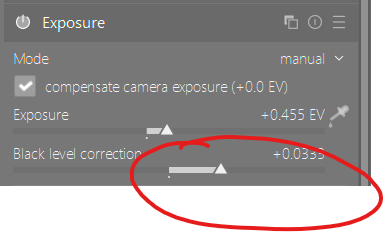
Then raise exposure to where it should be (ignoring any clipping! That’s for filmic to handle later).
Focus on shadows and mids.
What I see is a very weird black-level. I don’t see this often, but might be normal for your camera? Or just the scene…
image

So I adjust the black-level-correction till I think it’s where it should be.
image
image

Now enable filmic, and hit the ‘auto select white level’ thing to set it.
image

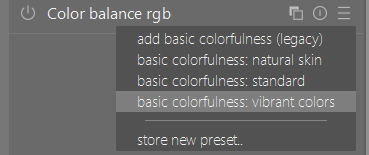
I enabled the vibrant-color preset in ‘color balance rgb’ to get some color going:
image

And enabled the ‘local contrast’ module at default settings.
In the xmp I posted I used the ‘tone equalizer’ to get the highlights a bit lower, but I don’t feel it did much.

I also used an earlier instance of local-contast in an extreme bilateral mode, masked for the highlights - to try to make some details more visible in the highlights.

Then enable lens correction /chromatics if you think it needs it, same for sharpening (I used some heavy diffuse).

4 Likes

IMG_6799.CR3.xmp (10.7 KB)

Could do with more work on the shadows perhaps and perhaps some masking…no masks used for this one…

I did use the new HLR mode (probably incorrectly :slight_smile: ) and changed the raw white point to a value I found in the metadata… Canon seems to have 2 values a specular one and something they call real white point??

I’ve notice with this image that my export and and lighttable previews seem to match. THe area alsong the left that was reconstructed is a bit of a smudge…but the preview in Darkroom view which I quite like had some definition and tone?? I am trying to reconcile this once again.

This is darkroom

image
and then Lighttable…similar to the export??


Obvioulsy I would like the export to match my display preview in darkroom view…

I will go over my settings again…

Edit2

@hannoschwalm I will see if I can replicate this in another image but this seems only to be the case if I use the new segmentation. For others it seems to match, ie the preview in Lighttable and Darkroom match… not sure if this is a one off or it could in some way be explained. Could your new mode be fed to the darkroom preview and not the same way to the export and lightable pipelines??

I will see if I can replicate elsewhere…

1 Like

Yes it’s only with the “new mode” that tries to reconstruct data in allclipped regions. Please note, that this is simply optional and still under evaluation / testing.

NP on my end…just passing along an observation… I see you have a few more minor updates. I will update the Windows build when I get a chance…

It was quite a contrast. I really liked what I managed to stumble on with your code but then the export didn’t do it justice…

I will work on this for some final tunings and checks tomorrow, don’t waste your time. I’ll let you know.

Thank you guys, your help and explanations are really useful. At least I’m not missing something easy.

Well , you clipped the sensor and took the shot too bright. The easy thing is to not over expose so you don’t have to fix things during the edit :wink: .

That being said , the only thing you might have missed is 'you clipped you highlights , so you need to turn on highlight reconstruction '. And just flick through the options to see if something looks better.

Setting it to "reconstruct color ’ mode without touching any other settings will fix your problem.

Now , If you don’t like the results you might need to learn a bit. And of course there are more ways to fix this issue.

But the easiest thing - and for me logical , but I’m more an IT nerd than a photographer - is to try highlight reconstruction in it’s ‘lch’ mode or ‘reconstruct color’ mode. If one of the two does what you want , tadaah.

But still , not overexposing is step 1 :wink:.

Ya no magic bullet esp for a large swath like that and I think in a recent video AP did he shows the GLP mode and what it can and cannot do and it is going to add in surrounding color when used on large area in a way that generally is not pretty so its more for those special situations with lighting and that sort of thing as far as I understand it…

Well, I usually get ugly artifacts with that setting, so do check the effect… (not sure what the cause is, may be camera dependant) My first pick is “reconstruct in Lch”.

In general, large areas clipped in even one channel are difficult, with two clipped channels its almost impossible to recover color (you might get some texture), three clipped channels => hopeless (note: large areas, for small areas like lights lack of detail isn’t a real problem.).

I agree here with @rvietor. The “reconstruct color” mode is notorious for maze-like artefacts especially if a) the clipped regions are larger than something “pretty small” or b) more than one clipped channel is involved.

Also, you suggested a clipping threshold of 1.25. This is almost ever simply not correct, it will just disable the chose algo to work correctly. Please note, there is the mask button besides the threshold slider, it will show you if there are any clipped data to be processed and what color planes are involved.

The exceptions from “almost ever” are just a few:

  1. you have set the whitelevel in rawprepare to something too low either by “you did it this way” or the library getting the value (either rawspeed or libraw) did it wrong.
  2. your color temperature settings are vastly wrong on some reason.

A last comment, getting rid of the color cast (mostly magenta in natural light) is just one point you want, point two would be: what details can we reconstruct by the algo (there are often some details availble in unclipped channels)

I didn’t say this is something to always do. On the contrary , i explained why I did in a long post above step by step.

I said that the easiest thing to try is 'one of the modes and see if you like it’s, and that the ‘not easy’ part begins if none give you a result you like. Ofcourse , the artifacts for reconstruct color falls under the ‘do not like the result’ category .

And the threshold i also explained, that IN THIS CASE I could raise it because it seems to give something back, and I raised it to just under the point where the purple disappears. Of course this is never precisely the case. Of course there is not one recipe for everything, and I never stated something even close to that.

I say that the first steps to try ARE very easy and not hard to grasp / learn. Try lch mode , try reconstruct color mode without altering the defaults (see, I even mentioned that ) just to see if you like the results and if it fixes your problem.

As I also stated , there are many ways to try to tackle this , and some might prefer one over the other or some might work better for some pictures … But if you want something easy, the first steps would be that. If it works , nice. It it doesn’t , you have to try another approach.
Your new highlight recovery will also be in this ‘easy to try’ list with the start settings you mentioned yourself… But for most of the users here that is still unavailable.

So, to the person that said ‘glad i did not miss anything easy’… With a smile i say 'well you kinda did, because reconstruct color works just fine for this image '. And that IS an easy thing to try . No, not for everyone And not THE solution… But as a first step to try, lch and color are the first things to observe at default settings. It only gets harder from there .

Please don’t feel offended by my comment. How to handle highlights is sometimes really tricky if you don’t want the dull and flat way we currently have by default in dt :slight_smile:

Together with @Iain and @garagecoder we will likely do some video chat specially about this topic - would be happy to see you there :slight_smile: and there also will be some sort of manual.

3 Likes

I stand by what I said… And I get more than a bit annoyed when only one or two sentences from a post are read and replied to, taking it all out if context.

Yeah, well, I didn’t see you warn about possible bad effects of the “reconstruct color” option. So I added that experience.

But if that’s how you feel about it, I guess the best thing for me is just to ignore you, so I won’t be tempted to add info to yours.