Hello, im new to darktable. When i import my raw files into the editing software for some reason the image loses its colour and goes dull/flat?
How do i stop this from happening?
That’s how it’s supposed to be. That’s how raw files really look like. You need to edit them. Add some local contrast and increase chroma with color balance rgb.
Oh i had no idea that was the case haha. I just thought it would look like the orginal image that i took. Very intresting to know. Thanks for the reply 
Commercial apps usually don’t show the real raw, they automatically make it look more beautiful. That’s what most people like. They don’t want to see the reality.
3 Likes
If you don’t want to see the reality, check here:
Some profiles use Filmic (the new way) and some use Base curve (the old way).
1 Like
It’s really the other way around. What you think is “the original image” has been processed to make a pretty JPEG image. The actual “original” is what you see from a raw processor, before white balancing and adjusting tones and increasing saturation and sharpening and other stuff to prettify it.
2 Likes
I think it would be very nice to have a button in DT that will automatically apply editing to match OOC jpeg. ART and RT can do that, why not DT? That would give a great starting point for my own editing. DT is a rather complex piece of software, some auto help would be much appreciated. I’ve spent already a lot of efforts and time reading instructions and watching videos about DT. I can squeeze now something close to OOC jpegs, but it takes quite a lot of manual editing.
The tools are already there to do this with darktable-chart, otherwise the answer is no.
1 Like
I took a look at the darktable-chart. Seems to be a non-trivial task for my skills level. I might try it one day when I have enough time and courage. Long time ago I tried to generate basecurve by closely following instructions. I made a few attempts but still my results were not good.
putting aside whether OOC jpeg is really what you should be targeting, if you use the metering inside your camera and set up a couple of auto-presets you shouldn’t need much manual editing at all for many images. How do you set up your camera, and which are these many manual editing steps that you are having to undertake?
2 Likes
I have Nikon Z6 with 24-70 S lens. Almost everything is in default, I shoot in Aperture mode. I’m an amateur who mostly takes travel photos. I like them to be kind of natural with good colors, tonality and sharpness. Nothing fancy or artistic. I use OOC jpeg as the initial step upon which I try to improve.
In DT (3.6 and 3.7 built locally) I need to:
- adjust exposure
- work with white balance and color calibration trying to get natural colors.
- adjust filmic rgb. This is far from trivial for me. I also need to watch out for reconstruct to produce weird color casts (magenta or cyan) in highlights.
- play with color balance rgb to get nice colors saturation, this also takes a lot of time. Especially since filmic desaturates shadows and highlights by design. For me it leads to grayish skin tones for people in shadows.
- play with local contrast to get decent sharpening.
For comparison in ART it is much simpler:
- select the best input camera profile from Adobe or use auto generated curve. This might take a few attempts.
- Almost everything else (color, sharpening, local constrast) magically works without much tinkering.
Though for some high contrast scenes with bright colors I managed to get better results from DT than ART. But after much more editing.
Sounds like ART is the right tool for you. Why do you want to use darkable? There are many raw processors, and each has a different approach, which suit different sets of people.
1 Like
Ok, so you are letting the camera set the exposure, then this makes it easier. To your points:
-
adjust exposure: since in Aperture mode you are letting the camera’s meter set the exposure, then in darktable you just need to define a fixed exposure adjustment that will fit for most photos. By default it is set to +0.5EV, but many cameras need a bit more (eg. +1.0EV). An auto-preset is an easy way to do this.
-
white balance: if you set your camera to auto white balance, then darktable can detect this and apply the setting automatically for you. If the camera doesn’t do a good job, then you can use the wb or color calibration module to balance off a neutral patch, etc. – this is works similarly in all software.
-
adjust filmic RGB – normally the defaults here should be fine. You might want to tweak the white point, possibly the black, but that should be about it.
-
color balance RGB – since this has now largely taken over from the saturation adjustments in filmic, it is just a matter of making a copy of the “add basic colorfulness” preset and setting it to “autoapply”
-
local contrast, decide how much you typically use, and make an auto-preset.
This will then cover you for most happy-snaps that you take. If you have a more challenging image, then some extra manual effort will be needed, but for the large part you can automate the above steps to produce a decent starting point on top of the raw data your camera provides.
7 Likes
Thank you, Matt, for the detailed answer, it is quite helpful.
I use both ART and darktable. ART for quick and dirty. I’d like to learn DT better since it has way more capabilities.
if doesn’t make sense to use default setting if the target is ooc jpg. Keep in mind the camera manufacturers spent a lot of effort to get the best output in different shooting conditions, so the in camera processing is more then just a „one size fits all“ aproach. There’s a reason they also provide raw processing software…
Even darktable chart is no solution if you dont take a photo with a target at the same conditions.
So it’s necessary to meet reality: there’s no shortcut in learning each step in raw processing if using darktable. It’s the appropriate tool if you decide yourself what’s important in the image and how to bring it out. No fancy algo can do this for you 
If quick and dirty is good enough, there are „better“ tools
Raising exposure to what you want modifying contrast in filmic should get you there for a large part.
No raw processor looks like the jpeg except the official raw processor of the supplier.
Lightroom/ACR apply their Adobe style (which is a starting point yes, but still different). Capture One applies their style.
Rawtherapee tries to match contrast in a simple curve but otherwise also doesn’t look like jpeg.
Darktable is no different. In a modern workflow where it auto enables filmic the starting point doesn’t look that different to other raw processors for me, just another flavor. The only ‘but’ is that - for me - often darktable starts with the exposure ‘to low’.
Specially if you bind hot keys for exposure and filmic contrast (hold a key while using the mouse wheel to change a parameter, wherever you are in the editor) it takes like 1 to 2 seconds for me to get a picture to a starting look.
And since I often ‘exposure to the left’ (grin) to protect highlights I need to raise exposure in every program, since the OOC jpeg is useless anyway.
As a side note, I like rawtherapee to tinker in (and try every now and then to see what’s new). ART I don’t use (it’s a principle thing, let’s not go into that).
But I often find rawtherapee more difficult than darktable. If I set the auto jpeg curve thing, I always have problems getting the highlights under control without haloing.
I get good results using flat data and then working with the tone-mapping module and using CIECAM in their ‘work together mode’. With the new local adjustments and the log encoding I also get good results…
But both are always after a lot of trial and error, and when I have something I like, the result is nice. But I always feel I got there by ‘luck’ rather than by knowing what I was doing.
Darktable is always exposure, filmic white point, color balance rgb colorfulness, and then fix (local) contrast with one of the many tools (tone equalizer is awesome for raising or lowering certain parts without fuzz). Works every time. And I always know the next step.
Too dark : exposure
Highlights clipped : filmic white to the right
Not enough saturation: color balance rgb.
Highlights not clipped but still too flat: add local contrast to highlights
Overal image too flat : use one of the contrast curve presets in tone equalizer, modify 0ev point to prevent clipping.
Local contrast too low: add local contrast module or contrast equalizer.
See a problem? I know the tool to fix it, it does what I expect. Repeat till image is ok. Works for me :).
Rawtherapee I always seem to think everything feeds into each other, so tweaking one module needs parameter changes in almost everything. I know people say this of (modern) darktable, but I always had it to other way around :).
3 Likes
The ability to use camera matched (if they exist for your camera) or adobe (if you don’t mind feeling dirty) dcp profiles in ART / RT really helps in some instances (well for my camera anyway), especially for really saturated subjects such as flowers.
This shot with the irises is a tricky one:
Camera standard
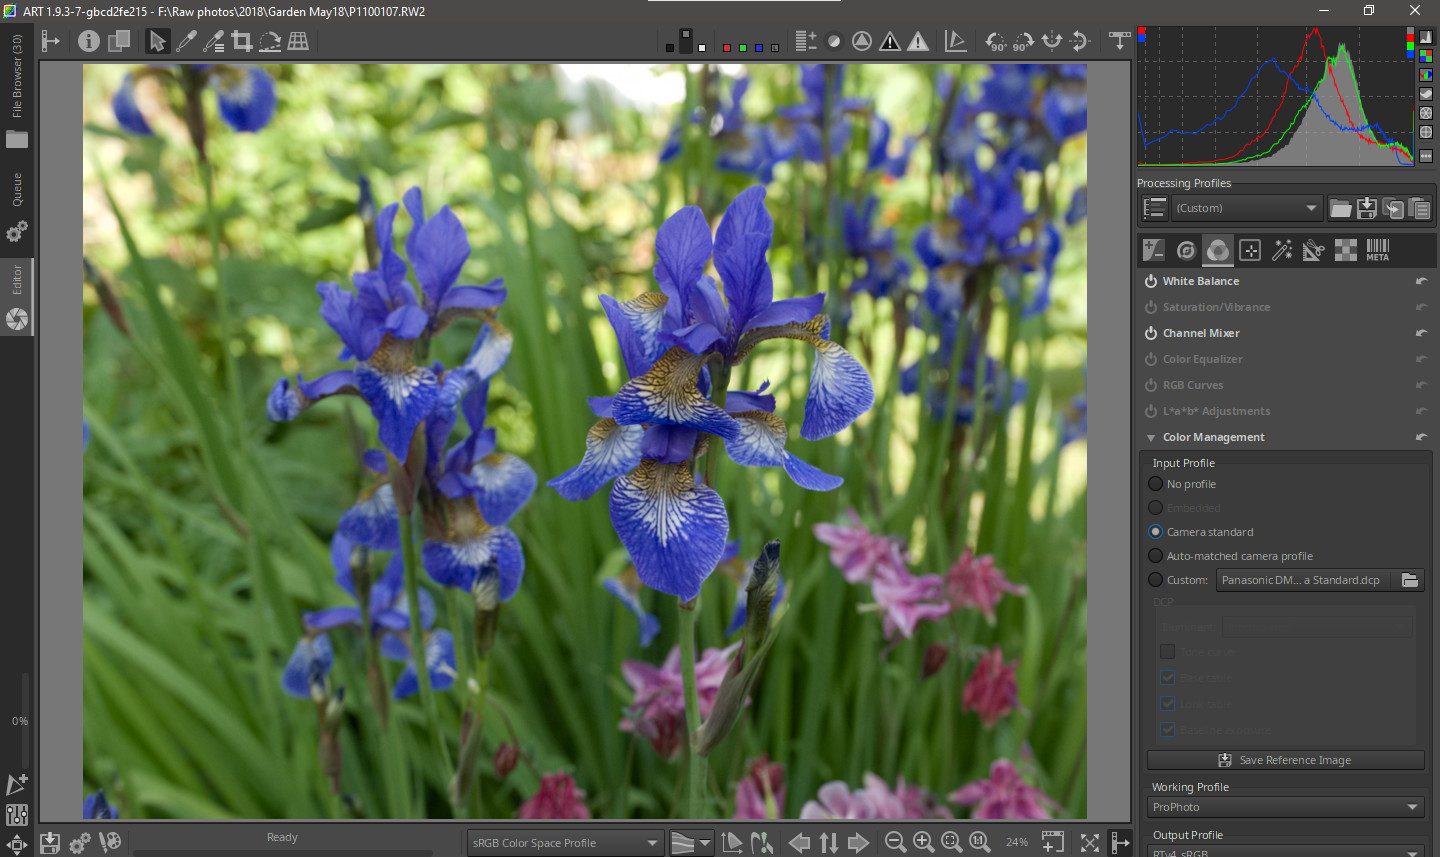
With colour matched profile:

The second picture much represents the colour of the irises in real life.
In practice for using darktable, I have had to make some tweaks to the colour calibration module to get realistic / pleasing colours, but luckily this seems to more or less work across the board, so now that I have done this, it is set up as an auto preset, and there is little fiddling to do.
Colour calibration left alone:

Colour calibration with tweaks:

However, it was necessary to play with the colour balance rgb module as well to make the flowers look realistic.
The add basic colourfulness preset, slightly overcooked the colours in the shadows:

but this was very easy to adjust to taste by reducing saturation (to reduce the depth of colour in the shadows) then increase the chroma slightly.

So, after this ramble, if there is a point to be made, I can now generally get really nice results from darktable very quickly. However, it took me quite a while of fiddling and trying things out to get to this stage. For me, I found this learning process quite enjoyable, but others might find it frustrating. I think darktable really should be thought of as akin to a darkroom full of home-brew chemicals (@Gotflute) - it takes some time to master but is satisfying to learn…
4 Likes
My rather blunt answer to this is always the same: use the JPG from the camera.
No chef tries to replicate what they can get for €1 at a fastfood burger franchise.
Neither a fastfood burger nor a handmade burger are better, but they hopefully will be different.
Embrace the difference. =)
6 Likes
I could do this with one module only. Using filmic only