Hello all.
A few additional details on the implementation of GHS in RT and its implications.
GHS was developed by two researchers in 2021/2022 and ported to PixInsight and Siril, but limited to Astrophoto. After examining the GHS code (complex and partial - Siril’s is incomplete), I found that it should allow for elegant and seamless resolution of problems known as tone mapping, or more simply adjusting image contrast. Mathematically, it is - by far, if we exclude solutions based on Laplacian transformations and Fourier transform - the most complex processing method compared to TRC, Sigmoid, Filmic, etc. (as the title says, it’s all about using multiple hyperbolic functions and not just one).
But, there are several buts:
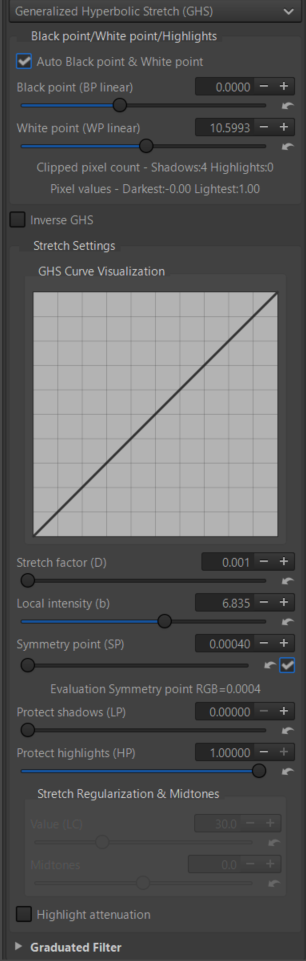
- The system was designed for astrophotography, generally low-exposure images – where highlights are rare. The exposed areas of ‘stars and nebulae’ are fairly easily identifiable. This has two consequences: the Symmetry Point (SP) setting is done fairly intuitively by pointing at the brightest nebula. Adjusting the WP and BP is desirable but not critical; BP is often close to 0, and HP is rarely above 1. Note that GHS works entirely in linear mode (Ev is not used), and all data must be between 0 and 1. If they fall outside these values, the values are ‘clipped’ and lose much of their relevance. If they fall within these values, the images will be underutilized and low in contrast.
- Daytime images used in ‘normal’ photography - those that we are trying to process with a ‘Tone mapper’ - have strong dynamics, BPs that can be very different from 0 (from 0 to 0.2) and WPs (e.g. sunset, LED, etc.) that can have very high values, for example 10.5. On the other hand, I challenge anyone on a ‘normal’ image to find where the Symmetry point (SP) is. This Symmetry point has very little to do with the Midgrey used in almost all tone mappers.
In RT how are the WP, BP and Dynamic Range and Midgrey calculated for ‘Log encoding’, Sigmoid, Color Appearance (CAM16 & JzCzHz)? The choice was made to take this calculation out of the loop that manages ‘Selective Editing’. It is done upstream just after demoisaicing. The advantage is that the calculation is independent of what is done downstream (obvious) and therefore does not influence it… The big disadvantage is that if algorithms (especially those of SE) modify the RGB values, the values used are wrong… (in some cases very wrong). To avoid these problems, other software sets default values, which the user has to adjust manually…this requires a significant mastery of the concepts and their implications.
GHS led me to rack my brains and start again with the definitions of BP, WP, and Symmetry Point (SP) in linear mode.
The calculation of BP and HP is done just before the implementation of GHS, in the ‘engine SE’ loop (with possible multi Spot), which is activated with a very low Stretch Factor value (0.001) to have very little influence, but is nevertheless taken into account. This leads to total dependency on the code and makes it almost impossible to ‘go back’. The values are exact (to the precision of the calculations in ‘float’) and bring all the data, which, for example, were in the interval [0.2, 10.5] before calculating the BP and HP, back to [0, 1].
It was more difficult for me to calculate the Symmetry Point. The choice I made:
- after calculating the BP and WP;
- I evaluate the histogram in linear mode (without gamma) and with the Working Profile. I simply calculate the maximum value which will become the SP value used by passing parameters. Here again we see that the calculation is ‘exact’ (with the inaccuracies of the calculations) because the calculation is done just before the GHS sliders are activated and after the calculation of the WP and BP. Here again it is difficult to ‘go back’.
I also had to add two additions that are missing from the initial GHS algorithm (at least the accessible code).
- I adjust the midtones using an ‘Ev’ function derived from ‘Tone Equalizer’ rather than the function used by PixInsight, which is a transform of ‘Stretch Factor’. The reason is that after GHS on ‘normal’ images, we often fall outside the [0 1] range.
- I added a ‘Highlight attenuation’ checkbox, in particular to account for the fact that there is a gamma in the display and output profile, and that this profile is smaller than the Working profile (often sRGB).
All these specific features had consequences:
- on the engine code (obvious) and GUI, in particular to count the number of times parameter passing functions are called between ‘engine SE’ and GUI, and to avoid infinite looping.
- graying out certain parts of the GUI to allow for proper calculation evaluation.
- the inability to ‘go back’ makes certain features difficult or even impossible in some cases, such as ‘history’ for BP and WP calculations.
I hope this ‘addition’ will clarify things a little and not complicate them.
Jacques