I’m processing a ton of underwater photos from a snorkeling vacation and while I love the auto white balance results from Gimp’s “Levels / Auto Input Levels” it causes horrific vignetting in the corners.
The effect can be seen here:
Is there a way to avoid this while still taking advantage of the easy auto white balancing offered in Gimp? Or is there an easy way to fix the vignetting afterwards?
Here’s the exact file. So maybe the vignetting is already present? It’s just not very pronounced prior to auto level adjustments which leads me to believe it’s really not as severe and is rather caused by the auto level adjustment.
Maybe converting the image to linear before stretching the histogram would reduce the effect?
But doesn’t that tool try to stretch the data to cover 0 to 100% on each channel? Is that valid for this image, is the a point where e.g. the blue channel should really be 0?
You can do better even in Gimp, for example using curves. You’ll find plenty of tutorials using any search engine. The Levels tool affects contrast as well, as it was clearly visible above.
Color calibration in darktable works quite well on non-RAW images, even though it’s meant for RAWs. I’ve found that color balance rgb also works well for adding contrast, with filmic rgb set for almost pass-through to handle highlights.
Didn’t need filmic (it’s not really meant for JPEGs anyway) but did add contrast and chroma in color balance rgb, after adjusting white balance.
The vignetting is definitely there from the start - but adding contrast (loads of it in your example) makes it much more noticeable.
For future shots, does your camera offer a lens correction? This might fix the vignetting. Did Nikon supply any software with the camera? This might have the vignette correction built in.
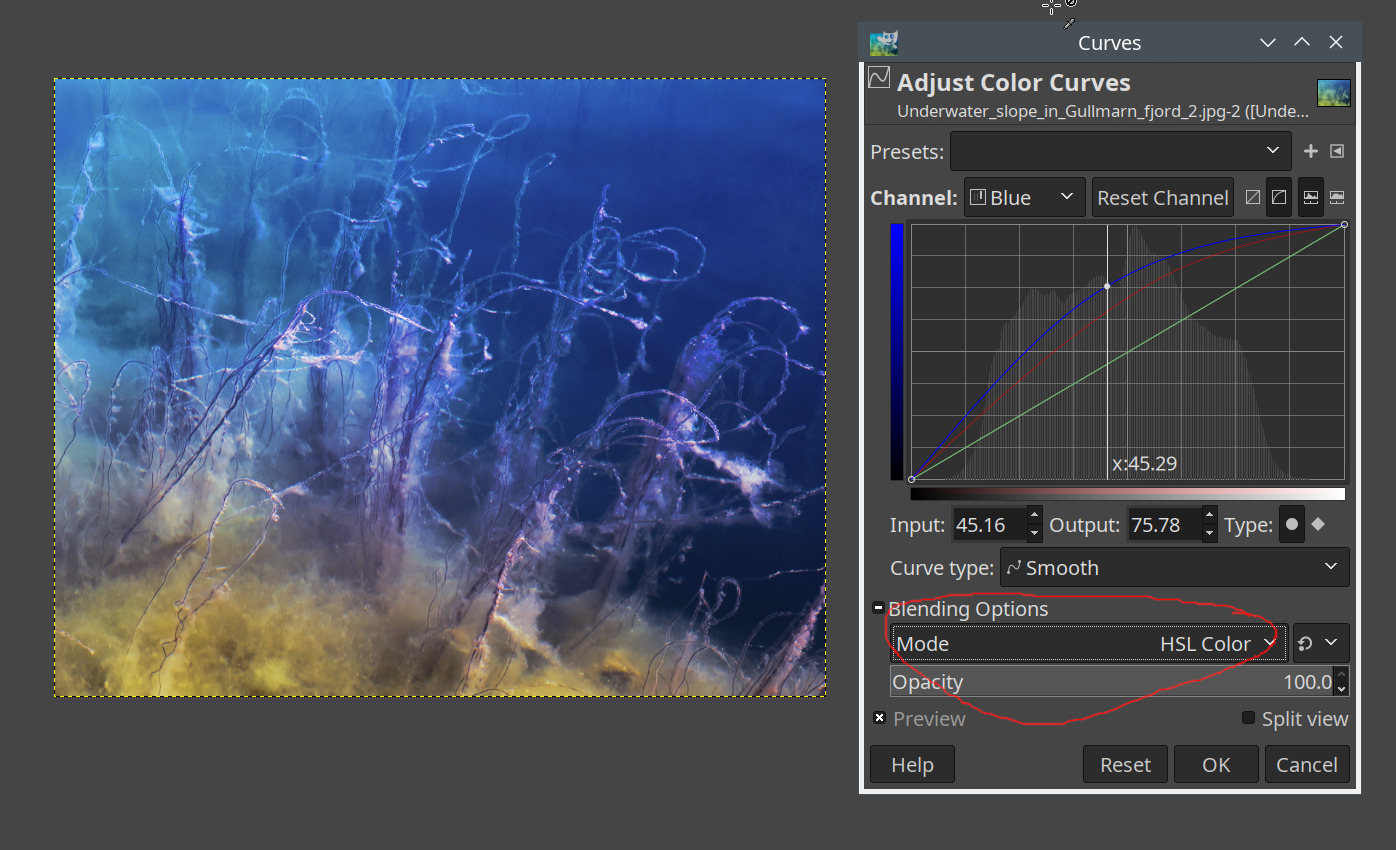
Go through your channels (red, green, blue). There will be such a vertical line for each, indicating the values of the colour channels for the selected area. Pick one of them the the correction target (‘value’, shown above, is simply the highest value, in this case, green). Remembering that target value, drag the curve for the other two channels to the target value, using the vertical line (the current channel value) as the basis. Here, I’m editing the blue channel, but you can see I’ve already changed red (its curve is visible):
You don’t have to be very precise. The modification above changes blue = 44.93 (close enough to the measured input value of 44.57) to 75.39 (close enough to the target value, which would be that of green, 75.64).
Input:
You can try the different Blending Options under the curve. Replace (default):
Probably the linear representation is also a step where I overcomplicated, as the whole operation isn’t linear, anyway. Try both with and without it.
If the Levels tool also has a merge option selector, you could try that, too.
And Gimp also has tools like Colors → Auto → Equalize and even Colors → Auto → White balance. You can also switch from Levels to Curves for finer adjustments.
The same image, without any linear etc. conversion, simply Colors → Levels, clicking Auto Input Levels, then Edit these Settings as Curves, with Blend Options = LCh Color:
I occasionally am lucky enough to go scuba diving when travelling. I bought an Olympus TG6 because it photographs RAW files and I use darktable to do my edits. The Nikon is fine for the purpose you bought it but shoots in JPG and this makes color correction a little more challenging.
I feel the auto levels in GIMP is too much adjustment and over cooks the image. I have posted a screen shot of how I tamed the auto levels by moving the opacity slider to the left. I want to keep some of the nice blue look to the image and didn’t want the vignette being too harsh.
I also darkened the image to my taste by moving the middle (grey) input slider to the right to get the brightness I wanted after having applied auto levels.
To clarify. My steps were auto levels, then opacity slider to the left, then adjust image brightness using the middle input slider. I am more pleased with the result and the vignetting is only minor.
Thank you so very much for the tips Kofa and Terry! I’ll play with each method and I’m sure the results will be better than the auto input levels result, which I agree, over cooks the image.