Excellent, glad to meet another fan!
Well, it sure is mighty confusing to read him bang on about the importance of focal length and aperture diameter in collecting light every article (see the bookcase example: https://clarkvision.com/articles/does.pixel.size.matter/index.html#etendue) only to find out its not that important. But what you’re saying does match my experience punching values into spreadsheets. I would read that focal length was supposed to have a dramatic effect, change the value, and see no change, while things like f-stop and pixel pitch would cause change. So I thought my spreadsheet must be wrong, but as it turns out, maybe it isn’t. You might have helped me understand something.
2 Likes
The histogram is linear on the horizontal axis, so that is just over 1/2 stop shy of clipping the green channel, 1 stop shy of clipping the blue channel, and 1 2/3 stops shy of clipping the red channel.
For better noise performance, most older-sensor Canons have better dynamic range at 100 and then multiples of 160. Unfortunately photonstophotos only has full stops listed for the 50D, though, so you’ll have to try it yourself by measuring the raw dark noise and comparing against white clipping points at various ISO.
But if it’s true that multiples of 160 perform better, then you need to make sure to bump ISO up to 320 in that situation. The noise performance vs 250, which is on the worse end of the DR kinks, may be noticeable.
See the dynamic range for the 40D through 60D: Photographic Dynamic Range versus ISO Setting
Both the 40D and 60D exhibit the kinks so I suspect the 50D will as well.
1 Like
I THINK it now has support for outputting a DNG that is after align-and-merge but prior to demosaic/tonemap/etc. I’m not sure as I have a hackish fork and I haven’t used it in a while. If there’s interest and there is still no DNG output capability, I’ll post my hackish patch.
Alternatively, for this scene when tripod-mounted, traditional bracketing combined with HDRMerge would provide far more DR improvement with fewer shots. Unfortunately, with most cameras, there’s enough deadtime between shots that the lack of rotational correction in Tim’s HDR+ implementation is problematic. Although since there’s no in-scene subject movement, one might be able to do:
Burst shots
Develop all to linear TIFFs
Feed those to hugin’s align_image_stack and hugin_stacker
Probably a bit of both. It’s challenging to tease out differences because of sensor improvements over time. What I do see in comparing my D7000 images to my Z 6 images is that I am far less compelled to denoise the Z 6 images for the same sort of scene. Now, in that comparison there’s all sorts of disparity, but I found moving to FF to be very forgiving of dynamic range challenges, to the point where I’m able to use the Z 6’s highlight-weighted matrix metering for all sorts of scenes and pull up the shadows in post without much fear of exposing noise. Can’t expose like that much with the D7000. Just a working observation…
Quantitatively, I go to Bill Claff’s photonstophotos.net Photographic Dynamic Range charts for comparative assessment. Here’s the plot of the EOS 50D, the D7000, and the Z 6:
https://www.photonstophotos.net/Charts/PDR.htm#Canon%20EOS%2050D,Nikon%20D7000,Nikon%20Z%206
I am confused by this - so the entire right half of the histogram on the horizontal axis represents a single stop (the brightest stop)? Does the next 1/4 of the histogram represent the second most bright stop (and so on)?
Thanks, this is a great insight! I would not have thought that a higher ISO would have better performance, but I’ll definitely keep this in mind (prefer base ISO and then multiples of 160) for future shots.
1 Like
Thanks for the link; unfortunately I often am unable to bring a tripod when shooting so I have to shoot handheld.
If I were to upgrade to FF, it would probably be to the 6D Mark II. Interestingly, its DR performance at low ISOs is very similar to the 50D until you start getting to ISO 320 and above.
That is pretty cool that the Z 6 has a highlight-weighted metering mode; I have not seen that feature on other models
Precisely.
This was shot this morning to try and prove “something”, it’s roughly the same settings that you used (from memory), with limited depth of field to show up the grain. It was shot on a Panasonic Bridge camera dating from 2014 compared to your camera which dates from 2007.
Zoomed in the sharpness captures the beads of water on the padlock, but this is not to diss your equipment, more to highlight that you take whatever you can, wherever you can, with whatever you have.
Searching flickr for Eos 40d reveals a host of images all of which in jpg for the web, the “grain” is not an issue.

_1080087.RW2 (22.5 MB)
_1080087.jpg.out.pp3 (11.5 KB)
I will not go into technical considerations.
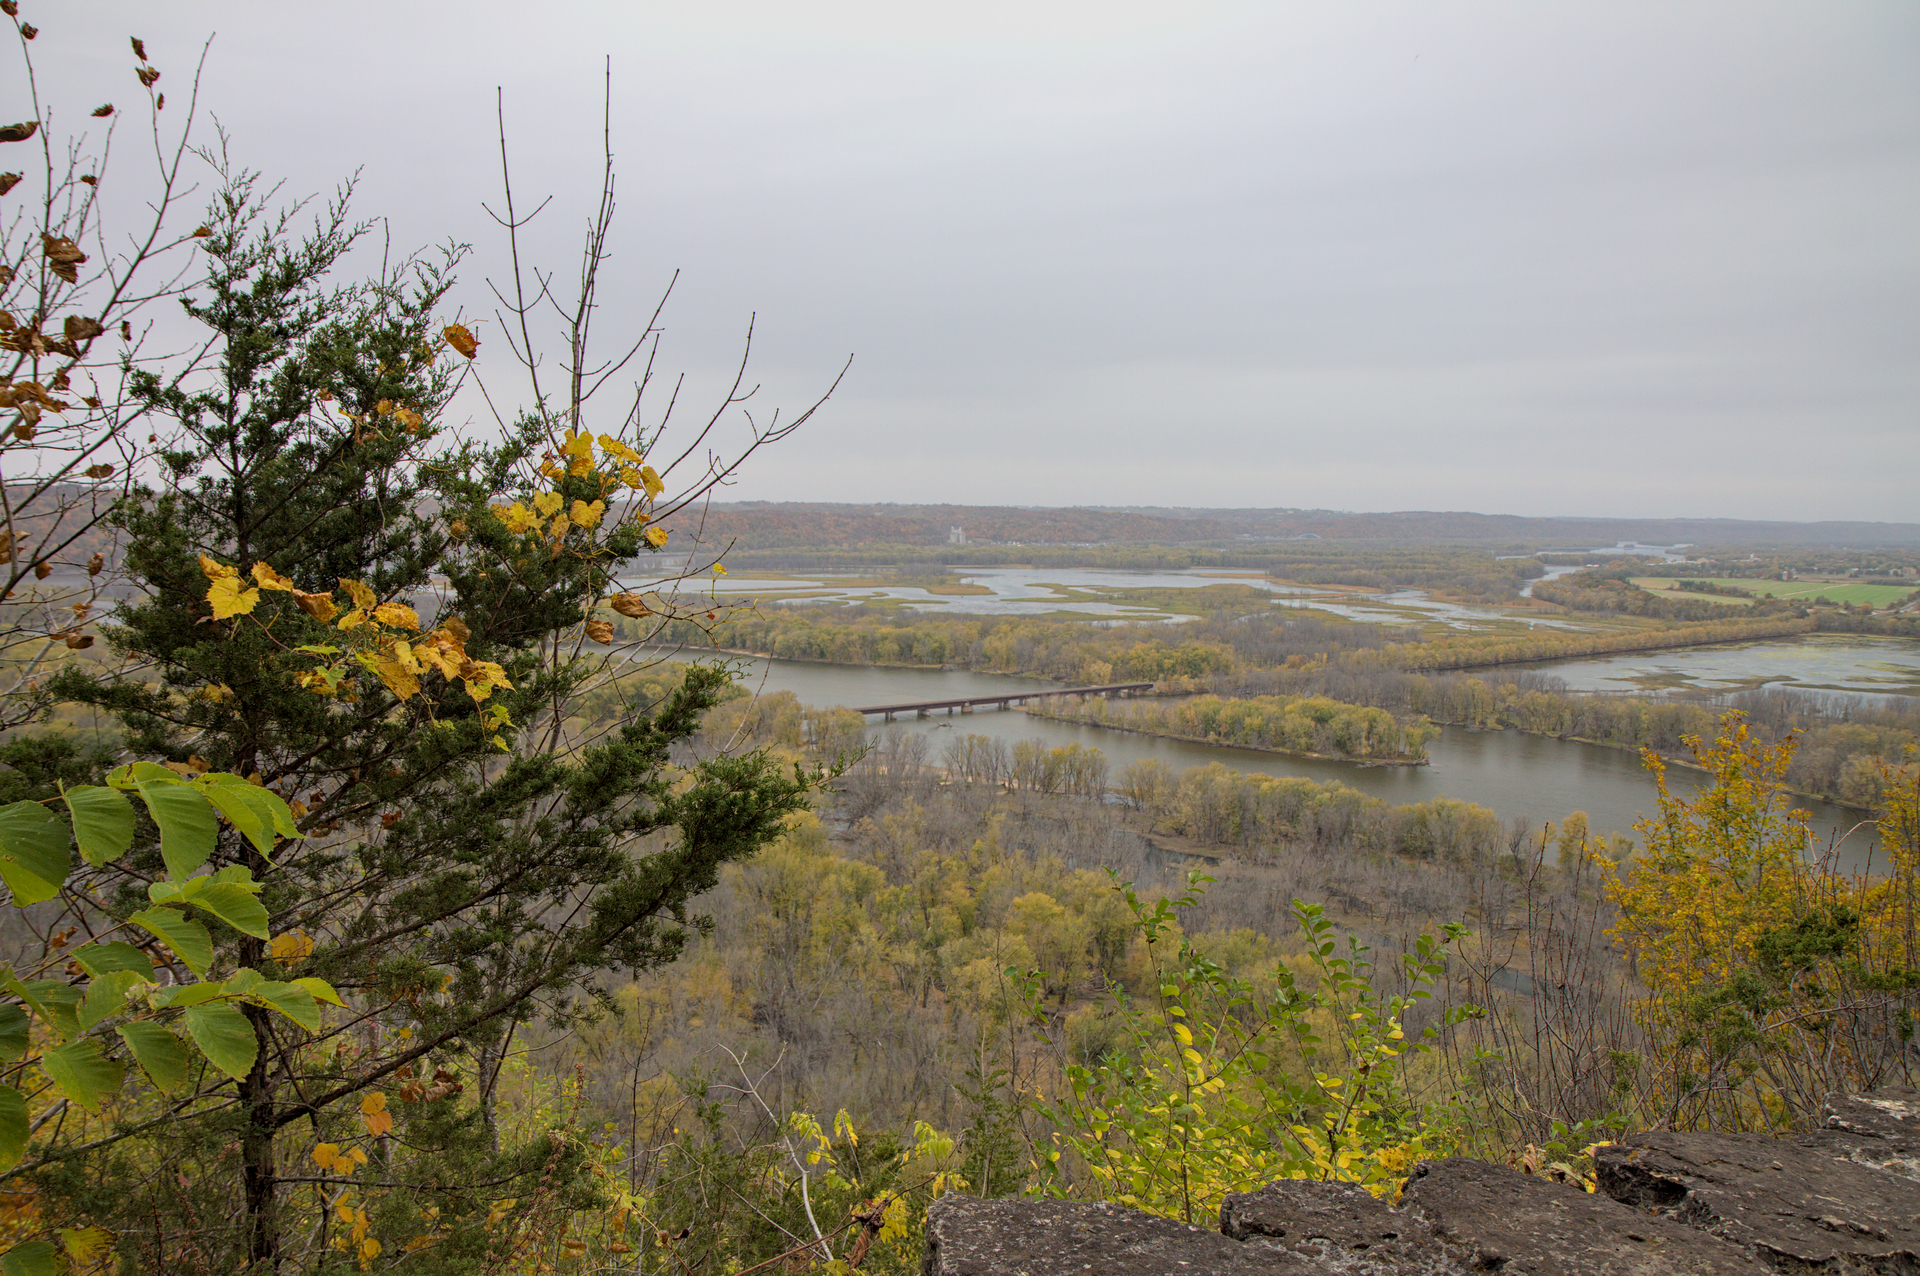
What attract my eye in this photo is the island and the bridge in the middle of photo. Regretfully it seems that the lens is not focused on that (or there is motion blur, I don’t know) but rather on the tree in the left and the foreground. for me, noise is not the issue as I already demonstrated.
Attached is my attempt at this shot using the two copies of denoise (profiled) that I described above; both the RT method you used and this approach seem to reduce the noise on the black mount behind the padlock nicely. Were you intending to illustrate how even a newer camera (e.g. circa 2014) can have this same type of noise issue, and that it can be reduced/eliminated in post?
_1080087.RW2.xmp (10.6 KB)
This is something that I find challenging - determining where to set the focus point in the moment. When taking this shot, I thought the tree in the foreground on the left would be important so I focused on it to be sure it wouldn’t be blurry and used a relatively small aperture to try and get a lot of DOF. It seems that this wasn’t enough to get the island and the bridge perfectly in focus, but I’m not sure I’d want to risk blurring the foreground either. Would it have been better to use an even smaller aperture (if the available light or tripod permits) and still focus on the foreground?
Take my comments with a grain of salt, because I’m better at saying them than executing them ![]()
“in the moment” - nothing in this scene was going anywhere. Don’t rush. If you want to get the shot with a particular light such as golden hour, get there early so you have time to get to your vantage point and compose without a “Oh %$#^, I’ve got to get this set up fast or I’ll miss the shot” situation.
My guess is that that tree was pretty close to you, and it was not possible to set your focus to get both the tree and the valley in reaonable focus. I can think of two workarounds:
- Set up far enough from the tree that you can get reasonable focus on it and the valley. If you have to crop away some foreground later, so be it.
- Use focus stacking to get it all in good focus.
1 Like
Nope, more along the lines of “noise happens” and if one looks for it at 200% one will always find it, regardless of equipment or tech improvements, so go out and take pictures with whatever is available.
1 Like
I feel the same as you on many occasions, and this tool helps me sometimes

I tried to guess the distance to the tree and set it as 2 meters.
I also set the focal length and apperture (and obviously, camera model)
This is Android Hyperfocal Pro.
EDIT: Set subject distance to 2.7 meters and there you have infinity focus:

Basic scene-referred workflow plus camera input profile for Canon 50D from @ggbutcher’s database, which adds more punch to the yellows and greens.
water_noise.cr2.xmp (10.9 KB)
(darktable 3.2.1)
3 Likes
Nice, this looks like a useful app! Does this mean that if I had been 2.7 meters or more from the tree and had still focused on it, the background (e.g. bridge, island, etc) would also have been in focus and sharper? I was definitely closer than 2 meters so that would explain why it wasn’t focusing to infinity as I had intended
That’s it.
Download it and play with it, if you don’t want to do the math manually from those dof charts you find on the internet.
Thanks to @shreedhar who first mentioned the app to me.
At the magnifications you use, you may be disappointed, you need to understand that hyperfocal is “acceptably sharp” and this is very much based towards holding a hard copy and what the human eye can see. Circle of confusion - Wikipedia has details, blowing an image to 200% on a computer screen is different. Fujifilm cameras have two depth of field scales LCD setting, one is big and based on print, and one is very narrow and based on a computer screen.