How do I get RawTherapee to do absolutely nothing?

Hi all! Sorry for the late reply, i was offline…

The correct procedure to use the latest version was already explained in the posts above :slight_smile:

The initial problem was due to the older version: in the 5.8 release, the Film Negative tool was indeed working before demosaic, and did some estimation of median channel values to “guess” a reasonable output white balance.
The ability to copy-paste the same parameters and get consistent results when scanning an entire roll, was one of the main reasons for the update, which is now in the development version of RT :wink:

With the new version, as long you keep the same backlight and camera settings while shooting the entire roll, you can adjust one frame, then copy-paste the processing profile on all the others.
Yes, you will notice over- and under-exposed frames, since nothing is auto adjusted :wink:

Regarding the backlight… from a signal processing point of view, trying to maximize the range on each channel makes a lot of sense. The problem is, that this “artificial” light should be taken into account in the camera input profile, which is not trivial.

The easy and intuitive solution that we’ve found to work reasonably well in most cases, is to use a white backlight, possibly close to daylight, and then apply the normal input profile also used for regular digital pictures. This gives an accurate representation of the negative to start with.

Now that said, the filmneg tool also gives you some flexibility for experimentation.
With the Inversion color space combo box, you can choose whether to perform the inversion before or after input profile conversion.
You could also create a custom ICC input profile for your adjusted RGB light, and try using that in place of the standard input profile. Unfortunately, i don’t have a ready-to-use “recipe” for this use case, you’ll have to do some experiments.

Oh, one final note: using Camera WB is ok as long as the camera itself is not set to AWB, otherwise you’ll get different multipliers on each shot (ok, sorry if it sounds obivous, just wanted to make it clear :wink: )

2 Likes

I just converted two rolls that I digitized yesterday, and can say that the dev version is a HUGE improvement. I used the film negative profile, and adjusted the black level so the spike in the histogram from the unexposed border of the image was all the way to the left, picked the white balance point on this unexposed border, copied this profile to all the other frames, and found that unexposed border spike was in the same place in the histogram for every frame on the roll, and never split into separate peaks for R, G, and B. This saved a HUGE amount of tweaking. Some frames I did not even have to tweak, and the white balance did not go wonky even once.
The sun has just set, so now I am off to digitize a couple more rolls of film.
Edit:

I am attaching a photograph of the light source with no film (had increase the shutter speed a lot to keep it from clipping) and a photo of some unexposed developed film (did not have a whole frame). This is a film type I have not run into before.
The RGB panel I am using is this one: Amazon.com
with a custom diffuser to make the light uniform.
The settings I came up with for my light source for this film type are:

Film				Red	Green	Blue	Exposure
Unknown ?Q4185		81	19		99		0.4

DSC04574.ARW (81.4 MB)
DSC04578.ARW (81.6 MB)

2 Likes

Thanks for supplying the images! Good to see you’re much happier with the procedure as well.

I’ve played a bit with your flower picture and I was somewhat surprised to see that I only got acceptable results when picking the White Balance on the bare film first and then keeping the Red ratio and Blue ratio in the Film Negative tool at 1.00. I only needed to adjust the Reference exponent en Output level to ensure the red channel doesn’t clip.
It doesn’t work at all when I pick the white balance from the light source and copy over the temperature + tint and then try to figure things out with the Red and Blue ratios. @rom9 Any guess as to why?

Here’s my pp3 to try for yourself:
DSC04578.ARW.pp3 (521 Bytes)

And the result:

Not perfect, but decent in any case.

My reasoning is that unexposed film is, by definition, black. Nothing in any image can be blacker than unexposed film. Also by definition, over exposed film must be white. I don’t always get an over exposed part of an image, but the way I am capturing the frame, I always get a bit of unexposed film. This is always one of my neutral points when I select two neutral points in an image. For the other, I usually pick a white shirt, or clouds, or white water. Then select the white balance to the unexposed film. This gets me adequate results for my purposes. My aim is to get a jpeg quickly that gives a good idea of what is in the picture. If someone wants to print one of the pictures I scanned, they should go back to the raw image and spend more than the 30 seconds I spent on it to get a better conversion. BTW, this is what I got for that whole picture:

I added tags to the thread because the title tells us “absolutely nothing” :slight_smile:. Feel free to change them.

If one REALLY wanted to maximize DR - they could bracket their shots digitizing the negative and then use hdrmerge to create a high dynamic range capture.

As others have mentioned, using “alternative” backlighting would require a profile designed for that backlight - which might be difficult since ColorCheckers are reflective and not transmissive, unless the backlight is bright enough to illuminate a ColorChecker in a VERY dark room.

1 Like

This might be a little tldr for me to read all, but loading a raw file and setting it to neutral is doing nothing for all intents and purposes. The white balance is set to ‘in camera’. No brightening, no base curve, no contrast… Nothing. Way less processing than possible with Lightroom for example.

And more importantly, a lot or people did good film scans with it so it can’t be limiting there.

You realize that inverting film negative consists of choosing black and white levels. if you leave that up to an auto-detect guess, then you will get different results.

If you shoot a whole roll with the exact same exposure settings (no auto exposure) then results should be predictable.

Are you sure you’re not clipping the raw data? Remember that the tools in your camera are pretty much useless. Really try shooting a piece of clear filmstrip (or leader) and looking at the raw histogram to make sure none of the channels are close to clipping. Then use the same exposure settings across the roll.
Don’t bother setting white balance in the camera. It has no use in capturing raw data.

Try in raw therapee setting the white balance to either the filmstrip, or the light source (but your light source must not be clipping then). Experiment for yourself what works.

The reason I created this thread is that the release version of RawTherapee was giving me randomly variable results, even when I tried to nothing to the loaded file the results were wildly different from frame to frame. I was trying to get control of the process. I wanted to be able to load a file and always get to a known starting point. I wanted the software to be predictable. It was not.

The dev version of the software entirely fixes the lack of control that I was experiencing with the released software. I don’t mind bad results when I am the cause of the bad results, but when I feel that nothing I do has any bearing on the results I’m getting I get frustrated because there is no path to get any better.

1 Like

Unfortunately, i have no idea :sob: I also did some experiments with non-white backlight from an rgb panel, but not enough yet to figure out a general rule to get consistent results.

True, i never tried but this might work.

@DAP In fact, i forgot to mention a very important feature in my previous post: the new version of the filmneg tool, also works on TIFF/PNG images, and not only on camera raw files as the previous version.
So, one can also apply the inversion after some custom preprocessing :wink:

Good to hear, though I am unlikely to use it on anything but RAW images, and only until I run out of my parents negatives, (though my brother is threatening to give me all his negatives). I will keep the RAW files around in case I, or someone after me, wants to try and do a better job of converting the negatives than I did.
After viewing more than 100 rolls of negatives, and thousands of slides (much easier to digitize), I’d never go back to film. The number of pictures I’ve run into with scratches, embedded dust, light leaks, age degradation etc. it really makes me appreciate digital images. Even when the negatives are in perfect condition, the film grain makes them noisy and limits the resolution obtainable on 35mm film. That and not knowing if you got the picture for several days (1 hour photo is a thing of the past, and even that was too long) means you can’t re-take it if you find out that you screwed it up.
I don’t know of any archival media for digital yet, but since one can make perfect copies easily, it means I can safely transfer the data to new media as it becomes available, and keep multiple copies in different locations. The hard part is getting the digital data from the analog originals in the first place.
Film is easily damaged in handling, and decays even when it is left untouched. I will never understand the nostalgia for film.
I am very happy that RawTherapee is supporting film negatives. I have been putting together the pieces to digitize my families negatives since 2017. Buying a 3D printer was the critical piece that made me believe I could achieve the system, and RawTherapee was the last piece of the puzzle that made it possible.

2 Likes

Yup. I’ve been wanting to digitize my old negatives for a while. My first attempt with my camera mounted on a normal tripod and darktable was a massive failure.

My second attempt with stuff I’d already digitized and an early version of @rom9 's module was much better.

I’ve been procrastinating on what is likely to be the third (and hopefully final) attempt - a copy stand based on the design @troodon posted a year or two ago, and this module. Maybe this weekend?

I’ve made a couple of modifications to my plumbing pipe copy stand. I now use a Benro GD3WH geared head instead of a ball head, which makes alignment easier and more precise. However, the positions of the adjustment knobs meant I couldn’t use a Manfrotto Super Clamp so I made a DIY clamp from a scrap of plywood and some cheap hardware.

I’d also recommend using a head with an Arca Swiss plate, positioned so the camera can slide vertically along the plate for fine adjustments. The main drawback with the Super Clamp or my DIY clamp is in making these fine adjustments to get the cropping just right. The Arca Swiss plate on the Benro allows for about 25 mm of adjustment, which is plenty, as all you really need is about 5 mm. And of course, you can buy longer Arca Swiss plates. This is easier than moving a Super Clamp 2 or 3 mm up or down on the plumbing pipe.

Of course you can always use a geared focusing rail such as the Novoflex Castel L Focusing Rack, but it’s not really necessary as the movement on the Arca Swiss plate is easy enough. You can also use longer Arca Swiss plates for more vertical movement.

Check out this setup and then the hack version that follows…start around 18 min into the video… Using a light a glass and some tissue… Breathe New Life into Old Photos – ON1

I’ve had a geared focusing rail for a while that I haven’t used much… Not as high-end as Novoflex, I think it’s a Velbon.

I’ve had plans for a while to use an alternative clamping method to what you had - in my case likely two Super Clamps attached to a cross-bar that should be much more resistant to twisting. Same idea as your eventual DIY clamp, just different implementation. I just haven’t gotten around to designing the crossbar in OpenSCAD yet and cleaning off my Lulzbot… It’s a bit dusty at the moment! :frowning:

How is the Velbon? I bought a cheap, no-name focusing rail years ago and it’s very poorly built and too coarse in the adjustments. One concern I have with a focusing rail is that it adds another possible source of vibration, especially if the camera is extended toward the end of the rail. I’d expect that the Novaflex would be solid, but it’s also pricey. In any case, I’m finding that moving the Arca Swiss plate in it’s rail is working well for these fine adjustments.

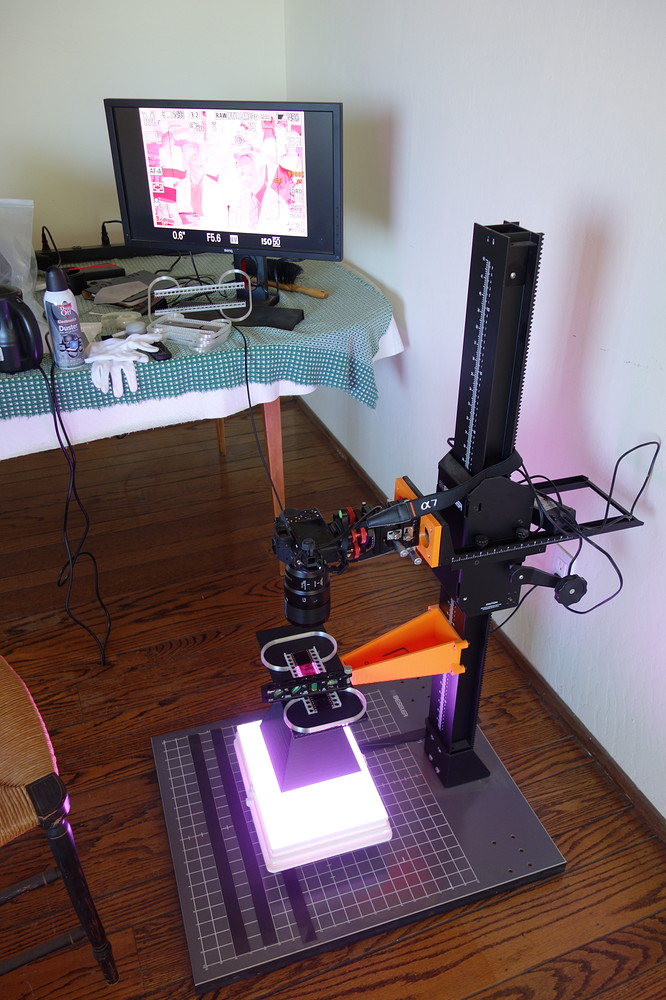
Since this thread has drifted into a discussion about copy stands for digitizing negatives, I’m attaching a picture of my rig (I tried to edit the title of this thread, but it does not look like I am allowed)


I have not really been happy with what is available for camera mounting, none of it is designed for repeatability.(One screw to hold the camera!?) I looked elsewhere for my alignment devices. The large black contraption allows x, y, and z translation along with yaw adjustment. The red knobs are a separate device that allows pitch and roll adjustment. Yaw is not held as rigidly as I’d like and gets thrown off slightly every time I remove the memory card, or replace the battery.

2 Likes

Is that orange component 3D printed?

It looks like your film holders are 3D printed and designed to keep the film under tension? I think I’ve seen that design before…

Yes, both orange items are 3D printed, as well as the black table the film is sitting on, and the white frame holding the two white plastic sheets of the diffuser. There is also a 3D printed stand for the light source that you can’t see since it is underneath the light.

You probably have seen it before. I published the design on Thingiverse: Film Negative Holder by AKADAP - Thingiverse

I think that was the first thing I designed for this project.

I also published an earlier version of the table mounting bracket when I was planning to use it to support the light: Light Mount for Copy Stand by AKADAP - Thingiverse

1 Like

Nice rig. Always enjoy people sharing their process.

Was it a disaster because of the shots / scans, or was it a disaster trying to convert them in a workable picture.

Because you can ask for help with the 2nd by posting a playraw.